Table of Contents
Advertisement
Advertisement
Table of Contents

Subscribe to Our Youtube Channel
Summary of Contents for WERTHEIM Pro Multi Steamer
- Page 1 User Manual...
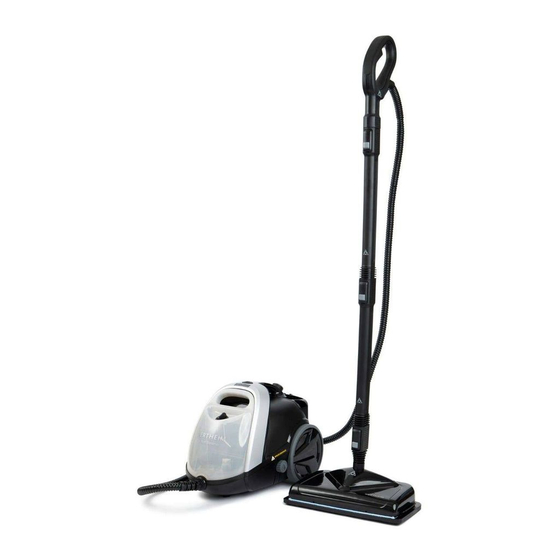
- Page 2 Features Steam Trigger 10. Scrubbing Head Handle 11. Steam Mop Head Hose 12. Carpet Glider Extension Tubes x 2 13. Accessory Bag Variable Steam Dial 14. Boiler Drainage Cap On/Off Button 15. Microfibre Mop Pad Status Light Indicator 16. Window Squeegee Water Tank Cap 17.
- Page 3 Accessories SPECIALISED CLEANING BRUSHES AND JET NOZZLE For cleaning a variety of surfaces such as: taps, sinks, windows, mirrors, floors, bench tops, toilets, door handles and more.
-
Page 4: Specifications
INTRODUCTION Congratulations on the purchase of your new Wertheim Pro Multi Steamer. There are many useful features built into your cleaner. We recommend that you carefully read this instruction manual for the best results. Specifications Power: 2400W Water Tank Capacity: 2.0L Boiler Capacity: 2.1L... -
Page 5: Safety Precautions And Warnings
SAFETY PRECAUTIONS & WARNINGS WARNING! To reduce the risk of fire, electric shock or injury when using an electrical appliance, basic precautions should always be followed, including the following: WARNING! Do not attempt to open the drainage cap when the unit is in use. - Page 6 Do not pull or carry the mop Check that the water tank head by the power cord, do cap is completely closed not use the power cord as a before use. handle, do not close a door 17. Do not operate the cleaner on the power cord or pull the without water in the water power cord around sharp...
- Page 7 30. Do not aim the steam in Use of attachments that are not provided or sold by the the same position for long manufacturer may cause fire, periods of time, this can cause electric shock or injury. damage to materials. 23. Never point or aim the steam 31.
- Page 8 39 Do not clean over floor 43. Damage caused by improper electrical outlets. use of steam on objects, materials, persons or animals 40. Ensure that the appliance or by not observing the does not operate on an empty instructions in this manual will tank.
-
Page 9: Before You Begin
BEFORE YOU BEGIN Please read this manual before operating the cleaner This will ensure you obtain full benefit from your new cleaner. Keep this Instruction Manual in a handy place for future reference. IMPORTANT! The heat generated and steam pressure may have adverse consequences for certain materials. Always check before putting the appliance into operation as to whether the surface or material is actually suitable for treatment with steam. -
Page 10: Precautionary Measures
Precautionary measures: Do not operate the cleaner too close to heaters, radiators or other hot surfaces. Before inserting the power plug into the power supply, make sure your hands are dry. When unplugging the power plug from the power supply, do not use the power cable, gently pull the power plug from the power supply. - Page 11 ASSEMBLY IMPORTANT! THE CLEANER SHOULD BE SWITCHED OFF BEFORE ASSEMBLY. EXTENSION TUBES Connect the extension tube to the handle. Push the extension tube into the handle until it clicks into position. Connect the second extension tube to the end of the first extension tube until it clicks into position. STEAM MOP HEAD Connect the extension tubes to the handle of the cleaner as per the...
-
Page 12: Accessory Bag
ACCESSORY BAG The accessory bag can be attached onto the cleaner by sliding the accessory bag hook onto the cleaner, as shown. - Page 13 ACCESSORIES IMPORTANT! The cleaner should be switched off before fitting or removing accessories. STEAM MOP HEAD Ideal for cleaning hard floors and sanitising carpets. The detachable Scrubbing Head can be used for cleaning stubborn stains. CARPET GLIDER The Carpet Glider attachment is used for sterilising carpeted surfaces. EXTENSION TUBES Allows the accessories to be attached onto the extension tubes for long reach cleaning.
-
Page 14: Window Squeegee
WINDOW SQUEEGEE Perfect for cleaning windows and glass surfaces. OVEN STEAM NOZZLE Provides a concentrated jet of steam for cleaning ovens. CAUTION! The metal rod will become hot during operation which can cause burns. Do not touch the metal rod during operation. Allow the metal rod to cool down completely before handling. - Page 15 SPECIALISED CLEANING BRUSHES AND JET NOZZLE For cleaning a variety of surface such as: taps, sinks, windows, mirrors, floors, bench tops, toilets, door handles and BBQ’s.
-
Page 16: Operation
OPERATION IMPORTANT: Do not add chemicals, detergents, disinfectant, eucalyptus oil or perfumes into the Water Tank. FILLING THE WATER TANK Remove the water tank by pulling on the Water Tank Handle. 2. Unscrew the Water Tank Cap and fill the water tank with cold tap water. During operation, the water tank can be filled by unscrewing the Water Tank Cap and filling the water tank with cold tap water. - Page 17 USING THE VARIABLE STEAM DIAL The steam output can be controlled by using “MIN” the Variable Steam Dial. “MAX” Simply turn the dial towards “Max” to increase the steam output and turn the dial towards “Min” to reduce the steam output.
-
Page 18: Status Light Indicator
STATUS LIGHT INDICATOR Illuminates red to indicate that the water tank requires filling. Illuminates blue Illuminates green to to indicate that indicate that the cleaner the cleaner has is ready for use. been turned on. Attention: If the cleaner is sitting on idle for 2 hours, it will automatically switch the boiler heater off. - Page 19 STEAM CLEANING HARD FLOORS NOTE: Before using the cleaner, sweep or vacuum the floor to remove any loose dirt or debris. IMPORTANT! Do not use the cleaner without a mop pad attached onto the mop head. NOTE: Do not use the Carpet Glider when cleaning hard floors. WARNING! Hard floor wax may be removed by the heat and steam action.
- Page 20 To produce steam press the Steam Trigger on the handle. When steam is emitting from the cleaner slowly pass over the surface to be cleaned. IMPORTANT! Do not operate the cleaner over the power cable. IMPORTANT! Keep the mop head moving during operation. Operating the mop head in a stationary position for an extended period of time can cause damage to the floorboards and make the flooring slippery.
- Page 21 IMPORTANT! Do not use the Scrubbing Head on dedicate materials. Test Before Use is recommended. USING THE SCRUBBING HEAD To release the Scrubbing Head, using one foot, press the Scrubbing Head Release and remove the Scrubbing Head from the mop head. To reinstall the Scrubbing Head, insert the Scrubbing Head into the mop head, as shown.
- Page 22 STEAM CLEANING CARPETS NOTE: Before using the cleaner, vacuum carpeted surfaces thoroughly. Use a vacuum cleaner with a powerbrush for best results. IMPORTANT! Do not use the cleaner without a mop pad and Carpet Glider attached onto the mop head. Place the mop head onto the Carpet Glider and insert as shown.
-
Page 23: Attaching The Accessories
ATTACHING THE ACCESSORIES Important! The cleaner should be switched off before fitting or removing accessories. Warning! Accessories become hot during use. Allow accessories to cool down before handling them. CONNECTING THE ACCESSORIES ONTO THE HANDLE The Window Squeegee and the High Pressure Steam Nozzle can connected directly onto the handle, as shown. - Page 24 Connect the Accessory Connector onto the handle. Select a Specialised Cleaning Brush or Jet Nozzle and install the accessory by inserting it into the end of the Accessory Connector and rotating the accessory until it is locked into position.
- Page 25 CONNECTING THE ACCESSORIES ONTO THE EXTENSION TUBES The Window Squeegee and the High Pressure Steam Nozzle can connect directly onto the extension tubes, as shown. The accessories will click into position when installed correctly. Connect the Accessory Connector onto the extension tube. Select a Specialised Cleaning Brush or Jet Nozzle and install the accessory by inserting it into the end of the Accessory Connector and rotating...
-
Page 26: After Use
AFTER USE WARNING! ENSURE THAT THE CLEANER IS DISCONNECTED FROM THE POWER SUPPLY BEFORE EMPTYING THE WATER TANK. EMPTYING THE WATER TANK Turn off and unplug the cleaner from the power supply. Remove any excess water from the water tank by removing the water tank from the steamer, unscrewing the water tank cap and emptying the water from the water tank. - Page 27 Remove the water tank from the steamer and add 100ml of a descaling solution into the water tank. Fill the rest of the tank with water. 2. Re-fit the water tank back into the steamer and plug the steamer into the power supply. Press the On/Off switch. The steamer needs to run until the water tank is empty.
- Page 28 Remaining water in the boiler can now be drained from the cleaner. 7. Once the water tank is empty, refit the drainage cap by firmly tightening using the drainage cap cover, and refill the water tank with water. Re-run the steamer again until the water tank is empty. This will help flush out any remaining mineral build up.
-
Page 29: Troubleshooting
You can be your own troubleshooter by reviewing this guide. All other servicing should be performed by an authorised service agent or qualified technician. Contact Wertheim Customer Service for your nearest authorised service agent on 1800 815 270 (AUS), 0800 282 288 (NZ). Fault... -
Page 30: Spare Parts
SPARE PARTS Water Tank 33156056 Steam Mop Pads 31400278 Descaling Solution 1 Litre 61101464... - Page 31 Consumer Law. You are entitled to a (AUS) 0800 282 288 (NZ), Monday-Friday 9am- replacement or refund for a major failure 5pm EST. Email: enquiries@wertheim.net.au. and for compensation for any other The decision to repair or replace the cleaner reasonably foreseeable loss or damage.
- Page 32 Electrical Home-Aids Pty Limited. ABN: 62 007 539 577 Level 1, Building 3, Brandon Business Park 530 Springvale Road, Glen Waverley, Victoria 3150 wertheimcleaning.com.au wertheim.co.nz enquiries@wertheim.net.au 06/19...
Need help?
Do you have a question about the Pro Multi Steamer and is the answer not in the manual?
Questions and answers