
Related Manuals for Co2meter SAN-0001


Summary of Contents for Co2meter SAN-0001
- Page 1 Pocket CO2 Monitor & Data Logger SAN-0001 Last Revised March 23, 2018 Copyright © 2018 CO2Meter Inc., all rights reserved.
-
Page 2: Table Of Contents
Contents INTRODUCTION ........................... 3 FEATURES ............................ 3 DESCRIPTION ..........................4 LCD DISPLAY ..........................4 OPERATION ..........................5 Power Button .......................... 5 Daily Bump Test ........................5 MENU OPTIONS .......................... 6 1. Set Alarm Threshold ......................7 2. Set Temperature Units ......................7 3. -
Page 3: Introduction
In addition to measuring the CO2 concentration, the monitor displays temperature and relative humidity. The SAN-0001 Pocket CO2 Monitor and Data Logger is shipped fully tested and calibrated and, with proper use, will provide years of reliable service. -
Page 4: Description
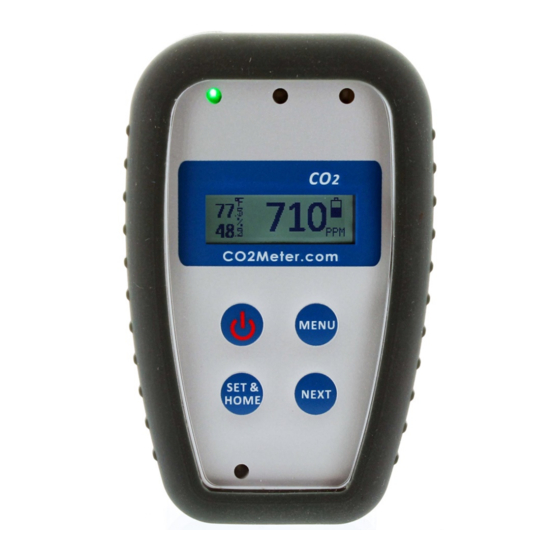
DESCRIPTION 1. Green LED - good 2. Yellow LED - normal 3. Red LED - warning 4. LCD display 5. Power button 6. Menu button 7. Set & Home button 8. Next button 9. High CO2 alarm LED 10. USB charging port 10, 11. -
Page 5: Operation
6. Remove the tubing and turn off the gas. As the CO2 gas inside the case is displaced, the CO2 level will return to normal. 7. If the monitor does not pass the bump test, do not use it. Contact CO2Meter support at (386) 256-4910 or e-mail us at support@CO2Meter.com. -
Page 6: Menu Options
CO2 level will return to normal. 5. If the monitor does not pass the bump test, do not use it. First, perform a full bump test. If the full bump test fails, contact CO2Meter support at (386) 256-4910 or e-mail us at support@CO2Meter.com MENU OPTIONS Press the Menu button to enter the menu mode. -
Page 7: Set Alarm Threshold
2. Set Alarm Threshold If the measured CO2 value exceeds the selected alarm threshold, an LED will flash, an audible alarm will sound, and the monitor will vibrate. 3 alarm thresholds can be selected: a 5,000ppm CO2 alarm, a 5,000ppm TWA CO2 alarm and a 30,000ppm (3%) STEL CO2 alarm, See Appendix A to determine which alarm is best for your application. -
Page 8: Altitude Correction
Turn off the gas and let the monitor stabilize. It will return to the normal indoor CO2 level. Two different SAN-0001 monitors may show different CO2 levels after calibration. If they are within 40ppm ±3% of the actual CO2 level, they are within the sensor’s specifications. -
Page 9: Data Logging Software
The GasDataLogging software is included on the USB drive shipped with your monitor. You can install the software from the USB drive, or from the website at: http://www.co2meter.com/pages/downloads Note: before exporting data to a PC, you must install the software and drivers first, then connect the monitor to your PC using a Micro USB to Standard USB cable (included). -
Page 10: Minimum System Requirements
“unknown device” driver and the monitor will not be recognized. To fix this problem, click the link below, or go to CO2Meter.com, select the App Notes tab, and download the following application note. It applies to all our USB-connected device software. -
Page 11: Installing The Software
4) Clicking on the Meter Select section to select the meter you want to connect. 5) Click the Connect button. 6) Click the Download Data button to download and view data logs stored in the meter’s internal memory. A progress bar indicates the download process. -
Page 12: Meter Select
Figure 2:GasDataLogging Main Screen Meter Select The Meter Select section is located on the top left area of the GasDataLogging main screen, as shown in Figure 2. Each meter’s COM port is automatically assigned when it is connected to your PC through USB cable. -
Page 13: Viewing Data As A Graph
The SAN-0001 comes pre-calibrated from the factory. However, the CO2 sensor should be calibrated at least once a year, or as described in your company’s safety procedures. You can perform the calibration yourself, or you can return it to CO2Meter for factory calibration at a nominal fee. -
Page 14: Cleaning And Storage
CO2) calibration gas, a flow regulator and flexible tubing. These can easily be obtained online: https://www.co2meter.com/collections/accessories/products/demand-flow-regulator The Atmospheric calibration will not require additional materials but must be performed in outdoor (400 ppm fresh air) during the entire procedure. The temperature and humidity sensors do not require calibration and should remain accurate for the life of your unit. -
Page 15: Troubleshooting
Verify that the ftd2xx.dll file is in the same folder as the GasDataLogging executable program. Try using a different USB cable. Windows reports Go to CO2Meter.com, select the App Notes tab, and follow the “unknown device” instructions for error http://www.co2meters.com/Documentation/AppNotes/AN153-GasLab-Driver- Installation.pdf... -
Page 16: Specifications
SPECIFICATIONS Device Specifications Operating Environment 0°C~50°C (32°F~122°F), <95% RH non-condensing Storage -10°C~60°C (14°F~140°F), <99% RH non-condensing Power Supply Li-ion battery (4.2V, 1000mAh), Micro USB cable w. Wall charger Dimensions 100x60x17mm (3.9x2.4x0.7") Weight 85 grams (2.73 oz.) CO2 Sensor Specifications CO2 Sensor Single-beam NDIR diffusion sampling Measurement Range 0~50,000ppm (5% Vol) -
Page 17: Warranty
The monitor comes with a one (1) year warranty starting from the date the monitor was shipped to the buyer. For more information visit our website: www.CO2Meter.com/pages/faq CONTACT US Support@CO2Meter.com CO2Meter, Inc. (386) 256-4910 Technical Support 131 Business Center Drive Ormond Beach, FL 32174 USA... -
Page 18: Appendix A: Co2 Levels And Guidelines
APPENDIX A: CO2 LEVELS AND GUIDELINES 1. CO2 Alarm Guidelines The Occupational Safety & Health Administration (OSHA) requires by law that workers must be protected from potentially dangerous high levels of CO2. There are 3 CO2 safety limits that must all be followed: •... -
Page 19: Appendix B: Altitude Correction
APPENDIX B: ALTITUDE CORRECTION CO2 sensor modules are calibrated at sea level designed automatically compensate for changes to CO2 at higher altitudes. The CO2 level will be approximately 3% lower for every increase of 1,000 feet (300m) in altitude. For example, at 5,000 feet a meter reading 400 ppm calibrated at sea level would read approximately 340 ppm. -
Page 20: Appendix C: Log File Format
SetBaudRate(FT_BAUD_57600); // Set baud rate to 57600 SetDataCharacteristics(FT_BITS_8, FT_STOP_BITS_1, FT_PARITY_NONE); Commands to download log from monitor: The server must send “SAN-0001” or “san-0001” ASCII code through the USB port to start the download. For example: 0X53 0X41 0X4E 0X2D 0X30 0X30 0X30...
Need help?
Do you have a question about the SAN-0001 and is the answer not in the manual?
Questions and answers