Table of Contents
Advertisement
Quick Links
Advertisement
Table of Contents

Related Manuals for Zanussi ZGH75524XA


Summary of Contents for Zanussi ZGH75524XA
- Page 1 User Manual GETTING STARTED? EASY. ZGH75524XA ZGH76524XS EN User Manual...
-
Page 2: Safety Information
VISIT OUR WEBSITE TO: Get usage advice, brochures, trouble shooter, service and repair information: www.zanussi.com/support SAFETY INFORMATION Before the installation and use of the appliance, carefully read the supplied instructions. The manufacturer is not responsible for any injuries or damage that are the result of incorrect installation or usage. - Page 3 WARNING: Unattended cooking on a hob with fat or oil can be • dangerous and may result in fire. NEVER try to extinguish a fire with water, but switch off the • appliance and then cover flame e.g. with a lid or a fire blanket. WARNING: The appliance must not be supplied through an •...
-
Page 4: Safety Instructions
SAFETY INSTRUCTIONS plug (if applicable) can make the terminal This appliance is suitable for the following markets: become too hot. • Use the correct electricity mains cable. PT ES • Do not let the electricity mains cable tangle. • Make sure that a shock protection is installed. INSTALLATION •... - Page 5 Make sure to connect the appliance according • Do not use large cookware that overlap the to current installation regulations. Pay attention edges of the appliance. This can cause damage to requirements regarding adequate ventilation. to the worktop surface. • Make sure the flame does not go out when you quickly turn the knob from the maximum to the minimum position.
-
Page 6: Before The Installation
• Disconnect the appliance from the mains • Flat the external gas pipes. supply. • Cut off the mains electrical cable close to the appliance and dispose of it. INSTALLATION B. Washer supplied with the appliance WARNING! Refer to Safety chapters. C. -
Page 7: Adjustment Of Minimum Level
applicable pressure adjuster on the gas supply pipe. ADJUSTMENT OF MINIMUM LEVEL To adjust the minimum level of the burners: 1. Light the burner. 2. Turn the knob on the minimum position. 3. Remove the knob and the gasket. WARNING! Make sure the flame does not go out when you quickly turn the knob from the maximum position to the minimum position. - Page 8 min. min. 650 mm 150 mm min. 55 mm 30 mm 480 mm 560 mm 1. Connect the green and yellow (earth) wire to the terminal which is marked with the letter 'E', or the earth symbol , or coloured green and yellow.
-
Page 9: Product Description
POSSIBILITIES FOR INSERTION The panel installed below the hob must be easy to remove and let an easy access in case a technical assistance intervention is necessary. Kitchen unit with door min 6 mm min 30 mm A) supplied bracket min 5 mm (max 150 mm) 60 mm... -
Page 10: Daily Use
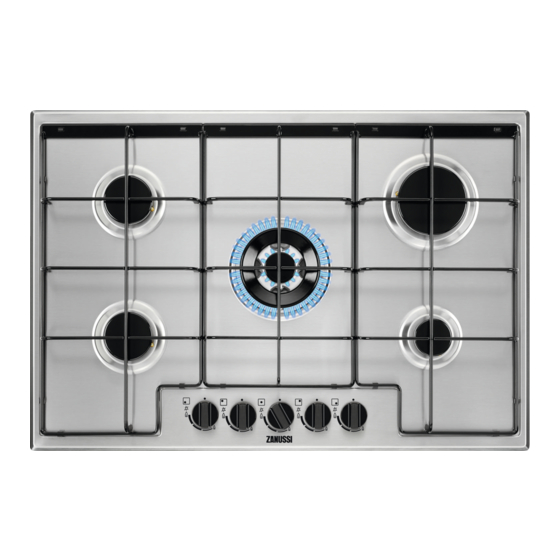
CONTROL KNOB Symbol Description Symbol Description minimum gas supply no gas supply / off position ignition position / maximum gas supply DAILY USE C. Ignition candle WARNING! Refer to Safety chapters. D. Thermocouple IGNITION OF THE BURNER BURNER OVERVIEW Always light the burner before you put on the cookware. -
Page 11: Turning The Burner Off
CAUTION! In the absence of The hob is supplied with the electricity you can ignite the burner progressive valves. They make the without electrical device; in this case flame regulation more precise. approach the burner with a flame, turn the control knob counter-clockwise to TURNING THE BURNER OFF maximum gas supply position and To put the flame out, turn the knob to the off... -
Page 12: Care And Cleaning
CARE AND CLEANING WARNING! Refer to Safety chapters. GENERAL INFORMATION • Clean the hob after each use. • Always use cookware with a clean base. • Scratches or dark stains on the surface have no effect on how the hob operates. •... -
Page 13: Troubleshooting
TROUBLESHOOTING WARNING! Refer to Safety chapters. WHAT TO DO IF... Problem Possible cause Remedy There is no spark when you try The hob is not connected to an Check if the hob is correctly to activate the spark generator. electrical supply or it is con- connected to the electrical nected incorrectly. -
Page 14: Technical Data
LABELS SUPPLIED WITH THE ACCESSORIES BAG Stick the adhesive labels as indicated below: MOD. MOD. MOD. TYPE PROD.NO. IP20 PROD.NO. PROD.NO. SER.NO. 0049 SER.NO SER.NO 03 IT DATA DATA MADE IN ITALY A. Stick it on Guarantee Card and send this part C. -
Page 15: Energy Efficiency
OTHER TECHNICAL DATA Gas original: G20 (2H) 20 mbar 12,0 kW TOTAL POWER: Gas replace- G30 (3+) 28-30 mbar 825 g/h ment: G31 (3+) 37 mbar 811 g/h Electric supply: 220-240 V ~ 50-60 Hz Appliance cate- II2H3+ gory: Gas connection: G 1/2"... -
Page 16: Energy Saving
Left front - Semi-rapid 55.0% Right front - Auxiliary not applicable Energy efficiency for the gas hob 55.6% (EE gas hob) Model identification ZGH75524XA Type of hob Built-in hob Number of gas burners Left rear - Semi-rapid 61.2% Right rear - Rapid 54.4%... - Page 20 WWW.ZANUSSI.COM/SHOP...
Need help?
Do you have a question about the ZGH75524XA and is the answer not in the manual?
Questions and answers