Advertisement
Quick Links
Advertisement

Related Manuals for Olymbros Z3

Summary of Contents for Olymbros Z3
- Page 2 Thank you for purchasing with Olymbros® Trail Monitor. For making the best use of all the functions of the device. Please read this manual carefully before you use the product and keep it as a handy reference. If you have any questions or concerns, please contact Olymbros at info@olymbros.us or submit the contact form on the official website www.olymbros.us.
-
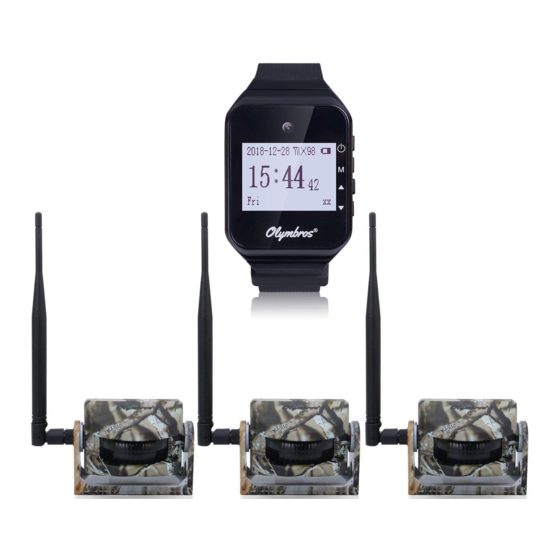
Page 3: Table Of Contents
Manual Content Sensors Battery Installation ..................Sensors Power On and Mounting ................Watch Handing and Operation .................. Quick Setup Guide ....................Tips ..........................Low Battery Alert of the Sensors ................Warning ........................FCC Caution ...................... -
Page 4: Sensors Battery Installation
Sensors Battery Installation Olymbros Z3 sensor is powered by one 9V battery(NOT included), open the battery cover by a flat-blade screwdriver and install one 9V carbon battery. Note: Every time you Install or remove the battery, please make sure that the sensors are turned off. -
Page 5: Watch Handing And Operation
Watch Handing and Operation 1. LCD Display Interface (1) Main Interface Operating Instruction ① When watch is under the main interface mode, other buttons are invalid except “MENU”. ② Press “MENU” button to open the main Settings menu interface and corresponding sub-menu interface. - Page 6 4) PromptSetting 5) ReceiveSwitch 6) Date&Time 7) RemoteStatus 8) VersionNO 9) Factory Reset (2) Pairing ① Pairing Menu List 1) Add Pairing 2) Del Pairing 3) Del All Pairing ② Add Pairing 1) Setting Interface • CurZone: Mark the number of sensors. Code: The sensor’s codes, xx-xx-xx means no pairing.
- Page 7 • CurZone: The number of sensors. • Code: The code of the sensors. 2) Button Operation “UP” and “DOWN” button: Switch sensor’s number among 0-99. • “MENU” button: Delete the current sensor’s pairing. • “ESC” button: Return to the “Pairing” menu interface. •...
- Page 8 ④ Del All Log 1) Select “Del All Log”, all the pairing records will be deleted. 2) Return to the “QueryLog” Menu interface automatically when all the pairing records are deleted. (4) DevNO.Setting - Set the number of the receiver watch ①...
- Page 9 2) “UP” and ”DOWN” button: Scroll through the alarm options. 3) “ESC” button: Save the current settings and return to the previous menu. (6) ReceiveSwitch - Select whether you want to disconnect the sensor or not. ① Interface ② Button Operation 1) “MENU”...
- Page 10 ② Button Operation 1) “UP” and “DOWN” button: Switch the sensors. (Mark:00 - Mark:99) 2) “ESC” button: Exit and return to the previous menu. (9) VersionNO (10) Factory Reset ① Interface ② Button Operation 1. “MENU” button: Restore to the default settings. “ESC”...
-
Page 11: Quick Setup Guide
Quick Setup Guide 1. With the watch fully charged, and the 9V batteries installed in the sensors, get everything sitting close to your location. 2. Turn on the watch, press the “MENU” button and select the “Pairing”, open the “Add Pairing” interface. Then turn on the transmitter, then press the “MENU”... -
Page 12: Low Battery Alert Of The Sensors
Low Battery Alert of the Sensors Usually, the 9V batteries life of the sensors would last about 4-6 months. The low battery alert for the sensors has five low battery modes: 1. When the sensor is at low battery, the watch gives an alarm once every two hours, the sensor will shut down after three consecutive alarms. - Page 13 • the icon at the lower right corner indicates the low voltage of a sensor. • The xx indicates the number of the sensor. • If several sensors give the low battery alarms at the same time, only the last alarm will be displayed. 4.
-
Page 14: Warning
Warning The device is IP54 standard waterproof. The device has electronic parts. Don’t disassemble the device by yourself in case of short circuit or other problems. 1 year after-sales service of warranty is included. PIR sensors can not detect motion which occurs behind walls, ceilings, floor, closed doors, glass partitions, glass doors or windows.
Need help?
Do you have a question about the Z3 and is the answer not in the manual?
Questions and answers