Table of Contents
Advertisement
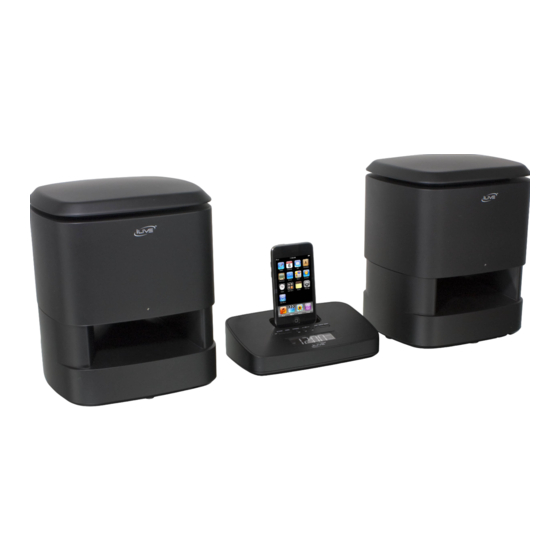
IS809B
Wireless Music System with Dock for iPod
T a B l e o f C o n T e n T S
Warnings and Precautions ....................................................................... 2
Important Safety Instructions .................................................................. 3
In the Box & features ............................................................................. 4
Powering the Unit ................................................................................... 5
Backup Batteries for the Unit ................................................................. 5
Powering the Speakers & Changing the Remote Battery ....................... 6
Pairing Speakers with the Unit ............................................................... 7
Setting the Clock ..................................................................................... 8
Using the auxiliary Input ........................................................................ 9
locations of Controls & Definitions ................................................10-15
Parts & Service Information ................................................................. 16
Advertisement
Table of Contents

Related Manuals for iLive IS809B


Summary of Contents for iLive IS809B
-
Page 1: Table Of Contents
IS809B Wireless Music System with Dock for iPod T a B l e o f C o n T e n T S Warnings and Precautions ............... 2 Important Safety Instructions ..............3 In the Box & features ................4 Powering the Unit ................... -
Page 2: Warnings And Precautions
Warnings and Precautions This symbol, located on back or This symbol, located on back or bottom of the unit, is intended to alert bottom of the unit, is intended to alert the user to the presence of uninsulated the user to the presence of important “dangerous voltage”... -
Page 3: Important Safety Instructions
Important Safety Instructions Read Instructions - all the safety and operating into the outlet, contact your electrician to replace following the operating instructions. adjust only instruction should be read before the product is your obsolete outlet. Do not defeat the safety those controls that are covered by the operating operated. -
Page 4: In The Box & Features
In the Box • IS809B • Remote control • Docking brackets for iPod • Documentation features • Dock plays and charges iPod • Wireless speakers • Supports multiple speakers • Advanced hi-fi sound with Channel Purity® • Remote • Digital volume control •... -
Page 5: Powering The Unit
Powering the Unit AC Power Cord Plug the included AC cord into a standard AC outlet (120V~60Hz) Backup Batteries for the Unit Backup Battery Compartment (Requires 2 AAA batteries, not included) Note: The Backup Battery Compartment will only backup the unit’s time for a short period. The unit cannot function on the backup batteries alone. -
Page 6: Powering The Speakers & Changing The Remote Battery
Powering the Speakers AC Power Cord Plug the included AC cord into a standard AC outlet (120V~60Hz) Battery Power (Requires 6 D batteries, not included) Changing the Remote Battery Battery Power (Requires 2 AAA batteries, not included) -
Page 7: Pairing Speakers With The Unit
Pairing Speakers with the Unit Step 1: Power Button on the unit to turn the unit on. Press the Step 2: Power Button on the speakers to turn the speakers on. Press the Step 3: Pair Button on the unit until the Link Indicator Press and hold the begins blinking. -
Page 8: Docking An Ipod & Playing An Ipod
Docking an iPod Step 1: Locate the numbered bracket that fits the iPod that will be docked. • Each included Bracket has a number on it, indicating which iPod model that bracket is compatible with. See the separate bracket chart page to identify which bracket is needed. -
Page 9: Setting The Timer & Setting The Sleep Timer
Setting the Timer Step 1: Timer Button. Press and hold the Step 2: Timer Button, press the Skip/Search Buttons to While holding the adjust the hour and minute. Step 3: Release the Timer Button to set the adjusted time. Step 4: Press the Power Button to turn the unit off. -
Page 10: Locations Of Controls & Definitions
Locations of Controls & Definitions iPod Connector Use the Dock Connector to connect an iPod to the unit. Source Button Press the Source Button to switch between iPod and Auxiliary Modes. Link Indicator a solid light indicates that the unit is not searching for nearby wireless speakers. a blinking light indicates that the unit is attempting to link up with nearby wireless speakers. - Page 11 Locations of Controls & Definitions Dimmer Button Press the Dimmer Button consecutively to adjust between low, medium, and high LCD display brightness’. Time Set Button Press and hold the Time Set Button to set the units clock. Sleep Button Press the Timer Button consecutively to set the sleep timer between 60 and 10 minutes (in 10 minute increments).
- Page 12 locations of Controls...
- Page 13 Control Definitions Volume Dial Turn the Volume Dial to adjust the volume of the speaker. Left/Right/Mono Button Turn the Left/Right/Mono Button to switch between left, right, and mono speaker modes. Battery Compartment (Requires 6 D batteries, not included) AC Power Cord Use the aC Power Cord to power the speakers as an alternative to using battery power.
- Page 14 locations of Controls...
- Page 15 Control Definitions Power Button Press the Power Button to turn the unit off and on. Source Button Press the Source Button to switch between iPod and Auxiliary Modes. Repeat Button Press the Repeat Button to activate the repeat options on a docked iPod. Skip/Search Buttons In iPod Mode, press the Skip/Search Buttons to skip between songs on a docked iPod.
-
Page 16: Parts & Service Information
Para descargar este manual de instrucción en inglés, español, o francés visite la sección de la ayuda en www.ilive.net. Pour télécharger ce manuel d’instruction en anglais, espagnol, ou le Français visitez la section de soutien à www.ilive.net.
Need help?
Do you have a question about the IS809B and is the answer not in the manual?
Questions and answers