Advertisement
Quick Links
Advertisement

Related Manuals for mychway LT-100A


Summary of Contents for mychway LT-100A
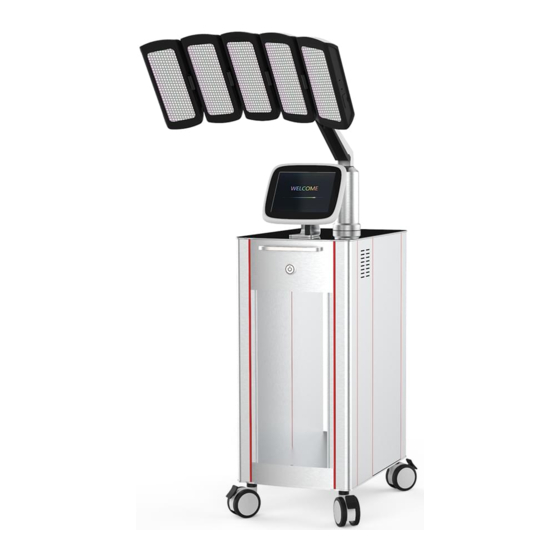
- Page 1 User Manual LT-100A...
- Page 2 Preface Dear users: We’re pleased to present to you Pro Toy-block 480 LEDs PDT LED Photon Photodynamic Beauty Machine IR Healing that adopts the IR+LED technology, targeting at facial fine lines, skin dullness, acne skin, poor skin absorption and so on. We aim at a safe and, at the same time, effective beauty result by using high-end technologies.
-
Page 3: Table Of Contents
Table of Contents Preface Part I Brief Introduction Advantages Principles Main Effects Applicable Range Inapplicable Range Notes after Operation Part II 1. Detailed Operations 2. Technical Parameters 3. Safety Precautions 4. Dos and Don’ts 5. Troubleshooting & Solutions FAQs Packing List Operational Diagrams... - Page 4 Part I Brief Introduction Pro Toy-block 480 LEDs PDT LED Photon Photodynamic Beauty Machine IR Healing is currently the most popular beauty machine that works on skin rejuvenation, acne removal, wrinkle removal, dark spots removal, skin firming and overall quality betterment.
- Page 5 Red LED: 640NM, reach into skin 1-6mm. Red light can increase the activity of cells, promote the metabolism of cells, and make the skin secrete collagen and fibrous tissue to fill itself. It can accelerate blood circulation, improve skin elasticity, improve sallow and dull skin condition, so as to achieve anti-aging, anti-oxidation and repair effect.
- Page 6 3. Fade wrinkles and pigmented spots. 4. Promote collagen formation and repair damaged skin. 5. Improve uneven facial skin tone, dull and sallow skin. 6. Destroy propionic acid bacillus, and fight inflammation. 7. Calm and relieve pain, promote blood circulation. 8.
-
Page 7: Detailed Operations
Part II 1. Detailed Operation Insert the back of the lamp board ① into the joint of the handle②. You should hear a clicking sound when it’s successfully connected. Raise the metal piece (as arrow indicated) with one hand to assist. Connect the handle wire with the jack, as shown below... - Page 8 Connect the wire with the jack on the back of the PDT board, as shown below After checking that the instrument is connected properly, the following starting interface will appear when the power supply is turned on.
- Page 9 Then it goes to the interface below: 1.1 Function Selection Start/Pause...
- Page 10 Cycle Flashing (One LED or multiple LEDs cycle through) Consecutive (One LED or multiple LEDs stay on constantly) Restore Working Time Adjustment (20 min is ideal) LED Light Selection (One or more LEDs can be selected) Energy Adjustment of Single LED (Stronger energy level, brighter LED) Energy Adjustment of All LEDs 1.2 Detailed Operation: Mono LED Light...
- Page 11 D. Click to start operation 1.3 Detailed Operation: Multiple LED Colors A. Select two or more LED lights, such as red, green, blue, IR or yellow Click to adjust energy level B. Click to adjust working time C. Click to select mode D.
-
Page 12: Technical Parameters
2. Technical Parameters Input is divided into 110 and 220v (dip switch to adjust switching power supply) Total power: 165w (5 light boards) No light power: 10w (screen, fan, circuit) Monochromatic lamp : Red light: 65W 75mw / cm2 Infrared: 40W 64mw / cm2 Yellow: 38W 40mw / cm2 Blue: 35W 48mw / cm2 Green: 20W 36mw / cm2... -
Page 13: Troubleshooting & Solutions
connected before each operation. 2. Ensure that the voltage of the device is appropriate. If the voltage of the local power supply is unstable, we recommend that users increase to the matching power voltage. 3. In order to ensure the therapeutic effect and normal service life expectancy of the device, please use the specified accessories provided or recommended by the original manufacturer. -
Page 14: Faqs
6. FAQs 1. Q: When can I start seeing results of LED photon skin rejuvenation? A: Everyone absorbs LED light to a different extent. It varies based on one’s physical condition, age, skin condition, diet, drinking and smoking and so on. Under normal circumstances, you should start seeing results in 2-4 weeks. - Page 15 Toner+ 2. Apply toner, 1 min. Mode: Sheet 3. Apply sheet mask. Red LED mask+ 4. Put on protective LT-100A eyewear for the customer, Energy: then place the device 50%-100% parallel above the customer’s face. Mode: 5. Turn on the device,...
- Page 16 adjust time, energy, LED Mode: mode, and click start, Consecutive 10-20 min. (constantly on) 5. Remove the device. 6. Apply toner and body lotion. Recommended treatment: 10 treatments account for one full course. After one treatment, skin is full hydrated, clean, and translucent.
Need help?
Do you have a question about the LT-100A and is the answer not in the manual?
Questions and answers