Table of Contents
Advertisement
Quick Links
Advertisement
Table of Contents

Related Manuals for STEINWAY LYNGDORF SP-1


Summary of Contents for STEINWAY LYNGDORF SP-1
- Page 1 MODEL SP-1 STEREO PROCESSOR INSTALLATION MANUAL April 21, 2021 [Skriv tekst]...
-
Page 2: Table Of Contents
Compliance ......................3 Pre-Installation ..................... 4 Cable Connections ....................8 Home Automation System Integration ..............9 Installation ......................9 How to Set Up RoomPerfect™ ................14 Troubleshooting ....................19 Speaker Routing ....................20 Voicing Curves ....................24 Specifications ..................... 26 Serial Control Manual .................. -
Page 3: Compliance
Steinway Lyngdorf products and accessories comply with parts 15 and 68 of the FCC rules. Operation is subject to the following two conditions: (1) this device may not cause harmful interference;... -
Page 4: Pre-Installation
Carefully remove the unit and accessory kit from the carton and visually check for shipping damage. Contact both the shipper and your Steinway Lyngdorf representative immediately if the unit bears any sign of damage from mishandling. Note: Keep shipping carton and packing material for future use or in the unlikely event that the unit needs servicing. - Page 5 Installer Kit An Installer Kit is available for setting up the SP-1 Stereo Processor. The Installer Kit is identical for all Steinway Lyngdorf systems and should be ordered individually as needed. RoomPerfect™ Calibration Microphone Cable Microphone Microphone Stand Model SP-1 Rear Socket Panel Analog audio inputs Microphone input for RoomPerfect™...
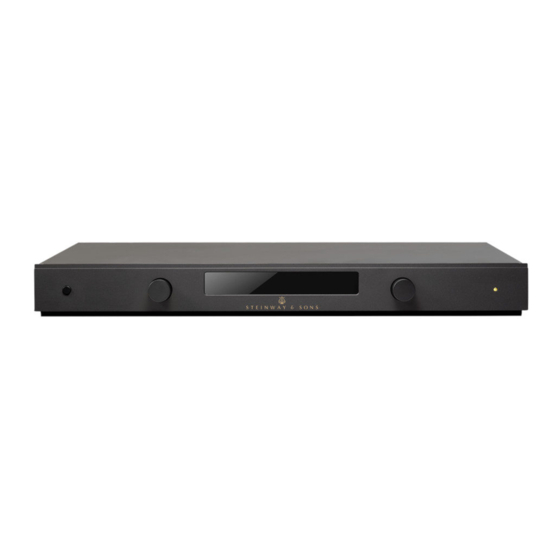
- Page 6 Model SP-1 Front Panel 1. Power - Switches the system on and off 2. Left knob a. Rotate left and right to toggle between audio sources and browse while in the menu. b. Press and hold to access the menu, press to select a menu item, press and hold to cancel.
- Page 7 Changing the Batteries The remote is shipped with two AAA batteries. If the SP-1 Stereo Processor does not respond to remote control commands, it may be because the remote control batteries need to be replaced. To change the batteries, use a Phillips Head screwdriver (PH1) to remove the locking screw from the battery compartment.
-
Page 8: Cable Connections
Only use cables and connectors approved by Steinway Lyngdorf. The Standard Remote The SP-1 comes with a standard remote control, which can operate all daily functions using the following buttons: Toggles through RoomPerfect... -
Page 9: Home Automation System Integration
Installing the USB Streaming Audio Driver on a Computer To stream audio from a PC or Mac to the SP-1, you need to install the driver for the SP-1 on your computer. The driver can be found on the USB key from the accessory kit. - Page 10 Speaker Routing on page 19. • Connect audio sources to the SP-1 Stereo Processor. • Connect power to the SP-1 Stereo Processor, the amplifiers, and all connected audio and video sources. The SP-1 Stereo Processor will automatically detect the voltage and does not have a mains voltage switch.
- Page 11 Menu Hierarchy RoomPerfect™ Select Focus or Global settings Voicing Select between enabled voicings Setup Speaker Distance Distance unit RoomPerfect™ Guided setup Add focus position Add room measurements RoomPerfect™ status Bypass enabled Input Input name Input enable Input sensitivity Voicing setup Default voicing Voicing enable Volume...
- Page 12 This is not volume-gain, it is volume-offset. For example, if an input is set to +12dB then the maximum volume for that input will be 87.9 on the SP-1 display. Going beyond 87.9 will increase the number on the display but not the volume.
- Page 13 Save the new software on a USB stick and position the USB stick in the appropriate connector on the back of the SP-1. Enter the menu and select YES for updating the software. Do not remove the USB stick before the SP-1 has powered off, as this will cause the software in the SP-1 to be corrupted.
-
Page 14: How To Set Up Roomperfect
WARNING: The microphone is a very sensitive and finely calibrated device which must be treated with utmost care. If the microphone has been dropped on the floor, it may be damaged. If this is the case, obtain a new microphone from your Steinway Lyngdorf representative before performing the system calibration. - Page 15 Plug the supplied microphone cable into the microphone. Connect the microphone cable to the microphone terminal on the rear panel of your processor. Placing the Microphone in the Focus Position When you are prompted to place the microphone in the focus position, connect the microphone to the microphone input on the back panel and place the microphone, using the microphone stand, in your primary listening position.
- Page 16 Measuring the Focus Position When the calibration volume has been set, RoomPerfect™ will send a range of tones to measure the focus position. If there is noise in the room, the measurement may take longer. This will not affect the quality of the end result.
- Page 17 Room Measurements Above 90% RoomKnowledge When RoomKnowledge has reached 90%, you can decide to add room measurements or do it at a later time. We recommend taking a couple of measurements within 50cm/.5ft of the walls and ceiling when above 90% RoomKnowledge. To fully optimize RoomPerfect™’s understanding of the room’s acoustical properties, we recommend you keep doing measurements until the RoomKnowledge is above 95%.
- Page 18 sound in the room. With high room correction index values, more extensive processing is employed. Add Focus Position/Add Room Position. You can add up to eight more Focus positions for the room, repeating the Focus 1 measurement procedure. You can also add room measurements to approach 100% RoomKnowledge.
-
Page 19: Troubleshooting
Error - Microphone Not Found No microphone is connected to the SP-1 or the microphone cable is not working. Check that the microphone cable is connected to the microphone socket on the back panel. If the problem continues, test the microphone cable by connecting the microphone directly to the Microphone socket and select Retry. -
Page 20: Speaker Routing
Assign ID Codes to the Steinway Lyngdorf Amplifier(s) The DIP switchboard on the back of the amplifier must be encoded in order to make it possible for the SP-1 Stereo Processor to identify the speaker. Each unit must have a sequential ID in the network. - Page 21 SP-1 with Model A1 Amplifiers...
- Page 22 SP-1 with Model A2 Amplifiers...
- Page 23 SP-1 with Model D Speakers...
-
Page 24: Voicing Curves
Voicing Curves The Voicing setting is an EQ filter that can be used to gently amplify or attenuate certain frequencies according to personal preferences and/or to compensate if a given recording sounds too “bright” or too “dark.” Action Action2 Further enhances the lower frequencies. Enhances the lower frequencies. - Page 25 Music Music2 Dampens the midrange to compensate for Further dampens the midrange. recordings that would otherwise sound too harsh. Neutral News No change in tonal balance. Cuts low frequencies for live broadcasting and sports events. Open Open Air Dampens the low range frequencies Further dampens the low range frequencies Relaxed Soft...
-
Page 26: Specifications
DIGITAL: 4 x S/PDIF (coax); 6 x Toslink (optical); 1 x USB (audio input) ANALOG: 4 x single-ended; Input for microphone OUTPUT 3 x Steinway Lyngdorf Digital Link MISCELLANEOUS 1 x Trigger input; 1 x IR sensor input; 1 x USB (software update); 1 x RJ 12 (RS 232 control) -
Page 27: Serial Control Manual
IP Control Settings Open a TCP connection to port 50042 on the MCB-1 and then use the same text-based protocol for control as is used on the RS-232 port on the SP-1. Serial Settings The serial port settings are always 8 data bits, no parity and one stop bit with a baud rate of 115200. -
Page 28: Command And Request Formatting
Command and Request Formatting All commands and requests start with the ‘!’ character. Commands end with a combination of the Carriage Return character (ascii 0x0D, referred to as <CR> in this document) and Line Feed (ascii 0x0A, <LF>). Often, a single <CR> is used, but because different systems handle these characters differently, it is also allowed to end with <LF>, <CR><LF>... -
Page 29: Requests
Requests The following requests are available on the SP-1: Request name Action Reply !VER?<CR><LF> Requests the SW version in the !VER(1.23a)<CR><LF> SP-1 If the version is 1.23a !DEVICE?<CR><LF> Requests the type of device An SP-1 will reply with: !DEVICE(SP-1)<CR><LF> Unless a CDP1 is connected on the link, then the reply will be: !DEVICE(SP-1,CDP-1)<CR><LF>... - Page 30 !VOINAME(n)?<CR><L Requests the name of voicing !VOINAME(n,Name)<CR><LF> F> number n. For legal values of n Where n is the number of the voicing and see Voicing Numbering on page “Name” is a string with the name of the Fejl! Bogmærke er ikke requested voicing.
- Page 31 Requests for CDP-1 The following requests are available if a CDP-1 is connected on the link: Request name Action Reply !CDVER?<CR><LF> Requests the SW version in the !VER(1.23a)<CR><LF> CDP-1 If the version is 1.23a !CDSTATE?<CR><LF> Requests the current state. One of: !CDSTATE(OFF)<CR><LF>...
- Page 32 !CDPLAYMODE?<CR><L Requests the current play !CDPLAYMODE(m), where m is one of: F> mode. 0 = Normal play mode 1 = Repeat disc 2 = Repeat track 3 = Random play !CDTRACKNAME?<CR>< Requests the trackname from !CDTRACKNAME(Name Of LF> cd-text info for the current track. Track)<CR><LF>...
-
Page 33: Commands
!OFF<CR><LF> Turns the SP-1 off. !ON<CR><LF> Turns the SP-1 on. !PWR<CR><LF> Toggles power on the SP-1. Same functionality as the standby button on the front. !VOLDN<CR><LF> Decreases the volume 1 step (0.5 dB). !VOLUP<CR><LF> Increases the volume 1 step (0.5 dB). - Page 34 !SRCDIS(n)<CR><LF> Disables source n. For valid values of n refer to Input Source Numbering on page Fejl! Bogmærke er ikke defineret.. !SRCEN(n)<CR><LF> Enables source n. For valid values of n refer to Input Source Numbering on page Fejl! Bogmærke er ikke defineret.. !SRCNAME(n,Name)<CR><LF>...
- Page 35 Commands for CDP-1 The following commands are available if a CDP-1 is connected on the link: Command name Action !CDEJECT<CR><LF> Opens or closes the tray. Same functionality as the eject button on the front. !CDPLAY<CR><LF> Play. !CDPAUSE<CR><LF> Pause. !CDPLAYPAUSE<CR><LF> Toggles between play and pause. Same functionality as pressing the rotary button on the front.
- Page 36 !CDSAMPLERATE(r)<CR><LF> Selects a new samplerate for the output, where r is one of: 1 = 48 kHz 2 = 96 kHz 3 = 192 kHz !CDSUBSCRIBESTATE<CR><LF> Start subscription mode for the state of the CDP-1. Will send information whenever the state changes. !CDUNSUBSCRIBESTATE<CR><LF>...
-
Page 37: Input Source Numbering
Input Source Numbering The following table shows which numbers corresponds to which inputs. Number Source Input Optical Digital 1 Optical Digital 2 Optical Digital 3 Optical Digital 4 Optical Digital 5 Optical Digital 6 Coax Digital 7 Coax Digital 8 Coax Digital 9 Coax Digital 10 USB Digital 11... -
Page 38: Voicing Numbering
Voicing Numbering This table shows which numbers corresponds to which voicings. This is a total list of all voicings available in all systems. Not all systems are able to use all of these voicings. Number Voicing Neutral Music Music 2 Relaxed Open Open Air... -
Page 39: Ir Code Overview
IR Code Overview Parameters for IrTool: Carrier:006b 0:0015 0015 1:0015 0042 Lead In: 015a 00ae Lead Out: 0015 00ae NEC system 55 NEC nr - Function - Pronto CCF BUTTON_UP 0000 006b 0022 0000 015a 00ae 0015 0042 0015 0042 0015 0042 0015 0015 0015 0042 0015 0042 0015 0015 0015 0015 0015 0015 0015 0015 0015 0015 0015 0042 0015 0015 0015 0015 0015 0042 0015 0042 0015 0042 0015 0015 0015 0015 0015 0015 0015 0015 0015 0015 0015 0015 0015 0015 0015 0015 0015 0042 0015 0042 0015 0042 0015 0042... - Page 40 BUTTON_OK 0000 006b 0022 0000 015a 00ae 0015 0042 0015 0042 0015 0042 0015 0015 0015 0042 0015 0042 0015 0015 0015 0015 0015 0015 0015 0015 0015 0015 0015 0042 0015 0015 0015 0015 0015 0042 0015 0042 0015 0042 0015 0015 0015 0042 0015 0015 0015 0015 0015 0015 0015 0015 0015 0015 0015 0015 0015 0042 0015 0015 0015 0042 0015 0042 0015 0042 0015 0042 0015 0042 0015 00ae BUTTON_VOL_UP...
- Page 41 0015 0015 0015 0015 0015 0015 0015 0042 0015 0015 0015 0042 0015 0015 0015 0042 0015 0042 0015 0042 0015 0042 0015 00ae BUTTON_MENU 0000 006b 0022 0000 015a 00ae 0015 0042 0015 0042 0015 0042 0015 0015 0015 0042 0015 0042 0015 0015 0015 0015 0015 0015 0015 0015 0015 0015 0015 0042 0015 0015 0015 0015 0015 0042 0015 0042 0015 0042 0015 0042 0015 0015 0015 0042 0015 0015 0015 0015 0015 0015 0015 0015 0015 0015 0015 0015 0015 0042 0015 0015 0015 0042...
- Page 42 0015 0015 0015 0015 0015 0042 0015 0015 0015 0015 0015 0042 0015 0042 0015 0042 0015 0042 0015 0042 0015 0015 0015 00ae BUTTON_DIG5 0000 006b 0022 0000 015a 00ae 0015 0042 0015 0042 0015 0042 0015 0015 0015 0042 0015 0042 0015 0015 0015 0015 0015 0015 0015 0015 0015 0015 0015 0042 0015 0015 0015 0015 0015 0042 0015 0042 0015 0015 0015 0015 0015 0042 0015 0015 0015 0015 0015 0015 0015 0015 0015 0042 0015 0042 0015 0042 0015 0015 0015 0042 0015 0042...
- Page 43 0015 0015 0015 0015 0015 0042 0015 0015 0015 0042 0015 0042 0015 0015 0015 0042 0015 0042 0015 0042 0015 0015 0015 00ae BUTTON_DIG11 0000 006b 0022 0000 015a 00ae 0015 0042 0015 0042 0015 0042 0015 0015 0015 0042 0015 0042 0015 0015 0015 0015 0015 0015 0015 0015 0015 0015 0015 0042 0015 0015 0015 0015 0015 0042 0015 0042 0015 0015 0015 0042 0015 0015 0015 0042 0015 0015 0015 0015 0015 0015 0015 0042 0015 0042 0015 0015 0015 0042 0015 0015 0015 0042...
- Page 44 0015 0015 0015 0015 0015 0042 0015 0042 0015 0042 0015 0042 0015 0042 0015 0015 0015 0042 0015 0042 0015 0015 0015 00ae BUTTON_FOCUS1 0000 006b 0022 0000 015a 00ae 0015 0042 0015 0042 0015 0042 0015 0015 0015 0042 0015 0042 0015 0015 0015 0015 0015 0015 0015 0015 0015 0015 0015 0042 0015 0015 0015 0015 0015 0042 0015 0042 0015 0042 0015 0015 0015 0015 0015 0015 0015 0042 0015 0015 0015 0015 0015 0042 0015 0015 0015 0042 0015 0042 0015 0042 0015 0015...
- Page 45 0015 0015 0015 0015 0015 0042 0015 0042 0015 0015 0015 0015 0015 0042 0015 0015 0015 0042 0015 0042 0015 0015 0015 00ae BUTTON_FOCUS7 0000 006b 0022 0000 015a 00ae 0015 0042 0015 0042 0015 0042 0015 0015 0015 0042 0015 0042 0015 0015 0015 0015 0015 0015 0015 0015 0015 0015 0015 0042 0015 0015 0015 0015 0015 0042 0015 0042 0015 0042 0015 0042 0015 0042 0015 0015 0015 0042 0015 0015 0015 0015 0015 0042 0015 0015 0015 0015 0015 0015 0015 0042 0015 0015...
- Page 46 0015 0042 0015 0015 0015 0042 0015 0042 0015 0015 0015 0042 0015 0042 0015 0042 0015 0015 0015 0042 0015 0015 0015 00ae BUTTON_VOICING3 0000 006b 0022 0000 015a 00ae 0015 0042 0015 0042 0015 0042 0015 0015 0015 0042 0015 0042 0015 0015 0015 0015 0015 0015 0015 0015 0015 0015 0015 0042 0015 0015 0015 0015 0015 0042 0015 0042 0015 0042 0015 0042 0015 0015 0015 0015 0015 0015 0015 0042 0015 0015 0015 0042 0015 0015 0015 0015 0015 0042 0015 0042 0015 0042...
- Page 47 0015 0042 0015 0015 0015 0042 0015 0042 0015 0042 0015 0042 0015 0015 0015 0042 0015 0015 0015 0042 0015 0015 0015 00ae BUTTON_VOICING9 0000 006b 0022 0000 015a 00ae 0015 0042 0015 0042 0015 0042 0015 0015 0015 0042 0015 0042 0015 0015 0015 0015 0015 0015 0015 0015 0015 0015 0015 0042 0015 0015 0015 0015 0015 0042 0015 0042 0015 0042 0015 0015 0015 0015 0015 0042 0015 0015 0015 0042 0015 0015 0015 0042 0015 0015 0015 0042 0015 0042 0015 0015 0015 0042...
- Page 48 0015 0042 0015 0015 0015 0042 0015 0042 0015 0015 0015 0015 0015 0015 0015 0042 0015 0015 0015 0042 0015 0015 0015 00ae BUTTON_VOICING15 0000 006b 0022 0000 015a 00ae 0015 0042 0015 0042 0015 0042 0015 0015 0015 0042 0015 0042 0015 0015 0015 0015 0015 0015 0015 0015 0015 0015 0015 0042 0015 0015 0015 0015 0015 0042 0015 0042 0015 0042 0015 0042 0015 0042 0015 0042 0015 0015 0015 0042 0015 0015 0015 0042 0015 0015 0015 0015 0015 0015 0015 0015 0015 0042...
-
Page 49: Trademarks
Trademarks DTS is a registered trademark & the DTS logos and Symbol are trademarks of DTS, Inc. Manufactured under license under U.S. Patent #’s: 5,451,942; 5,956,674; 5,974,380; 5,978,762; 6,226,616; 6,487,535 & other U.S. and worldwide patents issued & pending. DTS is a registered trademark and the DTS logos, Symbol, DTS-HD Master Audio are trademarks of DTS, Inc. -
Page 50: Service Information
Service Information In order to obtain warranty service, you must contact your original dealer or the Steinway Lyngdorf distributor of the region or country where you are located. If you have trouble locating an authorized representative, please contact service@steinwaylyngdorf.com. Steinway Lyngdorf...
Need help?
Do you have a question about the SP-1 and is the answer not in the manual?
Questions and answers