
Related Manuals for SCOLTA RP-101

Summary of Contents for SCOLTA RP-101
- Page 1 HANDHELD TRANSCEIVER Versions: RP-101: PMR446 RP-201: VHF RP-301: UHF INSTRUCTION MANUAL...
- Page 2 Waste disposal. Directive 2012/19 / EU Information on waste disposal of electrical and electronic equipment (WEEE). This symbol on the product means that the electrical and electronic prod- ucts used must not be mixed with household waste. For proper treatment, recovery and recycling, take this product to designated collection points where it will be accepted for free.
- Page 3 In order to make you fully understand the equipment, please read this user manual before using. This transceiver comes in 3 different versions: RP-101 Programmed with 8/16 PMR* channels. TX power 500 mW. Bandwidth 12.5 kHz. No registration or fees apply. Based on the country’s regulation only the channels 1-8 or 1-16 are permitted. RP-201 Commercial radio VHF; 147~174 MHz 199 programmable channels. Registration required, fees apply. Only assigned frequencies and parameters are permitted. Bandwidth 12.5 kHz or 25 kHz. Max. TX power 5W.
- Page 4 PRECAUTION The transceiver is a product with good design and advanced technology. The following suggestions will help you perform the obligations of warranty cause, understand and realize the security of using transceivers. Put transceiver and all its parts and accessories in place out of children’s reach. Do not try to disassemble transceiver as non-professional’s treatment to the transceiver may cause damage. Please use our company’s assorted battery pack and charger, avoid damage to transceiver. Please use our company’s assorted antenna, to prevent shorten communication distance. Do not expose transceiver to sunlight for a long time or in the overheated areas.
-
Page 5: Table Of Contents
CONTENTS UNPACKING AND CHECKING EQUIPMENT ......7 PREPARATION ................8 BASIC FUNCTIONS..............12 GENERAL FUNCTIONS ............14 CHANNEL SETTINGS ............... 17 DTMF ..................19 SPECIFICATIONS ..............20 TROUBLESHOOTING GUIDE ........... 21 DCS / CTCSS CODES ............... 22 PMR446 CHANNELS ..............22 DECLARATIONS OF CONFORMITY ........ -
Page 7: Unpacking And Checking Equipment
UNPACKING AND CHECKING Please take the transceiver from the package carefully. We suggest that you should check the following accessories before throwing away the package. If any items is lost or damaged when transportation, please submit a claim to the delivery man immediately. ASSORTED ACCESSORIES Item Qty. Antenna(*) Charger Adapter Battery pack Screw Set Belt clip User manual (*) In PMR version the antenna is fixed, ie it can not be removed from the device. -
Page 8: Preparation
PREPARATION CHARGING THE BATTERY PACK The battery pack is not charged at the factory. Please charge it before using. After purchasing or long time storage (more than two months), the battery can not reach its normal capacity when charge at the first time. After charging 2-3 times then the capacity reach the normal one. CAUTION • Do not recharge the battery pack if it is already fully charged. Otherwise, the battery life will be shorten or damaged. • After recharging the battery pack, disconnect it from the char- ger. Charging the battery pack more than 5 days may reduce the battery pack life due to overcharging NOTE: • The ambient temperature should be between 42 and 104°F (5 to 40°C) while charging is in progress. Charging outside this range may not fully charge the battery. • Always switch OFF the transceiver equipped with a battery pack before charging. Using the transceiver while charging will interfere with correct charging. • Even after completely correct charge, the using time still not increases, then the battery life is over, please replace the battery. - Page 9 Plug the Charger power cable into an AC outlet. Insert the battery pack or transceiver with a battery pack into the charger. • Make sure the battery pack contact with the charging terminals correctly. • The charger LED lights on and charging begins. • After charging the assorted battery pack for 4~8 hours, take the battery or the transceiver with battery from the charger. • The charge completes when charging light turns green. • Unplug the AC adaptor from the AC outlet...
- Page 10 Installing/Removing the Battery Pack The average using time of the supplied battery pack is 8 hours. Average times is calculated by using 5% transmit time, 5% receive time, and 90% standby time. CAUTION • Do not make the battery terminals short circuit or dispose the battery into fire. • Do not try to remove the shell from the battery pack. Battery Latch. Pull the latch downward to remove the battery pack...
- Page 11 Installing the Antenna Hold the antenna base and screw the antenna clockwise into the antenna connector at the top of the transceiver, until tighten. NOTES: • In PMR version the antenna is fixed, ie it can not be removed from the device. • Don’t hang keys, speaker or microphone on the antenna. Otherwise the antenna will be damaged or performance of the radio will be degraded.
-
Page 12: Basic Functions
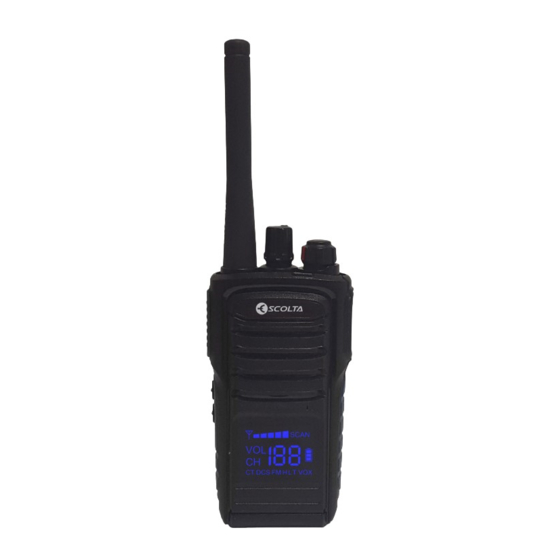
BASIC FUNCTIONS 1. Antenna 2. LED indicator • Lights red while transmitting. • Lights green while receiving a signal. • Purple light flashing when transmit with low battery power. 3. Speaker 4. Microphone 5. Hidden LCD 6. Channel selector • Rotate to select channels 7. Power switch / Volume control • Turn clockwise to switch ON the transceiver. • To switch OFF the transceiver, turn counterclockwise until a click sounds. • Rotate to adjust the volume level. 8. PTT (Push-to-talk) 9. - Page 13 ON / OFF To turn the radio on, turn the On / Off switch (7) clockwise beyond the barrier. A beep tone is emitted if the beep tone function is activated. There are 5 different tones available. To turn off the radio, please turn the On / Off switch (7) counterclockwise beyond the barrier. Volume control To change the volume level use the combined On/Off-Volume key (7). The display will show the symbol VOL and the volume level (00-10). Channel Selection For channel selection, use the rotary channel selector (6) switch. The channels are selected in the programmed order. The display will show the symbol CH and the actual channel number.
-
Page 14: General Functions
GENERAL FUNCTIONS The following settings concern the general operation of the radio. They are indendent of the channel settings. Time-out-timer (TOT) For the versions PMR, the TOT time has to activated, a max. of 180s is permitted. By default, the TOT time is set to 180 seconds. For the commercial radio versions UHF and VHF, the TOT function can be deactivated or set in a range between 30-600 seconds. A pre-alert is available and can be set up to 10s before expiration of the TOT time. Voice annunciation With activated voice annunciation, most of the settings, e.g. on/off, channel selection, tx-power switch, etc. are announced in english. Power on tone There are 5 different power-on tones available. This feature can be deactivated. Squelch The squelch can be set in a range between 0-9. (0=squelch deactivated; 9=lowest sensitivity, i.e. the signal has to be very strong to open the squelch). - Page 15 LED Hidden Display The radio has a hidden display located on the front of the radio below the speaker. There are different settings for the active status. • OFF: the display is deactivated during transmission and active during standby and during signal reception. • ON: the display is always activated (with this setting the power consumption is very high, the battery needs to be recharged more frequently) • Auto2-25: after a channel switch or the end of a transmission or reception period, the display is still active for the selected time period (in seconds). To access the VOX function, one of the function keys has to be assigned to VOX. The sensitivity levels 1-10 of the VOX function can be indiviually adjusted by software. Warning Tone For some setting changes (see multifunction key assignment), a warn tone is available. By default, it is activated but can be deactivated by software.
- Page 16 Multifunction Key Assignment 2 functions can be assigned to each function key. These are triggered by pressing the key shortly or long. How long a key has to be pressed to trigger the second function, can be set via software in a range of 0-7.5 seconds. The functions that can be assigned are: 01 – OFF non function 02 – Auto Dial. Transmit selected DTMF code 03 – Scan. Start/stop 04 – VOX. On / Off 05 – Monitor 06 – TX-power selection (High Power / Low Power) 07 – Alarm tone function 08 – Informs about actual battery level 09 – FM radio On/off (hold key) and scan start/stop (press shortly) 10 – Fir CH. Priority channel 1 11 – Sec CH. Priority channel 2 12 – Squelch OFF. (ON/OFF) Only for long press: 13 – Squelch Off temp. squelch is off as long as the key is held. 14 – 1750 Hz. Repeater tone 1750 Hz Alarm function An individual setup of the alarm function is possible with the many settings of the alarm function. E.g. it is possible to define an alarm channel, which is automatically set once the alarm function is activated.
-
Page 17: Channel Settings
CHANNEL SETTINGS The following options can be configured to each channel using software. RX Freq / TX Freq The radio has 199 programmable channels. The PMR version is exclusively programmable with the 16 PMR frequencies (446 MHz). The commercial versions UHF and VHF can be programmed in the designated frequency band according to the individual licence. For repeater operation, TX- and RX-frequencies are programmable independently. - Page 18 (Scan Add/Del) Scan You can add (add) or remove (del) the channel from the scan list through the software. Busy channel lock (BCL) Using this function, the transmission is blocked if there is a signal present on the selected channel. With VOX function it will activate the transmission with the voice without having to press PTT. The sensitivity of the VOX defines the threshold of the voice intensity to start the transmission automatically.
-
Page 19: Dtmf
Dial If DTMF is used, one of the max. 16 programmable DTMF codes has to be assigned. SP Unmute This setting determines when the squelch will open, i.e. when the speaker will unmute. There are 4 settings available. WAVE: signal regardless of any codes (CTCSS/DCS or DTMF) CT / DQT: signal with the proper CTCSS/DCS code. QD or Opt: signal with the proper CTCSS/DCS code OR DTMF code. QD and Opt: signal with the proper CTCSS/DCS code AND DTMF code. DTMF The DTMF function must be programmed by software. With its decoding and encoding features, DTMF can be used as a selective calling system. The automatic transmission of DTMF (PTT ID) codes and the STUN function (which enables remote transmission to be disabled) are also available. -
Page 20: Specifications
SPECIFICATIONS PMR: 446.00625 ~ 446.09375 MHz Frequency range VHF: 147~174 MHz UHF: 440~470 MHz Rated voltage 7.4 V Working temperature -20°C - +50°C Antenna impedance 50Ω Dimensions 63 x 115 x 37 mm Weight 251 gr. TRANSMITTER PMR: 500 mW Power output VHF: 5 W UHF: 5 W Frequency stability ±2.5PPM Maximum frequency deviation ≤ ±5kHz Remanent radiation < -60dB Modulation mode (W/N) 16KØF3E,11KØF3E Maximum frequency deviation ≤ 2.5kHz (N), ≤ 5kHz (W) Audio distortion ≤ 3% Adjacent channel power ≥ 60dB RECEIVER W: 0.223uV>12dB RF sensitivity N: 0.223uV>12dB Audio distortion ≤ 3% Adjacent Channel Selectivity ≥ 60dB Intermodulation Rejection... -
Page 21: Troubleshooting Guide
TROUBLESHOOTING Problem Solutión No power • Battery may run out of power, please update the battery or recharge the battery. • The battery pack may not be in- stalled correctly. Remove the battery pack and install it again. Battery power off The battery pack life is over. shortly after charging Replace the battery pack with a new one. Can not talk to or hear other mem- • Make sure you are using the bers in your group same frequency and Quiet Talk tone as the other mem- bers in your group. • Other group members may be too far away. Make sure you are within the working range of the transceivers. Other voices (besides group Change the Quiet Talk tone. Be members) are present on the sure to change the tone on all channel transceivers in your group. -
Page 22: Dcs / Ctcss Codes
50 CTCSS (Hz) 67.0 94.8 131.8 171.3 203.5 69.3 97.4 136.5 173.8 206.5 71.9 100.0 141.3 177.3 210.7 74.4 103.5 146.2 179.9 218.1 77.0 107.2 151.4 183.5 225.7 79.7 110.9 156.7 186.2 229.1 82.5 114.8 159.8 189.9 233.6 85.4 118.8 162.2 192.8 241.8... -
Page 23: Declarations Of Conformity
Product description: Equipment: PMR-446 Handheld transceiver Brand: ESCOLTA Model: ALFA RP-101 Manufacturer: FALCON RADIO & ACCESSORIES SUPPLY, S.L. Made in: CHINA We, FALCON RADIO & A.S., S.L. declare under our sole responsibility that the above named product it´s conforms to the provisions of the Directive 2014/53/UE of the... - Page 24 EU DECLARATION OF CONFORMITY FALCON RADIO & ACCESSORIES SUPPLY, S.L. CIF: B-60565314. C/ Vallespir, nº 13. Polígono Industrial Fontsanta. 08970 San Joan Despí - Barcelona (ESPAÑA). Product description: Equipment: PMR VHF handheld transceiver Brand: ESCOLTA Model: ALFA RP-201 Manufacturer: FALCON RADIO & ACCESSORIES SUPPLY, S.L. Made in: CHINA We, FALCON RADIO &...
- Page 25 EU DECLARATION OF CONFORMITY FALCON RADIO & ACCESSORIES SUPPLY, S.L. CIF: B-60565314. C/ Vallespir, nº 13. Polígono Industrial Fontsanta. 08970 San Joan Despí - Barcelona (ESPAÑA). Product description: Equipment: PMR UHF handheld transceiver Brand: ESCOLTA Model: ALFA RP-301 Manufacturer: FALCON RADIO & ACCESSORIES SUPPLY, S.L. Made in: CHINA We, FALCON RADIO &...
Need help?
Do you have a question about the RP-101 and is the answer not in the manual?
Questions and answers