Table of Contents
Advertisement
Quick Links
TECSUN
AM BW AM Bandwidth Selection
User Manual Page 15
Select a bandwidth to improve the intelligibility of LW/MW/SW signals.
AM bandwidths:
LW/MW: 2.3kHz, 3.5kHz, 5.0kHz and 9.0kHz
SW: 2.3kHz, 3.5kHz, 5.0kHz and 6.0kHz
SSB bandwidths:
0.5kHz, 1.2kHz, 2.3kHz, 3.0kHz and 4.0kHz
User Manual Page 8
VOLUME CONTROL
PAGE -/+ Memory Page Selection
User Manual Pages 11-14
Quick press to select the memory page (P0 - P24) for storing a frequency. P0 is the default memory
page for ATS and can store 750 frequencies (100 each for FM/LW/MW, 250 for SW, 100 for SSB,
and 100 for SYNC). Pages P1 - P24 can store 100 frequencies for FM/LW/MW/SW.
TREBLE CONTROL
User Manual Page 20
LEFT-CHANNEL SPEAKER
User Manual Page 20
BASS CONTROL
0 – 9 KEYS
User Manual Pages 7, 10, 13, 17 and 18
Can be used for (e.g.) direct frequency input, audio file selection, clock/alarm setting.
FM SET (key "1") Sets the FM Frequency Range
User Manual Page 7
With the device off, press and hold [ 1 ], followed by repeated presses to select the required frequency range.
The display shows
,
,
,
, which corresponds with 64 ~ 108MHz, 76 ~ 108MHz, 87 ~ 108MHz
and 87.5 ~ 108MHz respectively. After selecting an appropriate frequency range, quick press [
] to confirm,
or wait for 2 seconds to automatically confirm.
LW ON / OFF (key "2") Enables/Disables Longwave
User Manual Page 7
With the device off, press and hold [ 2 ]:
"
": Longwave is enabled.
"
": Longwave is disabled.
9 / 10kHz (key "3") Medium Wave (AM) Step Selection
User Manual Page 7
With the device off, press and hold [ 3 ]:
"
": Tuning step is set at 9 kHz with a frequency range of 522~1620 kHz (suitable for Asia, Europe, Oceania).
"
": Tuning step is set at 10 kHz with a frequency range of 520~1710 kHz (suitable for the Americas).
BACKLIGHT
(key "5")
User Manual Page 19
With the device on, press and hold [ 5 ] to select your backlight preference.
"
": Backlight stays on.
"
":
Backlight turns on when a button or knob is used and turns off after 5 seconds.
AUTO SORTING MEMORY (key "0")
User Manual Page 12
Automatically sort all station frequencies that have been stored in the memory.
1. With the device turned off.
2. Press and hold [ 0 ] until the memory page number in the upper right corner of the display shows
~
.
3. Sorting has completed once the memory page number stops running.
DIGITAL AUDIO INPUT (left side)
User Manual Page 17
Use H-501x as a computer speaker:
1. Turn on the device.
2. Quick press [ MODE ] to enter the audio player mode.
3. Use a micro-USB type-B data cable to connect to a computer.
4. Turn on the computer's audio player.
EARPHONES
User Manual Page 20
Listen to stereo broadcasts and music with stereo headphones up to 300 ohms.
LINE IN Stereo Audio Input
User Manual Page 20
To use H-501x as an active speaker, connect the audio output of the audio source
to the "LINE IN" socket with a stereo audio cable. While in use, volume and tone
can be adjusted with the [ VOLUME ], [ TREBLE ] and [ BASS ] knobs.
LINE OUT Stereo Audio Output
User Manual Page 20
For external amplifiers or recording equipment.
V031220
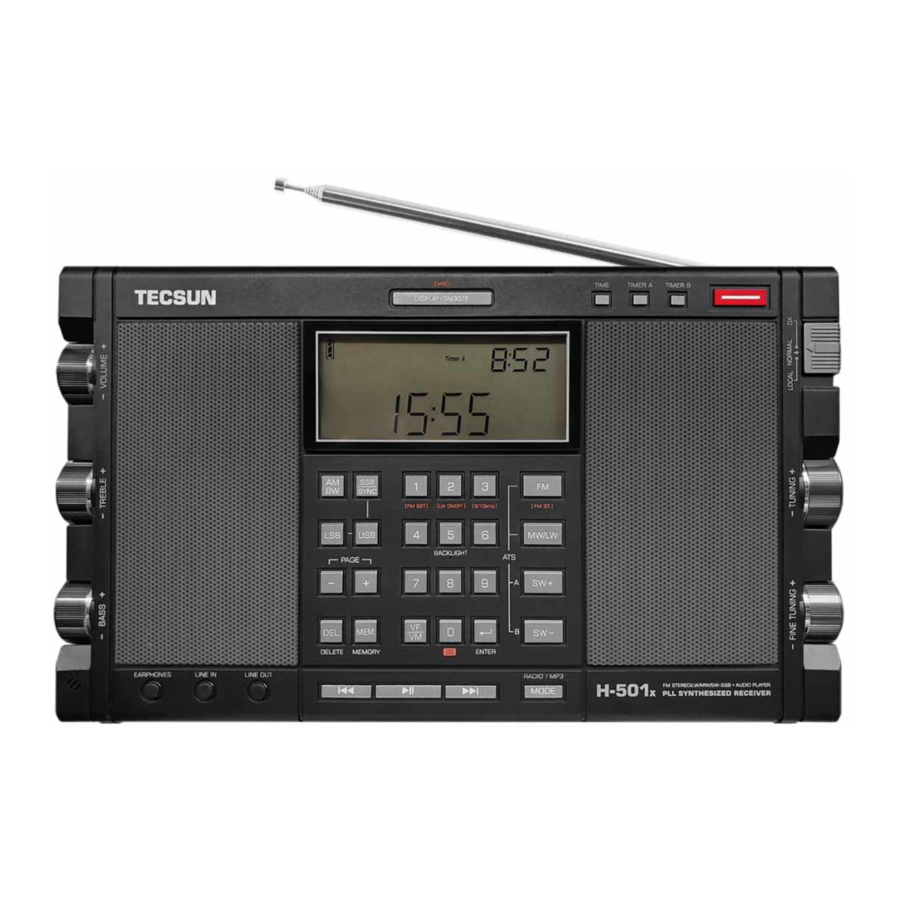
H-501x
QUICK START
FM-stereo / Longwave / Medium Wave / Shortwave-SSB
SSB / SYNC Single Sideband / Synchronous Detector
User Manual Page 15
When receiving longwave / medium wave / shortwave signals:
● Quick press to switch between AM (Amplitude Modulation) and SSB (Single Sideband).
● Press and hold to enable the synchronous detector, the display shows " SYNC ".
Quick press again to disable.
LSB Lower Sideband
User Manual Page 15
USB Upper Sideband
User Manual Page 15
WHIP ANTENNA
User Manual Page 9
For FM and shortwave reception.
VF / VM
Tuning Frequencies
Browsing Memory
User Manual Pages 8, 10, 12, 13 and 14
● Quick press to switch between View Frequency (VF) and View Memory (VM) modes.
● In VF mode, press and hold to auto scan for stations in the selected frequency band.
● In VM mode, press and hold to auto scan stored frequencies of the selected memory page.
Press any key (except [ DEL. ]) to stop auto scan.
MEM. Memory
User Manual Pages 11, 12 and 19
To store stations or selecting a station or audio track for the alarm feature.
An easy way to store radio frequencies:
1. Tune into the frequency you want to store.
2. Press [ MEM. ], causing the memory location on the display to flash.
3. Press [ MEM. ] again to confirm, or wait for 2 seconds to confirm automatically.
DEL. Delete
User Manual Pages 14, 17
Quick press to delete stored frequencies or audio files from an inserted microSD card.
RESET System Reset (bottom side)
User Manual Page 22
If the radio malfunctions, use a pointy object to press the [ RESET ] button. This operation does not delete
any stored stations.
MicroSD Card Slot (bottom side)
User Manual Page 16
Supports microSD cards up to 128GB.
Audio Player
DISPLAY
User Manual Page 5
User Manual Pages 16, 17, 19 and 20
DISPLAY / SNOOZE
● Snooze: When the power-on alarm time is reached (TIMER A / TIMER B), quick press the button to
temporarily turn off the device; it will turn on again after 5 minutes.
● Display: While listening to radio, quick press to switch between Signal Strength/Signal-to-Noise Ratio, alarm time,
clock time and memory location information.
● Display: While listening to the audio player, quick press to display the current album number and the total number of tracks
within the album. Quick press again to display the total number of albums and audio tracks.
● Keylock: Press and hold, causing the "
" icon to appear on the display. All keys and tuning knobs are disabled.
Press and hold again to restore the functions.
SELECT BATTERY A
B (back side)
Select the battery to be used for powering/charging.
User Manual
BATTERY COMPARTMENT (bottom side)
Pages 4 and 6
Holds two 18650 batteries. One spare battery and one for powering/charging.
ENTER
User Manual Pages 7, 10, and 17-19
Quick press to confirm entered information.
MODE Radio
Audio Player
User Manual Page 16
Quick press to switch between radio and audio player mode.
AUDIO PLAYBACK CONTROLS
User Manual Pages 16-17
This device supports 16bit / 44.1kHz audio files in FLAC / WAV / APE / WMA
and MP3 formats.
[
]
Play/Pause: Quick press
Repeat track: Press and hold
[
] Previous: Quick press twice
Restart track: Quick press
Rewind: Press and hold
[
] Next: Quick press
Fast forward: Press and hold
TIME Clock Time
User Manual Page 7
● Time setting (24-hour clock)
1. Press and hold [ TIME ] until the clock flashes.
2. Use the numeric keys to enter the time (4 digits).
● With the device on, quick press to switch between clock and radio/MP3 display.
TIMER A, TIMER B Auto Turn-On (Alarm)
User Manual Page 18-19
Two independently programmable alarm time settings, at which point the device turns on automatically. The settings and
operations of TIMER A and TIMER B are the same. The following uses TIMER A as an example.
Quick press [ TIMER A ] to enable the alarm, the "
" icon is shown on the display. Press again to disable the alarm,
the "
" icon is no longer displayed.
● Setting the alarm time (with the device turned off)
1. Press and hold [ TIMER A ], causing the alarm time to flash in the upper right corner of the display.
2. While still flashing, use the numeric keys to enter the alarm time. The display then shows the alarm duration,
while "
" and "
" are flashing.
3. While still flashing, rotate the [ TUNING ] knob to set the duration of the alarm (01 - 60 minutes).
4. Quick press [ TIMER A ] to confirm the setting.
● Alarm by Radio / Audio Player
You can set the alarm so the device turns on to a radio broadcast or by playing an audio file from an inserted microSD card.
1. Alarm by Radio
1) Turn the device on, then select a station frequency for the alarm and set an appropriate volume level.
2) Quick press [ MEM. ], causing the memory location in the upper right corner of the display to flash.
3) While flashing, quick press [ TIMER A ], causing the alarm icon "
" to flash.
4) Quick press "
" to confirm the setting.
2. Alarm by Audio Player
1) Insert a microSD with supported audio files and then turn on the device.
2) Enter the audio player mode, then select the desired audio file and set an appropriate volume level.
3) Quick press [ MEM. ], causing "
" to flash.
4) While flashing, press [ TIMER A ], causing the "
" and "
" icons to flash.
5) Quick press "
" to confirm the setting.
POWER / SLEEP
User Manual Pages 8, 14, and 19-20
● Power on/off: Quick press
● Sleep Timer: With the device turned off, press and hold, then rotate the tuning knob to select the number of minutes
(01 – 120) you would like the radio to play before shutting off. Select "
" to disable the Sleep Timer.
FM ANTENNA External Antenna Socket (right side)
Socket to connect external antennas for enhancing FM reception. Caution! When using an outdoor antenna, waterproofing
and lightning protection measures must be taken.
AM ANTENNA External Antenna Socket (right side)
Socket to connect external antennas for enhancing long wave, medium wave (AM) and shortwave. Caution! When using an
outdoor antenna, waterproofing and lightning protection measures must be taken.
(AM) DX / LOCAL GAIN SELECTION
User Manual Page 15
DX: For distant or weak signals; NORMAL: Standard; LOCAL: For near or strong signals.
RIGHT-CHANNEL SPEAKER
TUNING Multifunctional Knob
User Manual Pages 7, 10 - 14, 16-18
Can be used (e.g.) to tune the frequency bands, browse through a memory page, select audio files on the microSD card.
KEYPAD LED Location Guidance Light for the Visually Impaired
Multifunctional Knob
FINE TUNING
User Manual Pages 7, 10, 15, 17
Can be used (e.g.) to tune the frequency bands, select memory pages, switch between audio albums, select an AM bandwidth.
1A Charging Input Socket (right side)
CHARGE 5V
User Manual Page 6
Place a 18650 rechargeable lithium battery in either the A or B compartment, push the battery selection switch to the
related position, and then connect a 5V / 1A DC charger using a micro-USB type-B cable.
BAND SELECTION /ATS
User Manual Pages 10-12
FM / FM ST.: Quick press for FM radio. While listening, quick press to select mono or stereo mode.
MW/LW: Quick press for medium wave (AM) band, quick press again to select longwave band.
SW -/+: Quick press for shortwave band or to change meter bands.
Selectable in SW: 120m / 90m / 75m / 60m / 49m / 41m / 31m / 25m / 22m / 19m / 16m / 15m / 13m / 11m
Selectable in SSB mode: 160m / 80m / 60m / 40m / 30m / 24m / 20m / 17m / 15m / 12m / 10m
ATS: Please select an empty memory page before initiating Auto Tuning Storage.
FM/MW/LW: Press and hold the band button to automatically search and store stations.
SW: Press and hold [ SW - ] to search and store shortwave stations within all meter bands.
Press and hold [ SW + ] to search and store shortwave stations in the current meter band.
TECSUN ELECTRONIC IND. LTD.
Address: Unit 11, 13/F, Block A, Hoi Luen Ind. Ctr., 55 Hoi Yuen Road,
Kwun Tong, Kowloon, Hong Kong.
E-mail:
tecsun@on-nets.com
Website: www.tecsun.com.cn
www.tecsun-audio.com
Advertisement
Table of Contents

Subscribe to Our Youtube Channel
Related Manuals for Tecsun H-501x


Summary of Contents for Tecsun H-501x
- Page 1 User Manual Page 22 To use H-501x as an active speaker, connect the audio output of the audio source Selectable in SW: 120m / 90m / 75m / 60m / 49m / 41m / 31m / 25m / 22m / 19m / 16m / 15m / 13m / 11m Repeat track: Press and hold to the “LINE IN”...
Need help?
Do you have a question about the H-501x and is the answer not in the manual?
Questions and answers
I **** not able to start up my roku t.v ?