Advertisement
Quick Links
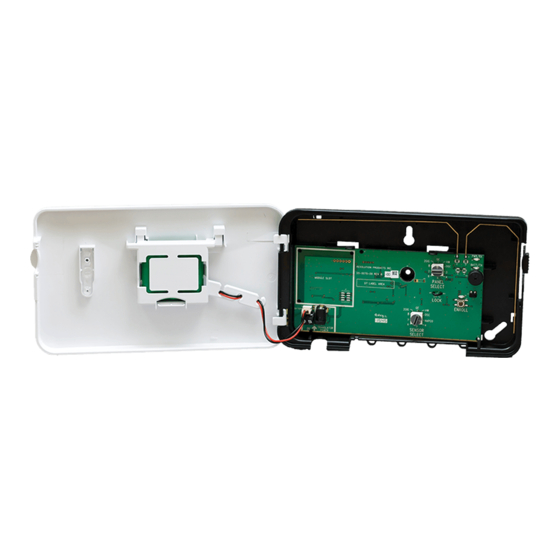
Installation Guide: RE524X & RE524XC Universal Wireless Translator™
Features
•
Selectable wireless panel and sensor compatibility
•
Translator or repeater operation
•
Rechargeable backup battery
•
Cover tamper
•
Certified to UL1023, ULC1023, UL1610, and ULC S304
Quick Setup
1
MOUNT AND WIRE
A Select a mounting position and location.
B Connect the power supply to the translator.
2
TRANSLATOR CONFIGURATION
A Select the brand of panel that the translator must
talk to using the "PANEL SELECT" knob.
B Select the brand of sensors that the translator must
listen to using the "SENSOR SELECT" knob.
C Sensor configuration: The translator must learn
the sensors that are to be translated or repeated.
a) Press the "CONFIGURE" button to enter configuration mode.
b) Tamper or trip all sensors that are to be included in the system
c) Press the "CONFIGURE" button to exit configuration mode.
3
PANEL ENROLLMENT
(For full sensor enrollment instructions, refer to Advanced Setup, step 3)
A Enroll Translator into Panel.
• Trip the translator tamper to enroll the translator into the panel (For Honeywell® and 2GIG® panels select loop 1).
-or-
• Enter ID into panel. The translator's ID is printed on the bar code label.
B Enroll Sensors into Panel
• With the translator cover open, trip each sensor to enroll it into to the panel.
• Finish setup of each sensor at the panel.
4
FINISH
A With the translator cover open, perform a panel sensor test.
B Close the cover. Test and verify proper operation of the sensors at the panel.
C Cut the lock wire to lock the translator (For more information on locking, refer to Advanced Setup, step 4).
D Secure cover with screw.
Wall mounting
screw locations
Wall Tamper
(Do not overtighten
mounting screw)
(Mounting hardware not included. Use two
DIAGRAM
#4 or # 6 screws for mounting )
Advertisement

Subscribe to Our Youtube Channel
Related Manuals for Alula RE524X

Summary of Contents for Alula RE524X
- Page 1 Installation Guide: RE524X & RE524XC Universal Wireless Translator™ Features • Selectable wireless panel and sensor compatibility • Translator or repeater operation • Rechargeable backup battery • Cover tamper • Certified to UL1023, ULC1023, UL1610, and ULC S304 Quick Setup MOUNT AND WIRE A Select a mounting position and location.
- Page 2 Advanced Setup PANEL ENROLLMENT (continued) MOUNT AND WIRE B Enroll Sensors into panel: A Select a mounting position and location. • With the translator cover open, tamper or trip each sensor • Mount the translator at least 5 feet from the Control Panel’s to send an enrollable transmission to the panel.
- Page 3 PANEL ENROLLMENT (continued) Notes DSC ® SENSORS A Translator enrollment: • If the translator loses both 12VDC input power and battery back up power, sensor configuration data is retained. a) Enter Wireless Enrollment mode. • Low battery, tamper, and supervisory signals are reported by the b) Trip the translator cover tamper to enroll the translator.
- Page 4 ALULA PRODUCTS WILL FUNCTION WITH ONE OF EITHER INTERLOGIX (FORMERLY GE), HONEY- Tamper Activation Cover Opening, Wall Removal WELL, DSC, 2GIG OR QOLSYS SYSTEMS. HOWEVER, NO ALULA PRODUCT IS PRODUCED BY, ENDORSED Mounting Screws #4 or #6 BY, NOR IS OFFICIALLY ASSOCIATED WITH INTERLOGIX (FORMERLY GE), HONEYWELL, DSC, 2GIG, QOLSYS OR NAPCO.
Need help?
Do you have a question about the RE524X and is the answer not in the manual?
Questions and answers