Advertisement
Quick Links
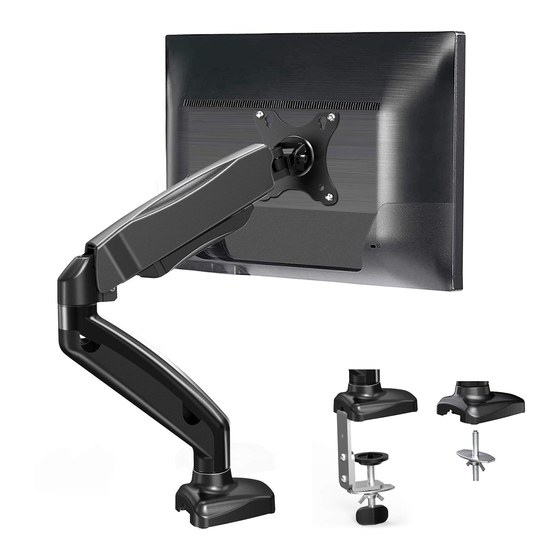
Single Arm Monitor Desk Mount
Instruction Manual
V2.0
Model: EBSSK4
Thank you for choosing this product! We strive to provide you with
the best quality products and services in the industry. Should you
have any issues, please don't hesitate to contact us at
JKO2YU@outlook.com (US/CA)
Advertisement

Related Manuals for Ergo Tab EBSSK4

Summary of Contents for Ergo Tab EBSSK4
- Page 1 Single Arm Monitor Desk Mount Instruction Manual V2.0 Model: EBSSK4 Thank you for choosing this product! We strive to provide you with the best quality products and services in the industry. Should you have any issues, please don't hesitate to contact us at...
-
Page 2: Important Safety Information
IMPORTANT SAFETY INFORMATION Please carefully read all instructions before attempting installation. If you do not understand the instructions or have any concerns or questions, please contact our customer service at JKO2YU@outlook.com. • Do not use this product for any purpose that is not explicitly specified in this manual. - Page 3 Product Features C-Clamp Mounting Grommet Mounting - 02 -...
- Page 4 TENSION ADJUSTMENT SHOULD BE DONE ONLY AFTER MOUNT INSTALLATION Warning Do not adjust tension without monitor. 1. Ensure monitor has been attached to the mount. 2. Read your monitor box or manual to find out monitor net weight. 3. Ensure the net weight of monitor (including accessories) is within 17.6 Ibs (8 kg).
- Page 5 Supplied Parts and Hardware for Step 1 Connecting Desk Bolt Bolt Bottom Plate Clamp M6x10mm M6x12mm Plate Butterfly Grommet 5/32in.(4mm) Plate Allen Key Bolt Supplied Parts and Hardware for Step 2 VESA Bolt Bolt Washer Spacer Plate M4x12mm M4x30mm L13mm M-A x4 M-B x4 M-C x4...
- Page 6 Secure Desk Clamp [C] to Connecting Plate [B] According to the 1A-2 Thickness of the Desktop 1A-3 Secure the Mount Assembly to Desktop Step 1B For Grommet Mounting 1B-1 Secure Bottom Plate [F] and Bolt [H] to Arm [A] 1B-2 Secure the Mount Assembly to the Desktop Max: 2.36in.(60mm)
- Page 7 Step 2 Attach the Monitor Plate [K] to the Monitor Select Monitor Bolts Only one bolt size fits your monitor. M4x12mm M4x30mm Too Short Too Long Correct Correct Option A [Flat Back Monitor (Universal Monitor Plate)] Option B [Round Back Monitor (Universal Monitor Plate)] Step 3 Secure the Monitor to Arm Assembly The tension is preset at 4-5kg.
- Page 8 Step 4 Adjust the Gas Spring Tension Be sure to keep the arm in horizontal position during adjustment. Or else, it would be difficult to adjust the mount or damage the mount. 1. If the monitor can stay at the desired height by itself, no adjustment needed.
- Page 9 Step 6 Adjustments Tilt Adjustment “+” Clockwise: Tighten “-” Counter-clockwise: Loosen Situation 1: If the monitor can stay at the desired tilt angle by itself, no adjust- ment needed. Situation 2: If the monitor can not stay at the desired tilt angle by itself, turn the bolt clockwise or counter-clockwise as shown until the monitor can stay at the desired tilt angle by itself.
- Page 10 Step 7 Route the Cables Along the Arm [A] Step 7-1 Detach the cable covers from the arm [A] Note: Loosen the preassembled bolts from the covers, then pinch the both sides of the bottom end of the cable covers to make it detach from the arm Step 7-2 Route the cables along the arm and secure the cable covers to the arm [A] Note: Pinch the both side of the bottom end of the...
- Page 12 Thank you again choosing this product! All of us do appreciate your product purchase. We hope that you are as happy with your product as we designing and manufacturing it for you. We strive to provide you with the best quality products and services in the industry.
Need help?
Do you have a question about the EBSSK4 and is the answer not in the manual?
Questions and answers