
Related Manuals for Makita XCV23


Summary of Contents for Makita XCV23
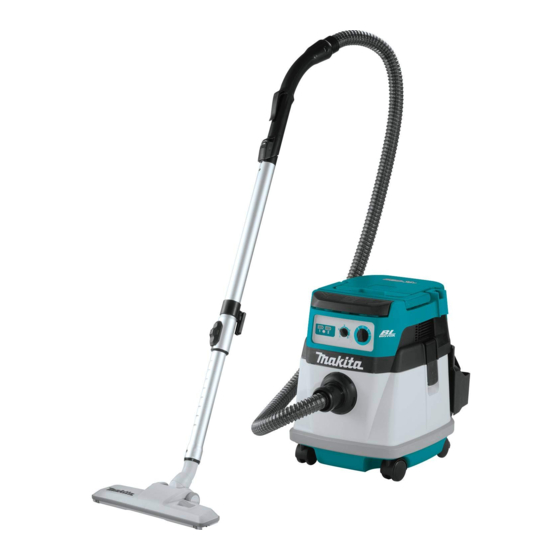
- Page 1 INSTRUCTION MANUAL MANUAL DE INSTRUCCIONES Cordless Vacuum Cleaner Aspiradora Inalámbrica XCV20 XCV23 IMPORTANT: Read Before Using. IMPORTANTE: Lea antes de usar.
-
Page 2: Specifications
ENGLISH (Original instructions) SPECIFICATIONS Model: XCV20 XCV23 Standard filter type Cloth filter (for dry and wet dust) Maximum air volume (with BL1850B, Φ32 mm (1-1/4") x 1.7 m (67") hose) 2.1 m /min (74.15 cu.ft/min) Vacuum (with BL1850B, Φ32 mm (1-1/4") x 1.7 m (67") hose) - Page 3 Do not handle battery or appliance Sharp objects (glass, cutlery, • with wet hands. wood splinter, metal, stone, nail, razor, push pin, etc.) Do not put any object into openings. Do not use with any opening blocked; Solidifying and conductive fine •...
- Page 4 Symbols Recharge only with the charger specified by the manufacturer. A charger that is suitable for one type of The followings show the symbols used for battery pack may create a risk of fire tool. when used with another battery pack. Use appliances only with specifically desig- volts nated battery packs.
-
Page 5: Parts Description
Only use genuine Makita batteries. Use of non-genuine Makita batteries, or batteries that have been altered, may result in the battery bursting causing fires, personal injury and damage. It will also void the Makita warranty for the Makita tool and charger. 5 ENGLISH... -
Page 6: Functional Description
To remove the battery cartridge, slide it from the tool FUNCTIONAL while sliding the button in front of the cartridge. DESCRIPTION CAUTION: Always install the battery cartridge fully until the red indicator cannot be seen. If not, it may accidentally fall out of the cleaner, causing CAUTION: Always be sure that the tool is injury to you or someone around you. -
Page 7: Overload Protection
Indicating the remaining battery Tool / battery protection system capacity The tool is equipped with a tool/battery protection sys- tem. This system automatically cuts off power to the motor to extend tool and battery life. The tool will auto- matically stop during operation if the tool or battery is placed under one of the following conditions: Overload protection When the tool is operated in a manner that causes it to... - Page 8 Suction power can be increased by turning the suc- Carriage handle tion force adjusting knob from the symbol to symbol. When carrying the cleaner, carry it by holding the han- dle on the head. The handle is retractable at the head NOTICE: Always set the stand-by switch to the "O"...
-
Page 9: Installing The Water Filter
Mount the tank cover and lock it. NOTE: It is recommended using water filter when picking up large amount of water repeatedly. Otherwise vacuum ability may be reduced in case of cloth filter. Installing the paper pack Optional accessory WARNING: Before using the paper pack, make sure that the cloth filter or prefilter is used together. -
Page 10: Installing The Tool Box
Installing the polyethylene bag Emptying the polyethylene bag Cleaner can also be used without polyethylene bag. WARNING: Always make sure that the cleaner However, using polyethylene bag is easier to empty the is switched off and the battery cartridge is removed tank without letting your hands dirty. -
Page 11: Connecting The Hose
The tool box is convenient for carrying batteries, pipe, Connecting the attachment with or cuffs. lock function Optional accessory Insert the attachment into the suction inlet until it clicks. To remove, pull the attachment while pushing the release button. Connecting the hose NOTICE: Never force the hose for bending or stamp it. -
Page 12: Maintenance
To maintain product SAFETY and RELIABILITY, repairs, any other maintenance or adjustment should be performed by Makita Authorized or Factory Service Centers, always using Makita replacement parts. Storage of accessories The pipes can be placed into the pipe holder when not using the cleaner for a short time. -
Page 13: Optional Accessories
OPTIONAL ACCESSORIES CAUTION: These accessories or attachments are recommended for use with your Makita tool specified in this manual. The use of any other accessories or attachments might present a risk of injury to persons. Only use accessory or attachment for its stated purpose. -
Page 14: Especificaciones
ESPAÑOL (Instrucciones originales) ESPECIFICACIONES Modelo: XCV20 XCV23 Tipo de filtro estándar Filtro de tela (para polvo seco y húmedo) Volumen de aire máximo 2,1 m /min (74,15 cu.ft/min) (con BL1850B, manguera de Φ32 mm (1-1/4″) x 1,7 m (67″)) Aspiradora (con BL1850B, manguera de Φ32 mm (1-1/4″) x 1,7 m (67″)) - Page 15 No lo utilice con una batería dañada. Si Materiales inflamables (tóner, • el aparato no está funcionando como pinturas, aerosoles, etc.) debiera, se ha dejado caer, se ha dañado, Espumas, como limpiadores de • se ha dejado a la intemperie o ha caído alfombras, etc.
- Page 16 Este aparato no se destina para utili- En condiciones abusivas, podrá zarse por personas (incluyendo niños) escapar líquido de la batería; evite cuyas capacidades físicas, sensoria- tocarlo. Si lo toca accidentalmente, les o mentales sean diferentes o estén enjuague con agua. Si hay contacto reducidas o carezcan de experiencia o del líquido con los ojos, busque de conocimiento, a menos que dichas...
- Page 17 Utilice las baterías únicamente con a un médico. Esto podría ocasionar los productos especificados por pérdida de visión. Makita. Instalar las baterías en pro- Evite cortocircuitar el cartucho de ductos que no cumplen con los requi- batería: sitos podría ocasionar un incendio, un No toque las terminales con nin- calentamiento excesivo, una explosión...
-
Page 18: Descripción De Las Piezas
Asimismo, esto inva- PRECAUCIÓN: Asegúrese siempre de que la lidará la garantía de Makita para la herramienta y el herramienta esté apagada y el cartucho de batería cargador Makita. haya sido extraído antes de realizar cualquier Consejos para alargar al máximo... - Page 19 Para quitar el cartucho de batería, sáquelo de la herra- Indicación de capacidad restante de mienta mientras desliza el botón enfrente del cartucho. la batería PRECAUCIÓN: Siempre introduzca comple- tamente el cartucho de batería hasta que el indi- cador rojo no pueda verse. De lo contrario, podría salirse accidentalmente de la aspiradora y ocasio- narle lesiones a usted o a alguien a su alrededor.
-
Page 20: Protección Contra Sobrecarga
Para poner la aspiradora en el modo en espera, oprima Sistema de protección para la nuevamente el botón de encendido/apagado. herramienta/batería Para apagar la aspiradora, ajuste el interruptor de modo en espera en el lado “O”. La herramienta está equipada con un sistema de pro- La potencia de succión se puede ajustar según sus tección de la herramienta/batería. -
Page 21: Mango De Transporte
Coloque el prefiltro en el tanque alineando las NOTA: Cuando mueva la aspiradora, asegúrese de marcas de posición de montaje. que la rueda esté desbloqueada. El mover la aspi- radora con la rueda en la posición bloqueada podría Instale el amortiguador en el filtro de polvo y luego causar daños a la rueda. - Page 22 Para aspirar solamente agua o polvo húmedo, es más Alinee la abertura de la bolsa de papel para polvo conveniente usar el filtro de agua que el filtro de tela. con la abertura de succión de polvo de la aspiradora. Cuando instale el filtro de agua, alinee su marca de Inserte el cartón de la bolsa de papel para polvo posición de montaje con la del tanque.
-
Page 23: Conexión De La Manguera
Extienda la bolsa alrededor de la parte superior del NOTA: Retire con cuidado la bolsa de polietileno del tanque de manera que el borde del filtro de tela/prefiltro tanque de manera que ésta no pueda quedar engan- pueda agarrar y sujetar la bolsa firmemente. chada y romperse por la protuberancia en el interior del tanque al vaciarla. -
Page 24: Mantenimiento
Makita, empleando ► 1. Entrada de succión con la función de bloqueo 2. Botón siempre repuestos Makita. -
Page 25: Accesorios Opcionales
Estos accesorios o aditamen- tos están recomendados para utilizarse con su La obstrucción del filtro de tela causa que el desem- herramienta Makita especificada en este manual. peño de la succión sea deficiente. El empleo de cualquier otro accesorio o aditamento Limpie el filtro de tela ocasionalmente. - Page 26 GARANTÍA LIMITADA DE MAKITA Ésta Garantía no aplica para México Consulte la hoja de la garantía anexa para ver los términos más vigentes de la garantía aplicable a este producto. En caso de no disponer de esta hoja de garantía anexa, consulte los detalles sobre la garantía descritos en el sitio web de su país respectivo indicado...
- Page 28 Para reducir la exposición a estos productos químicos: trabaje en un área bien ventilada y póngase el equipo de seguridad indicado, tal como las máscaras contra polvo que están especialmente diseñadas para filtrar partículas microscópicas. Makita Corporation 3-11-8, Sumiyoshi-cho, Anjo, Aichi 446-8502 Japan 885779-949...
Need help?
Do you have a question about the XCV23 and is the answer not in the manual?
Questions and answers