Table of Contents
Advertisement
Quick Links
Advertisement
Table of Contents

Related Manuals for ARTDEV AS-7210 V2


Summary of Contents for ARTDEV AS-7210 V2
- Page 1 AS-7210 V2 / AS-7310 V2 User Manual Version: AS-7x10V2_UM_EN_V1.0.2...
- Page 2 Notice AS-7210 V2 and AS-7310 V2 (mentioned as AS-7x10 V2 in this manual) are a lightweight programmable data terminal. A SDK based on C is provided including user-friendly IDE and fully functional APIs. Before operating the terminal, please make sure you carefully read the following information to ensure that your terminal is able to perform at the level for which it is designed.
-
Page 3: Table Of Contents
Contents Notice ................................i Contents ..............................ii 1 Specifications ............................1 1-1 Technical specifications ........................ 1 1-2 Default settings for each barcode ....................4 1-3 Dimensions ........................... 6 1-4 Parts of the terminal ........................7 1-5 Keys Introduce ..........................8 1-6 Parts of the cradle ......................... - Page 4 6 Barcode programming instructions ....................27 6-1 Example: Single-parameter setting by scanning 1D barcodes ..........27 6-2 Decode illumination and decode aiming pattern ................ 28 6-3 DPM, Multiple symbols, Structured append, etc. read setting ........... 29 6-4 Scanning mode and some global settings .................. 33 6-5 UPC-A ............................
-
Page 5: Specifications
1 Specifications 1-1 Technical specifications Table 1-1 Technical specifications AS-7210 V2 AS-7310 V2 Working range Bluetooth: 30m(line of sight) Radio link Bluetooth: 2.4–2.5GHz, Bluetooth 4.0/3.0/2.1+EDR, Class 2 Bluetooth: HID keyboard, SPP, BLE Interface USB: USB HID keyboard, USB virtual COM, U Disk... - Page 6 Standby time 14 days 7 days Bluetooth: 22 hours Bluetooth: 19 hours Working time (based on 1 scan/5 seconds) (based on 1 scan/5 seconds) Light source 650nm visible laser diode white light Image size 1280×800 pixels Scanning angle Horizontal:42°,vertical:26.5° ±50°,±65°,±35° ±70°,±72°,360°...
- Page 7 Laser safety: EN60825-1,Class 1 EMC:EN55022,EN55024 Electrical safety: EN60950-1 Safety Illumination: 0~100,000LUX Protection class: IP65 Drop resistance: Multiple 1.2m(4.9ft)drops to concrete Environmental: RoHS compliant *Bluetooth is optional (Alternative).
-
Page 8: Default Settings For Each Barcode
1-2 Default settings for each barcode Table 1-2 Default settings Check Check Read Proprietar digit digit Min.cod Code type enabl verificat transmi e length code ID code ID ssion UPC-A √ √ √ (12) UPC-E √ √ √ (8) UPC-E1 √... - Page 9 Note: The settings for ISBN/ISSN and EAN-13 must be the same. Fixed-length barcodes. The settings for GS1 DataBar Truncated and GS1 DataBar must be the same.
-
Page 10: Dimensions
1-3 Dimensions Figure 1-1 Dimensions of the terminal Figure 1-2 Dimensions of the cradle... -
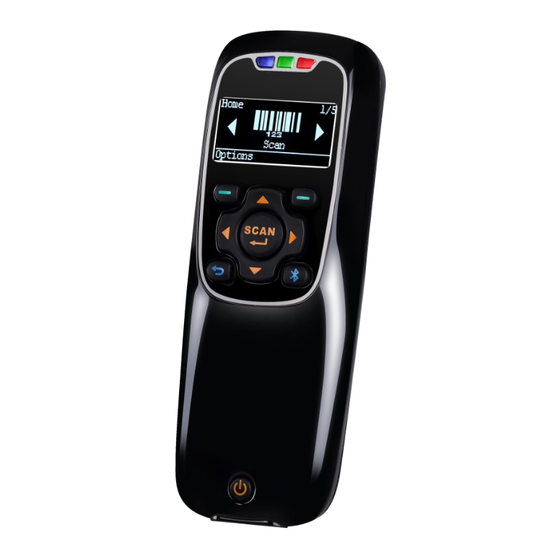
Page 11: Parts Of The Terminal
1-4 Parts of the terminal Figure 1-3 Parts of the terminal ○ ,1 Blue LED (Bluetooth power); Green LED (Decode success); Red LED (Charging indicator) ○ ,2 OLED ○ ,3 Left soft key ○ ,4 Right soft key ○ ,5 Up navigation key ○... -
Page 12: Keys Introduce
1-5 Keys Introduce Operations, such as scrolling and selecting menus, moving a cursor, or scanning a barcode, are controlled by trigger keys and stroke keys. Table 1-3 Key functions Key/Action/Feature Part Position Description ○ Left soft key Functionalities are identified by the screen display. In general, the acknowledge/non-acknowledge of ○... -
Page 13: Parts Of The Cradle
1-6 Parts of the cradle Figure 1-4 Parts of the cradle ○ ,19 Charging (Green) ○ ,20 USB interface ○ ,21 Firmware upgrade key... -
Page 14: Introduction To Installation
2 Introduction to installation 2-1 Installing a USB HID keyboard wired terminal Note: The default interface of the terminal is Bluetooth. Please change the interface to USB HID Keyboard (See 5-2 Data Transfer). Refer to Figure 2-1, plug one end of the USB cable to the terminal. Plug the other end into the USB port of the computer. - Page 15 Figure 2-2 Diagram of replacing the Lithium-ion battery...
-
Page 16: Getting Started
3 Getting started 3-1 Power on/off terminal Power on terminal: Press the Power/Sleep key for two seconds. Power off terminal: Press the Power/Sleep key for two seconds. 3-2 Charge terminal Please charge the terminal before the first time of use. There are three methods of charging battery as demonstrated in Figure 3-1. -
Page 17: Introduction To Oled Display
4 Introduction to OLED display OLED display icons Note1: The OLED screen is designed to display barcode scanning, Bluetooth network establishing, data transfer, system setting and other information. Note2: The display area is 64 dots (V) by 128 dots (H). The backlight will be switched off automatically if time of no operation exceeds a programmable duration (see 5-3 System setting Table 4-1 OLED display icons... -
Page 18: Oled Display Menu
4-2 OLED display menu The Home menu consists of five items, which are described in details in the following chapters. Table 4-2 depicts the hierarchy chart of the OLED display menu. Note: Items that are labeled ‘*’ are default selections. Table 4-2 OLED display menu Hierarchy chart Menu... - Page 19 Hierarchy chart Menu AS-7x10 V2 1.Disable* Auto Reconnection 2.Enable Bluetooth* Inter-character delay 1.Disable* Out Of Range 2.Enable USB HID Keyboard Inter-char Delay USB Virtual COM Create New File Empty File U-Disk List Files Data Transfer Delete File Format Send Batch Data 1.Bluetooth* 2.USB HID Interface...
- Page 20 Hierarchy chart Menu AS-7x10 V2 1. USA* 2. Turkish F 3..Bluetooth BLE Slave Cradle BLE Master 1. USA* USB HID Keyborad 2. Turkish F 3..1. English* Language 2. Chinese 3. TR Chinese 1. UTF-8* Character Encoding 2.
- Page 21 Hierarchy chart Menu AS-7x10 V2 View Memory Erase System Information Bluetooth Info Scanner Firmware Version Scan Engine...
-
Page 22: Operations Of The Terminal
5 Operations of the terminal Note: 1. Please establish a Bluetooth network and hold the terminal in the range of the network before the first time of scanning barcodes (See 5-3-1 Bluetooth). 2. The terminal can perform a barcode scan operation even though no Bluetooth network is available. However, the terminal may react in a way that differs from what is described here if no Bluetooth network is working. -
Page 23: Add Time/Date
Step 2: Press Right Soft Key to the window below. Step 3: Use Navigation Keys to move the cursor, Scan/Select Key to select number(s), Right Soft Key to delete selected number(s). And then press Left Soft Key to continue. 5-1-4 Add Time/Date The time information can be added as an appendix to a barcode by enabling the Add Time. -
Page 24: Data Transfer
5-2 Data Transfer 5-2-1 Bluetooth 5-3 System Setting - Bluetooth for instructions to establish a Bluetooth network. Three options are listed below. Auto reconnection- When terminal’s Bluetooth is power on, it will try to establish the wireless connection with the host which it last connected, if Auto Reconnection is enabled. Inter-char delay- Inter-character delay is abbreviated to Inter-char delay. -
Page 25: Data Batch
Caution: Empty and Delete operations are not undoable. It is strongly recommended to back up the data before empty or delete operation. A) Empty/Delete Files If the U-disk is almost full, occupied room can be released by emptying/deleting some files. A target file is protected by system and prevented from being deleting. -
Page 26: System Setting
5-3 System Setting 5-3-1 Bluetooth Functionalities The terminal can be configured to send data to a PC/Notebook/PDA/other instrument which has an integrated Bluetooth module or is connected with an external Bluetooth USB adapter. A diagram of Bluetooth functionalities and a table of various Bluetooth profiles are shown below, respectively: Table 5-1 Various Bluetooth profiles HID Keyboard The terminal connects to the PC/host via Bluetooth and behaves like a keyboard. - Page 27 5-3-1-2 Configure Bluetooth SPP profile communication Note : Make sure the Bluetooth module of the terminal is powered on (blue LED is on) and the selected profile is SPP. Step 1: Press Left Soft Key to the SPP List, if no connection record, press Left Soft Key to search. Wait for about 20 seconds and then the devices list will be shown Step 2: Use Navigation Key to move the cursor and press Scan/Select Key to connect.
-
Page 28: Usb Hid Keyboard
5-3-2 USB HID Keyboard Keyboard layout – supports different national keyboard layouts. 5-3-3 Language This option is used to select a language for menu display. 5-3-4 Character Encoding A character encoding system consists of a code that pairs each character from a given repertoire. Common examples include Morse code, Baudot code, ASCII, UTF_8 and Unicode. - Page 29 5min* 10min...
-
Page 30: System Information
5-4 System Information 5-4-1 View Memory Note: User can press Left Soft Key to erase data to release used memory. User can view the used and remain memory capacity in Batch Mode. Caution: 1. Erasing operation will delete all data in the memory. 2. -
Page 31: Barcode Programming Instructions
6 Barcode programming instructions 6-1 Example: Single-parameter setting by scanning 1D barcodes Important notes: 1. During the process of programming, LED is lighting to indicate the programming correctness. LED will go off if any incorrect programming operation performed. 2. After each successful programming, LED will go off and the terminal will beep twice. 3. -
Page 32: Decode Illumination And Decode Aiming Pattern
6-2 Decode illumination and decode aiming pattern Decode illumination mode: Enable illumination causes the terminal to turn on the illumination to aid decoding. Disable illumination to turn off illumination for the terminal during decoding. Better quality images could be obtained with illumination support. The effectiveness of the illumination decreases as the distance to the target increases. -
Page 33: Dpm, Multiple Symbols, Structured Append, Etc. Read Setting
6-3 DPM, Multiple symbols, Structured append, etc. read setting 2D symbols read: A global setting of 2D symbols readability. DPM format read: By setting Enable, the terminal can read 2D symbols in DPM (Direct Park Marking) format. Some barcodes in DPM format are shown below. Multiple symbols &... - Page 34 Vertical centering read: By setting Enable, the terminal reads only the barcode centered by the aimer in vertical direction. However, the terminal will read either one of two barcodes which are positioned horizontally. See example below.
- Page 35 Multiple-scan setting Single-scan setting Alpha. Option barcode Option entry Follow respective 2D symbol setting All 2D OFF All 2D ON Only PDF417 ON 2D symbols read Only QR code ON Only Data Matrix ON Only MaxiCode ON Only Aztec Code ON Only Han Xin Code ON Disable DPM format read...
- Page 36 Note: The instruction of calibrating the aimer in vertical centering direction. Scan the barcode on this page. The terminal will give three musical short beeps to indicate entering calibration mode. Press the trigger of the terminal while maintaining the distance of about 15cm between the exit window of the terminal and this paper.
-
Page 37: Scanning Mode And Some Global Settings
6-4 Scanning mode and some global settings Scanning mode: Good-read off -The trigger button must be pressed once to activate scanning. The light source of terminal stops scanning when there is a successful reading or no code is decoded after the Stand-by duration elapsed. - Page 38 Multiple-scan setting Single-scan setting Option barcode Option Alpha. entry Good-read off Scanning mode Momentary Continue 01-99 Standby duration 01-99 (second) 00-FF Same barcode delay time 00-FF (50ms) 00-09 Double confirm 00-09 (00: no ) Global Max. code length 04-99 1D symbol 04-99 Global Min.
- Page 39 Multiple-scan setting Single-scan setting Option barcode Option Alpha. entry Data output delay in 00-FF continue-scan mode 00-99 (100ms) FF (Never) ASCII Character encoding system UTF-8 Windows-1251 Decode-data transfer type Serial in USB HID mode Parallel...
-
Page 40: Upc-A
6-5 UPC-A Read: Format System character Data digits (10 digits) Check digit Check digit verification: The check digit is optional. Check digit trans.: By setting Enable, check digit will be transmitted. Code ID setting: Code ID is a one-or-two-character string used to represent the symbol upon a succeeding reading. - Page 41 Multiple-scan setting Single-scan setting Option barcode Option Alpha. entry Disable Read Enable Disable Check digit verification Enable Disable Check digit trans. Enable 00-FF Code ID setting 00-FF (ASCII) <A>* 00-66 Insert group selection 00-66 None 2 digits Supplement digits 5 digits 2 or 5 digits None Truncation/Expansion...
-
Page 42: Upc-E
6-6 UPC-E Read: Format System character “0” Data digits (6 digits) Check digits Check digit verification: The check digit is optional and made as the sum of the numerical value of the data digits. Check digit trans.: By setting Enable, check digit will be transmitted. Code ID setting: Refer to Code ID setting of UPC-A. - Page 43 Multiple-scan setting Single-scan setting Option barcode Option Alpha. entry Disable Read Enable Disable Check digit verification Enable Disable Check digit trans. Enable 00-FF Code ID setting 00-FF (ASCII) <D>* 00-66 Insert group selection 00-66 None 2 digits Supplement digits 5 digits 2 or 5 digits None Truncate leading zeros...
-
Page 44: Upc-E1
6-7 UPC-E1 Read: Format System character “1” Data digits (6 digits) Check digits Check digit verification: The check digit is optional and made as the sum of the numerical value of the data digits. Check digit trans.: By setting Enable, check digit will be transmitted. Code ID setting: Refer to Code ID setting of UPC-A. - Page 45 Multiple-scan setting Single-scan setting Alpha. Option barcode Option entry Disable Read Enable Disable Check digit verification Enable Disable Check digit trans. Enable 00-FF Code ID setting 00-FF (ASCII) <D>* 00-66 Insert group selection 00-66 None 2 digits Supplement digits 5 digits 2 or 5 digits None Truncation/Expansion...
-
Page 46: Ean-13 (Isbn/Issn)
6-8 EAN-13 (ISBN/ISSN) Read: Format Data digits (12 digits) Check digit Check digit verification: The check digit is optional and made as the sum of the numerical value of the data digits. Check digit transmission: By setting Enable, check digit will be transmitted. EAN-13 code ID setting: Refer to Code ID setting of UPC-A. - Page 47 Multiple-scan setting Single-scan setting Option barcode Option Alpha. entry Disable Read Enable Disable Check digit verification Enable Disable Check digit transmission Enable 00-FF EAN-13 code ID setting 00-FF (ASCII) <A>* 00-66 Insert group selection 00-66 None 2 digits Supplement digits 5 digits 2 or 5 digits Disable...
-
Page 48: Ean-8
6-9 EAN-8 Read: Format Data digits (7 digits) Check digit Check digit verification: The check digit is optional and made as the sum of the numerical value of the data digits. Check digit trans.: By setting Enable, check digit will be transmitted. Code ID setting: Refer to Code ID setting of UPC-A. - Page 49 Multiple-scan setting Single-scan setting Option barcode Option Alpha. entry Disable Read Enable Disable Check digit verification Enable Disable Check digit trans. Enable 00-FF Code ID setting 00-FF (ASCII) <C>* 00-66 Insert group selection 00-66 None 2 digits Supplement digits 5 digits 2 or 5 digits None Truncation/Expansion...
-
Page 50: Code 39 (Code 32, Trioptic Code 39)
6-10 Code 39 (Code 32, Trioptic Code 39) Read: Format Start character (*) Data digits (variable) Check digit (optional) End character (*) Check digit verification: The check digit is optional and made as the sum module 43 of the numerical value of the data digits. - Page 51 Multiple-scan setting Single-scan setting Option barcode Option Alpha.entry Disable Read Enable Disable Check digit verification Enable Disable Check digit transmission Enable 00-99 Max. code length 00-99 00-99 Min. code length 00-99 00-FF Code ID setting 00-FF (ASCII) <M>* 00-66 Insert group selection 00-66 Standard Format...
- Page 52 Multiple-scan setting Single-scan setting Option barcode Option Alpha.entry Code 32 Prefix “A” Disable transmission Enable Disable Trioptic Code 39 read Enable Trioptic Code 39 Start/End Disable transmission Enable...
-
Page 53: Interleaved 2 Of 5
6-11 Interleaved 2 of 5 Read: Format Data digits (Variable) Check digit (optional) Check digit verification: The check digit is made as the sum module 10 of the numerical values of all data digits. There are two optional check digit algorithms: the specified Uniform Symbol Specification (USS) and the Optical Product Code Council (OPCC). - Page 54 Multiple-scan setting Single-scan setting Option barcode Option Alpha. entry Disable Read Enable Disable Check digit verification OPCC Disable Check digit transmission Enable 00-99 Max. code length 00-99 00-99 Min. code length 00-99 00-FF Code ID setting 00-FF (ASCII) <I>* 00-66 Insert group selection 00-66...
-
Page 55: Industrial 2 Of 5 (Discrete 2 Of 5)
6-12 Industrial 2 of 5 (Discrete 2 of 5) Read: Format Data digits (variable) Max./Min. code length: Refer to Max./Min. code length of 6-10 Code Code ID setting: Refer to Code ID setting of UPC-A. Insertion group selection: Refer to Insertion group selection of UPC-A. -
Page 56: Matrix 2 Of 5
6-13 Matrix 2 of 5 Read: Format Data digits (variable) Check digit (optional) Check digit verification: The check digit is made as the sum module 10 of the numerical values of all data digits. Check digit transmission: By setting Enable, check digit will be transmitted. Max./Min. -
Page 57: Codabar
6-14 Codabar Read: Format Start character Data digits (variable) Check digit (optional) End character Check digit verification: The check digit is made as the sum module 16 of the numerical values of all data digits. Check digit transmission: By setting Enable, check digit will be transmitted. Max./Min. - Page 58 Multiple-scan setting Single-scan setting Option barcode Option Alpha. entry abcd/abcd ABCD/TN*E abcd/tn*e Disable Start/End transmission Enable Disable Start/End character equality Enable...
-
Page 59: Code 128
6-15 Code 128 Read: Format Data digits (variable) Check digit (optional) Check digit verification: The check digit is made as the sum module 103 of all data digits. Check digit transmission: By setting Enable, check digit will be transmitted. Max./Min. code length: Refer to Max./Min. code length of 6-10 Code Code ID setting: Refer to Code ID setting of UPC-A. - Page 60 Multiple-scan setting Single-scan setting Option barcode Option Alpha. entry Disable Read Enable Disable Check digit verification Enable Disable Check digit transmission Reserved 00-99 Max. code length 00-99 00-99 Min. code length 00-99 00-FF Code ID setting 00-FF (ASCII) <K>* 00-66 Insert group selection 00-66 Disable...
-
Page 61: Ucc/Ean 128
6-16 UCC/EAN 128 Read: Format Data digits (variable) Check digit (optional) Check digit verification: The check digit is made as the sum module 103 of all data digits. Check digit transmission: By setting Enable, check digit will be transmitted. Max. /Min. code length: Refer to Max./Min. code length of 6-10 Code Code ID setting: Refer to Code ID setting of UPC-A. - Page 62 Multiple-scan setting Single-scan setting Option barcode Option Alpha. entry Read Disable Enable Check digit verification Disable Enable Check digit transmission Disable Reserved Max. code length 00-99 00-99 Min. code length 00-99 00-99 Code ID setting 00-FF 00-FF (ASCII) <K>* Insert group selection 00-66 00-66 Disable...
-
Page 63: Isbt 128
6-17 ISBT 128 Read: Format Start character (“=” or “&”) Data digits (variable) Check digit (optional) Check digit verification: The check digit is made as the sum module 103 of all data digits. Check digit transmission: By setting Enable, check digit will be transmitted. Max./Min. -
Page 64: Code 93
6-18 Code 93 Read: Format Data digits (variable) 2 check digits (optional) Check digit verification: The check digit is made as the sum module 47 of the numerical values of all data digits. Check digit transmission: By setting Enable, check digit will be transmitted. Max./Min. -
Page 65: Code 11
6-19 Code 11 Read: Format Data digits (variable) Check digit 1 (optional ) Check digit 2 (optional) Check digit verification: The check digit is presented as the sum module 11 of all data digits. Check digit transmission: By setting Enable, check digit 1 and check digit 2 will be transmitted upon your selected check digit verification method. - Page 66 Multiple-scan setting Single-scan setting Option barcode Option Alpha. entry Disable Read Enable Disable One digit Check digit verification Reserved Reserved Disable Check digit transmission Enable 00-99 Max. code length 00-99 00-99 Min. code length 00-99 00-FF Code ID setting 00-FF (ASCII) <V>* 00-66...
-
Page 67: Msi/Plessey
6-20 MSI/Plessey Read: Format Data digits (variable) Check digit 1 (optional) Check digit 2 (optional) Check digit verification: The MSI/Plessey has one or two optional check digits. There are three methods of verifying check digits, i.e. Mod 10, Mod 10/10 and Mod 10/11. The check digit 1 and check digit 2 will be calculated as the sum module 10 or 11 of the data digits. - Page 68 Multiple-scan setting Single-scan setting Option barcode Option Alpha. entry Disable Read Enable Disable 1 digit (Mod 10) Check digit verification 2 digits (Mod 10/10) 2 digits (Mod 10/11) Disable Check digit transmission Enable 00-99 Max. code length 00-99 00-99 Min. code length 00-99 00-FF Code ID setting...
-
Page 69: Plessey
6-21 UK/Plessey Read: Format Data digits (variable) 2 check digits (optional) Check digit verification: The UK/Plessey has one or two optional check digits. The check digit 1 and check digit 2 will be calculated as the sum module 10 or 11 of the data digits. Check digit transmission: By setting Enable, check digit will be transmitted. -
Page 70: China Post
6-22 China Post Read: Format 11 Data digits Max. /Min. code length: Refer to Max./Min. code length of 6-10 Code 39. The code length of China Post is 11. Code ID setting: Refer to Code ID setting of UPC-A. Insertion group selection: Refer to Insertion group selection of UPC-A. -
Page 71: China Finance
6-23 China Finance Note: This type of barcode is not Omni-directionally decodable. The encodable character set includes numeric 0 to 9. Among the symbol of 0 to 9, 0 and 2, 4 and 9, 5 and 8, 6 and 7, have the symmetrical pattern;... - Page 72 Multiple-scan setting Single-scan setting Option barcode Option Alpha. entry Disable Assigned to 0 Assigned to 5(A) Assigned to 6(B) Assigned to 7(C) Leading character assignment Assigned to 8(D) Assigned to 9(E) Assigned to 1 Assigned to 2 Assigned to 3 Assigned to 4 00-FF Code ID setting...
-
Page 73: Gs1 Databar (Gs1 Databar Truncated)
6-24 GS1 DataBar (GS1 DataBar Truncated) GS1 DataBar Truncated is structured and encoded the same as the standard GS1 DataBar format, except its height is reduced to a 13 modules minimum; while GS1 DataBar should have a height greater than or equal to 33 modules. Read: Format 16 Data digits... -
Page 74: Gs1 Databar Limited
6-25 GS1 DataBar Limited Read: Format 16 Data digits Code ID setting: Refer to Code ID setting of UPC-A. Insertion group selection: Refer to Insertion group selection of UPC-A. Conversion: Refer to Conversion of 6-24 GS1 DataBar (GS1 DataBar Truncated). Multiple-scan setting Single-scan setting Option barcode... -
Page 75: Gs1 Databar Expanded
6-26 GS1 DataBar Expanded Read: Format Data characters (variable) Code ID setting: Refer to Code ID setting of UPC-A. Insertion group selection: Refer to Insertion group selection of UPC-A. Conversion: UCC/EAN 128- Refer to Code ID transmission of 6-36 String transmission, ]Cm will be identified as AIM ID. -
Page 76: Pdf417
6-27 PDF417 Read: Format Data characters (variable) Multiple-scan setting Single-scan setting Option barcode Option Alpha. entry Disable Read Enable... -
Page 77: Micropdf417
6-28 MicroPDF417 Read: Format Data characters (variable) Multiple-scan setting Single-scan setting Option barcode Option Alpha. entry Disable Read Enable... -
Page 78: Qr Code
6-29 QR Code Read: Format Data characters (variable) Multiple-scan setting Single-scan setting Option barcode Option Alpha. entry Disable Read Enable... -
Page 79: Micro Qr Code
6-30 Micro QR Code Read: Format Data characters (variable) Multiple-scan setting Single-scan setting Parameters Alpha. Option barcode Option of the code entry Disable Read 0x11 0x95 Enable 00-FF Code ID setting 00-FF 0x11 0x96 (ASCII) <q>*... -
Page 80: Data Matrix
6-31 Data Matrix Read: Format Data characters (variable) Multiple-scan setting Single-scan setting Option barcode Option Alpha. entry Disable Read Enable... -
Page 81: Han Xin Code
6-32 Han Xin Code Read: Format Data characters (variable) Multiple-scan setting Single-scan setting Option barcode Option Alpha. entry Read Disable Enable... -
Page 82: Aztec Code
6-33 Aztec Code Read: Format Data characters (variable) Multiple-scan setting Single-scan setting Option barcode Option Alpha. entry Disable Read Enable... -
Page 83: G1-G6 & C1-C3 & Fn1 Substitution String Setting
6-34 G1-G6 & C1-C3 & FN1 substitution string setting Format of barcode data transmission: Prefix Code name Preamble Code ID Code length Code data Code ID Postamble Suffix Suffix string setting: The <enter > key is represented in different ASCII when it is applied by different OS. - Page 84 Truncate leading G5 string setting: By setting, a defined leading character or string can be truncated. Also a single character can be un-defined. Repeat of a G5 character setting: While G5 is set as a single defined/un-defined character, G5 can also be set to be repeated.
- Page 85 Steps: scan the following barcodes in order. The ASCII value for “A” is 41, for “B” is 42, for “C” is 43, for “D” is “44”, for “E” is 45, and for “F” is 46. Testing barcode:...
- Page 86 Multiple-scan setting Single-scan setting Option barcode Option Alpha. Entry Prefix string setting 0-22 characters 00-FF None 0-22 characters 00-FF Suffix string setting <ENTER> 0D0A* Preamble string setting 0-22 characters 00-FF None Postamble string setting 0-22 characters 00-FF None 0-22 characters 00-FF Insert G1 string setting None...
- Page 87 Multiple-scan setting Single-scan setting Option barcode Option Alpha. Entry Defined times 01-22 Un-defined times (All) A un-defined character Truncate ending G6 string setting 1-22 defined 01-7F characters <0> Once Repeat of a G6 character setting Defined times 01-22 Un-defined times (All) Single character C1 0000* replacement...
-
Page 88: G1-G4 String Position & Code Id Position
6-35 G1-G4 string position & Code ID position Format of barcode data transmission: Prefix Code name Preamble Code ID Code length Code data Code ID Postamble Suffix Insert G1/G2/G3/G4 string position: The terminal offers 4 positions to insert strings among the symbol. In case of the insertion position is greater than the length of the symbol, the insertion of string is not effective. -
Page 89: String Transmission
6-36 String transmission Note: The information in this chapter is closely related to 6-33 G1-G6 & C1-C3 & FN1 substitution string setting. Format of barcode data transmission: Prefix Code name Preamble Code ID Code length Code data Code ID Postamble Suffix Prefix transmission: By setting Enable, prefix will be appended before the data transmitted. - Page 90 Multiple-scan setting Single-scan setting Option barcode Option Alpha. entry Prefix transmission Disable Enable Suffix transmission Disable Enable Code name transmission Disable Enable Preamble transmission Disable Enable Disable Postamble transmission Enable Disable Code ID transmission Proprietary ID AIM ID Code length transmission Disable Enable Disable...
-
Page 91: Barcode Representing Non-Printable Character
Multiple-scan setting Single-scan setting Option barcode Option Alpha. entry Keyboard wedge/USB RS-232 Keyboard wedge / USB/RS-232 All-non-printable-character Disable string transmission with string setting Enable Transmit the first N data characters only 01-99 Transmit the last N data characters only 01-99 7 Barcode representing non-printable character Notes to make the following barcode: 1. - Page 92 Enter Insert Delete...
-
Page 93: Ascii Table
8 ASCII Table for keyboard wedge for RS-232 Null Down Left Right PgUp PgDn Home Enter Insert Ctrl+ Delete Alt+ Notes: The 2nd and the 3rd columns above are used for keyboard wedge only. “ & ‘ < > Example: ASCII “A” = “41”. -
Page 94: Enable & Disable Configuration By Scanning Barcode
9 Enable & Disable configuration by scanning barcode Note: The setting of the below two barcodes does affect the operation of scanning the barcodes in 13 Return default parameters & firmware version. Enable configuration by scanning barcode (Default) The default status of the embedded scanner is enabled to scan configuration barcode. Disable configuration by scanning barcode Scan the above barcode to disable scanning configuration barcode, then the embedded scanner will not operate configuration by scanning configuration barcodes, but the data string of... -
Page 95: Enable & Disable "Nr
Enable & Disable “NR” Enable “NR” If it is enabled, while the scanner receives the STOP_DECODE command or fails to decode a barcode within the Stand-by duration time, the scanner will transmit “NR”. Disable “NR” (Default) -
Page 96: Test Chart
Test Chart UPC-A UPC-E UPC-E1 EAN-13 ISBN/ISSN EAN-8 Code 39 Code 32 A908765439 Trioptic Code 39 (Default setting: Disable) Interleaved 2 of 5 Industrial 2 of 5 (Default setting: Disable) Matrix 2 of 5 Codabar Test Chart (Continued) - Page 97 Code 128 UCC/EAN 128 ISBT 128 Code 93 Code 11 (Default setting: Disable) MSI/Plessey (Default setting: Disable) UK/Plessey China Post Telepen GS1 DataBar (GS1 DataBar Truncated) GS1 DataBar Limited GS1 DataBar Expanded...
-
Page 98: Return Default Parameters
12 Return default parameters WARNING: Restore Factory Defaults Scan this barcode to restore the factory default values. -
Page 99: Configuration Alphanumeric Entry Barcode
13 Configuration alphanumeric entry barcode To finish parameter setting, please scan the bar code below.
Need help?
Do you have a question about the AS-7210 V2 and is the answer not in the manual?
Questions and answers