Table of Contents
Advertisement
Quick Links
Advertisement
Table of Contents

Related Manuals for Philips Kala


Summary of Contents for Philips Kala
- Page 1 All manuals and user guides at all-guides.com...
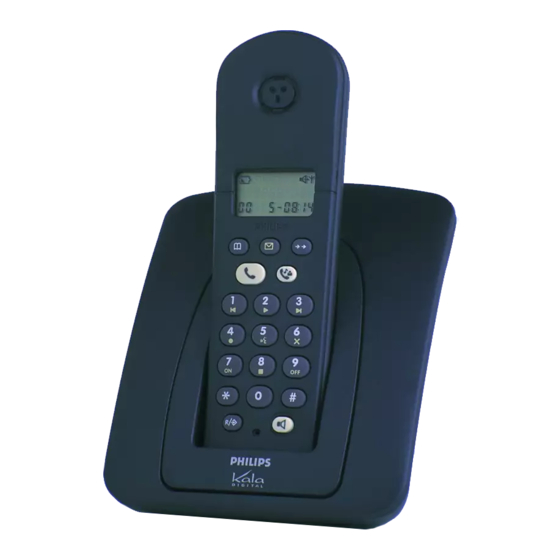
- Page 2 All manuals and user guides at all-guides.com ILLUSTRATION Base station Mains power supply / Earpiece line LED Display SOS key Memory key On/Off line key Redial key Internal call / Dialling keypad music on hold key Recall and Programming key Earpiece volume key Microphone Colour clip...
-
Page 3: Safety Information
Your telephone has been manufactured at a site certified ISO 14001 - the international standard for environmental management systems. Your telephone has also benefited from the Philips EcoDesign program - Environmental Conscious Product Design - which considers the environmental impact of a product during its... -
Page 4: Installing Your Telephone
Only use the cables supplied with the product. FITTING THE COLOUR CLIP 1 ðInsert the clip from the top first. 2 ðFirmly press on the clips (in the arrow direction) until they lock. 3 ðTo remove the colour clip, pull it out from the “Philips “ marking. -
Page 5: Handset Display
All manuals and user guides at all-guides.com DESCRIPTION HANDSET DISPLAY Numerical Telephone icons characters ICON STATE DESCRIPTION Displayed Batteries charged. Batteries low. Blinking Handset being charged. Displayed Programming activated. Blinking Waiting for an answer from the base station (in the context of registration). -
Page 6: Telephone Leds
All manuals and user guides at all-guides.com DESCRIPTION TELEPHONE LEDS The base station has a green LED: - Lit, when the base station is powered. - Blinking, when: . receiving a call, . the line is connected or the answering machine is replying. - Unlit, when the base station is not connected to the power supply. -
Page 7: Using Your Telephone
All manuals and user guides at all-guides.com USING YOUR TELEPHONE Your Philips telephone is GAP certified, nevertheless we cannot guarantee its use with DECT products made by other manufacturers. You can register 4 handsets with 1 base station and 1 handset with 2 base stations. - Page 8 All manuals and user guides at all-guides.com USING YOUR TELEPHONE TO ADJUST THE EARPIECE VOLUME Your telephones handset is equipped with adjustable earpiece volume (3 levels). During a call: ð Ã Ç High TO PUT ON HOLD OR TRANSFER AN EXTERNAL CALL During an external call: If you have no additional handset, when you press the call is put on hold with music:...
- Page 9 All manuals and user guides at all-guides.com USING YOUR TELEPHONE TO PROGRAMME A NUMBER IN THE MEMORY You can programme 10 telephone numbers in the memories. Using this function, you can dial the numbers you call regularly automatically. select a digit* Dial the number to from...
-
Page 10: Programming Your Telephone
All manuals and user guides at all-guides.com PROGRAMMING YOUR TELEPHONE Your telephone has programmable functions. To change the settings, refer to the table below. The options you choose will be saved even if there is a power cut. A beep confirms programming changes. - Page 11 All manuals and user guides at all-guides.com PROGRAMMING YOUR TELEPHONE FUNCTIONS COMMENTS COMBINATIONS DIALLING MODE Tone Only for U.K. Pulse REGISTERING/UN-REGISTERING A HANDSET TO A BASE STATION Before registering a handset, unplug the base station mains adapter and then plug it in again. Register this handset The ∆...
- Page 12 All manuals and user guides at all-guides.com PROBLEMS YOU MAY ENCOUNTER WITH YOUR TELEPHONE The table below lists the problems you may encounter when using your Philips telephone. CAUSE PROBLEM SOLUTION The LED on the base station is The base station has not been Check the connections.
Need help?
Do you have a question about the Kala and is the answer not in the manual?
Questions and answers