
Related Manuals for ESP HDVIPCPTZC

Summary of Contents for ESP HDVIPCPTZC
- Page 1 HDVIPCPTZC Keyboard controller USER INSTRUCTION USE/INSTALLATION The latest product manual and software is available online: https://www.espuk.com/technical_support/ Rev. F21 w w w . e s p u k . c o m...
-
Page 2: Product Description
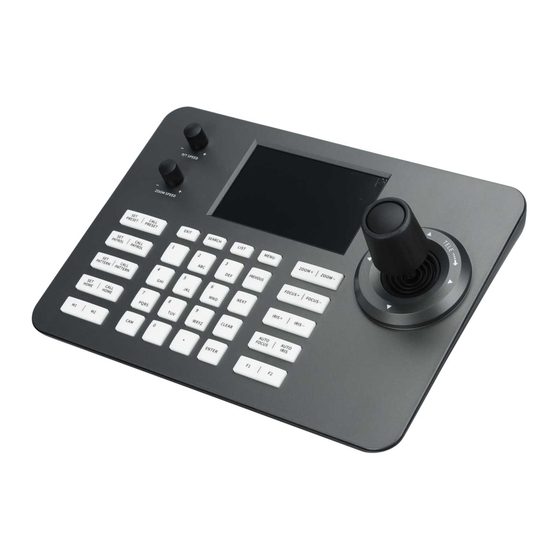
1.Product Description 1.1 Descrip�on The network IP keyboard adopts the new design of PC + ABS outer case. It is light and easy to operate. The bottom is designed with a non-slip silicone pad that can be operated with one hand. The IP keyboard uses an industrial-grade 5-inch LCD screen. With Solution 1920 * 1080P H.264/265 stream, super wide viewing angle IP opera�on keyboard. -
Page 3: Interface Description
(3) With Import variable-speed 4D joystick Twist the joystick to control the PTZ camera directly. (4) Support standard POE power supply. (5) The bottom is designed with non-slip silicone pad. 1.3 Product Appearance 1.4 Interface Description RS422 IP Interface Power switch RS232 Power interface Name... -
Page 4: Keyboard Function
1.5 System Topology diagram Product Connection Diagram with onvif protocol video conference camera Cable Cable Dome camera Camera Camera and keyboard need to be connected to the same LAN. 2. Keyboard function 2.1 Button Description (1) SET PRESET: Example: Set Preset 1 [SET PRESET ] >... - Page 5 A. Press [SET PRESET] button, and the text “Set preset ” appears in the lower right corner of the screen. B. Press the number [1], the number 1 appears on the screen in the back of the "Set preset " C.
- Page 6 SEARCH: Example: adding the IP address of a camera A. Press [SEARCH] key to enter, move the joys�ck to the right, select search, and press [ENGER] or the middle button of the joys�ck to confirm the search. B. Use the joys�ck to select the IP, press the middle button of the joys�ck to select, joys�ck move right to select the new one, and press the middle button of the joys�ck to add.
- Page 7 1~9: Single point is a number key function / continuously press to switch letters CAM: For quick camera switching Example: Press[CAM] +Serial number in camera device list+[ENTER] PREVIOUS: Quickly switch to the camera with a serial number on the list of added devices NEXT: Quickly switch to the camera with the next serial number in the list of dded devices CLEAR: Delete one...
- Page 8 Output Output Output Operating Operating Operating Control Control Control Right Zoom + Zoom Press the middle joystick button to confirm in menu mode 2 . 3 K n o b D e s c r ip tio n (1) P/T SPEED: PTZ control speed Turn the knob to the right + Turn to the left- (2) ZOOM SPEED 3.
- Page 9 3.2 ONVIF connection (1) Press <SEARCH> to the search device, move the red cursor to the right to jump into the search, press the middle button of the joys�ck to confirm the search for the device, select the device to be added, press OK, and then move the red cursor to New. Enter the camera user name and password to save (the camera and keyboard must be on the same network segment) Search>Results...
- Page 10 Search>Adduser Device List Search Device Username admin Manually Add Password admin System Set Network Set Exit Save Cancel (2) Press the MENU button to enter the menu and select to manually add the camera IP, port, user name, password, and select the Onvif protocol point to save (the camera and keyboard must be on the same network segment) Search>Adduser Device List...
-
Page 11: Web Upgrade
(3) The successfully added devices can be viewed in the device list and exit to the main interface. Press the CAM key + number keys + confirmation key to select the online device. 4. WEB Upgrade 4.1 System Upgrade The keyboard and the computer are connected to the same local area network. Enter the keyboard IP address on the browser, then enter the keyboard upgrade page. - Page 12 Telephone: 01527 51 51 50 Elite Security Products Fax: 01527 51 51 43 Unit 7, Target Park, Email: info@espuk.com Shawbank Road, Lakeside, www.espuk.com Redditch B98 8YN E&OE - Errors and omissions excepted.I19 w w w . e s p u k . c o m...
Need help?
Do you have a question about the HDVIPCPTZC and is the answer not in the manual?
Questions and answers