LG F8K5XNK4 Owner's Manual
Hide thumbs
Also See for F8K5XNK4:
- Owner's manual (48 pages) ,
- Owner's manual (100 pages) ,
- Owner's manual (93 pages)
Table of Contents
Advertisement
Available languages
Available languages
Quick Links
OWNER'S MANUAL
WASHING
MACHINE
Before beginning installation, read these instructions carefully.
This will simplify installation and ensure that the product is
installed correctly and safely. Leave these instructions near the
product after installation for future reference.
EN ENGLISH FR FRANÇAIS
F8K5XNK4
MFL70280534
Rev.00_101518
MFL70280534_E.indd 1
Copyright © 2018 LG Electronics Inc. All Rights Reserved.
www.lg.com
2018. 10. 18. 오전 9:46
Advertisement
Chapters
Table of Contents

Subscribe to Our Youtube Channel
Related Manuals for LG F8K5XNK4


Summary of Contents for LG F8K5XNK4
- Page 1 This will simplify installation and ensure that the product is installed correctly and safely. Leave these instructions near the product after installation for future reference. EN ENGLISH FR FRANÇAIS F8K5XNK4 www.lg.com MFL70280534 Rev.00_101518 Copyright © 2018 LG Electronics Inc. All Rights Reserved. MFL70280534_E.indd 1 2018. 10. 18. 오전 9:46...
- Page 2 MFL70280534_E.indd 2 2018. 10. 18. 오전 9:46...
-
Page 3: Table Of Contents
TABLE OF CONTENTS This manual may contain images or content different from the model you purchased. This manual is subject to revision by the manufacturer. SAFETY INSTRUCTIONS ............4 IMPORTANT SAFETY INSTRUCTIONS ............ 4 INSTALLATION ..............10 Parts ......................10 Accessories ....................11 Specifications ................... -
Page 4: Safety Instructions
SAFETY INSTRUCTIONS The following safety guidelines are intended to prevent unforeseen risks or damage from unsafe or incorrect operation of the appliance. The guidelines are separated into ‘WARNING’ and ‘CAUTION’ as described below. This symbol is displayed to indicate matters and operations that can cause risk. - Page 5 For use in Europe: This appliance can be used by children aged from 8 years and above and persons with reduced physical, sensory or mental capabilities or lack of experience and knowledge if they have been given supervision or instruction concerning use of the appliance in a safe way and understand the hazards involved.
- Page 6 •If the power cord is damaged or the hole of the socket outlet is loose, do not use the power cord and contact an authorized service centre. •This appliance must not be installed behind a lockable door, a sliding door or a door with a hinge on the opposite side to that of the appliance, in such a way that a full opening of the appliance door is restricted.
- Page 7 Improper use can cause fire or explosion. •In case of flood, disconnect the power plug and contact the LG Electronics customer information centre. •Do not push down the drawer excessively, when the appliance drawer is open.
- Page 8 •Do not touch the door during a high temperature programme. •Do not use flammable gas and combustible substances (benzene, gasoline, thinner, petroleum, alcohol, etc.) near the appliance. •If the drain hose or inlet hose is frozen during winter, use it only after thawing.
- Page 9 Maintenance •Securely plug the power plug in the socket outlet after completely removing any moisture and dust. •Disconnect the power cord before cleaning the appliance. •Never unplug the appliance by pulling on the power cable. Always grip the power plug firmly and pull straight out from the socket outlet.
-
Page 10: Installation
INSTALLATION Parts Door Water Supply Hose Drum Power Plug Control Panel Water Drain Hose Drawer Leveling Feet MFL70280534_E.indd 10 2018. 10. 18. 오전 9:46... -
Page 11: Accessories
Accessories Water supply hose Connecting Water drain hose Water supply hose Water drain hose (for cold water) supply hose connector connector Anti-slip sheets Detergent Brackets (front) Brackets (back) Spanner (2 EA) measuring (2 EA) (2 EA) * Screws Cable ties Band clamps Remote control Connecting drain... -
Page 12: Installation Place Requirements
Installation Place • Do not install the appliance in rooms where freezing temperatures may occur. Frozen Requirements hoses may burst under pressure. The reliability of the electronic control unit may be Location impaired at temperatures below freezing point. • Ensure that when the appliance is installed, it 135 cm is easily accessible for an engineer in the 123 cm... -
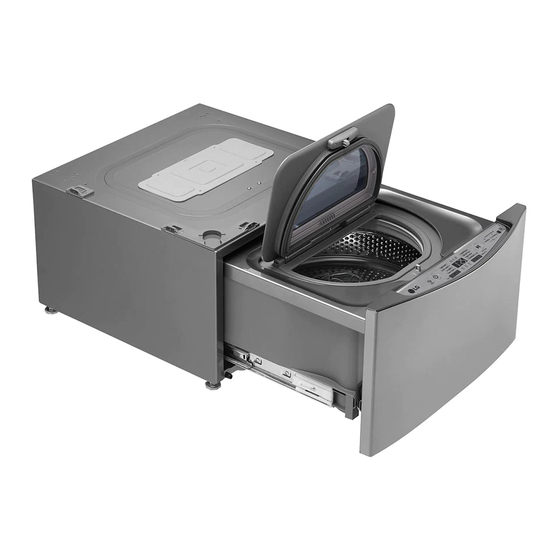
Page 13: Stacking Mini Washer
Stacking Mini Washer Type 1. The bottom part of the Main Washer is silver in color. • First assemble the stacking holder using 2 type A screws included in the accessory box of the Mini Washer, then each bracket using 7 type A screws included in the Brackets accessory box of the Mini Washer. - Page 14 Pull and save the foam block for future use. Place Main Washer on top of Mini Washer. • If the washing machine must be moved in • Make sure the 4 legs are totally locked the future, the foam block will help prevent and the holes of Mini Washer align with damage to the washing machine during the holes of Main Washer.
-
Page 15: Connecting The Supply Hose
Connecting the Supply Hose Connecting Hose to Water Tap • Water supply pressure must be between 0.1 Connecting Screw-Type Hose to Tap MPa and 0.8 MPa (1.0‒8.0 kgf/cm with Thread • Do not overtighten the water supply hose. Screw the hose connector onto the water •... - Page 16 Connecting Hose to Two Washing Connect the additionally provided water supply hose of Main Washer to the water Machines supply hose connector and water tap. Water supply hose Connect the water supply hose connector to connector the water supply hose of Main Washer. Open the accessory package for Mini Washer installation.
-
Page 17: Installing The Drain Hose
Installing the Drain Hose Using the Drain Hose Connector • The drain hose should not be placed higher Insert the band clamps into the end of the than 100 cm above the floor. Water in the Main and Mini Washer’s drain hose. appliance may not drain or may drain slowly. -
Page 18: Leveling The Appliance
Leveling the Appliance CAUTION • Adjust the band clamps to prevent the hoses If the floor is uneven, turn the adjustable feet as from coming loose or leaking. Failure to do so required (Do not insert pieces of wood etc. could result in flooding. - Page 19 Using Anti-Slip Sheets (Optional) NOTE • You can obtain anti-slip sheets from the LG If you install the appliance on a slippery Service Centre. surface, it may move because of excessive vibration. Incorrect leveling may cause malfunction through noise and vibration. If this occurs, install the anti-slip sheets under the leveling feet and adjust the level.
-
Page 20: Operation
OPERATION Using the Appliance Choose the desired washing cycle. • Press the cycle button repeatedly until the desired cycle is selected. Sort laundry and load items. • Sort laundry by fabric type, soil level, colour and load size as needed. Open the door and load items into the washing machine. -
Page 21: Sorting Laundry
Sorting Laundry Caring before loading. • Do not wash 'memory wire' on female Look for a care label on your clothes. inner wear (such as a brassiere) as it may damage other clothes or the washing • This will tell you about the fabric content machine and create noise. -
Page 22: Closing The Door And Drawer
Provide • Forcing the drawer or the door to open can the power again or contact the LG service cause part damages and safety problems. centre. • Closing the drawer before having closed the •... -
Page 23: Adding Cleaning Products
Adding Cleaning Products Adding Detergent Measure the detergent with the detergent Detergent Dosage dispenser and pour it into the tub. • Detergent should be used according to the instruction of the detergent manufacturer and selected according to type, colour, soiling of the fabric and washing temperature. - Page 24 Adding Softeners NOTE • Do not pour fabric softener directly on the clothes. Adding Fabric Softener • The softener can also be diluted with water CASE 1. When the machine chimes: and added directly into the drum. Do not pour Press Start/Pause to pause the cycle.
-
Page 25: Control Panel
Control Panel Power Button Start/Pause Button • Press the Power button to turn the • This Start/Pause button is used to start washing machine on. the wash cycle or pause the wash cycle. • If a temporary stop of the wash cycle is needed, press the Start/Pause button. -
Page 26: Programme Table
Programme Table Washing Programme Maximum Programme Description Note Load Use this programme to wash lightly soiled normal • To change the setting during Light Soil items, except delicate washing, change the setting after 2.0 kg fabrics such as wool or pressing Start/Pause button. - Page 27 Maximum Programme Description Note Load • Laundry weight should be less than 1 kg to prevent damage to the fabric. Use this programme to wash shrinkable woolen or • Use only natural or wool-safe hand- washable items detergent safe for fabrics and Hand Wash requiring delicate care.
-
Page 28: Option Programme
Option Programme Child Lock Use this option to disable the controls. This Spin Only feature can prevent children from changing cycles or operating the appliance. Use this option to spin-dry. Locking the Control Panel Tub Clean Press and hold the Tub Clean and Extra Rinse button at the same time for three Use this option to keep the drum clean. -
Page 29: Smart Functions
• To verify the Wi-Fi connection, check that Wi-Fi icon on the control panel is lit. Installing Smart ThinQ • LG SmartThinQ is not responsible for any network connection problems or any faults, Search for the LG SmartThinQ application from malfunctions, or errors caused by network the Google Play Store or Apple App Store on a connection. - Page 30 NOTE • Once the Remote Start mode is enabled, you can start a cycle from the LG SmartThinQ smartphone application. If the cycle is not started, the machine will wait to start the cycle until it is turned off remotely from the application or the Remote Start mode is disabled.
- Page 31 Smart Diagnosis™ can not be activated unless copyright notices are available for download. the appliance is connected to power. If the LG Electronics will also provide open source appliance is unable to turn on, then code to you on CD-ROM for a charge covering...
-
Page 32: Using Smart Diagnosis
Customer Information Centre transmitted for analysis. Use this function if you need an accurate diagnosis by an LG Electronics customer NOTE information center when the appliance • The Smart Diagnosis™ function depends on malfunctions or fails. -
Page 33: Maintenance
MAINTENANCE Cleaning the Interior WARNING • Unplug the washing machine before cleaning • Use a towel or soft cloth to wipe around the to avoid the risk of electric shock. Failure to washing machine door opening and door follow this warning may result in serious injury, glass. -
Page 34: Cleaning The Drum
Cleaning the Drum Cleaning the Water Inlet Filter Use the Tub Clean option to keep the drum • Turn off the stopclock if the washing machine clean. is to be left for any length of time (e.g. holiday), especially if there is no floor drain Press the Power button. -
Page 35: Caution On Freezing During Winter
Caution on Freezing During How to Handle Freezing Winter Step 1. When the Door is Frozen • When frozen, the product does not operate • Thaw out the door using a hot water cloth. normally. Make sure to install the product where it will not freeze during winter. - Page 36 Step 3. When the Drain Pump is Frozen icon may blink on the display when • drain pump problems occur, take the following measures. Pour 15 ℓ warm water below 50–60 °C in the drum until washing machine wing nuts are immersed and wait for an hour.
-
Page 37: Troubleshooting
TROUBLESHOOTING The appliance is equipped with an automatic error-monitoring system to detect and diagnose problems at an early stage. If the appliance does not function properly or does not function at all, check the following before you call for service: Diagnosing Problems Symptoms Reason... - Page 38 Symptoms Reason Solution • Always wash dark colors separately from light colors and whites to prevent Clothes were not properly Staining discoloration. sorted. • Never wash heavily soiled items washed with lightly soiled items. Supply hose connection is • Check hoses and drain hose connectors loose at the tap, washing for leaks, cracks and splits.
- Page 39 Symptoms Reason Solution Control panel has powered • This is normal. Press the Power button off due to inactivity. to turn the washing machine on. Washing machine is • Make sure cord is plugged securely into unplugged. a working outlet. Water supply is turned off.
- Page 40 Symptoms Reason Solution • Make sure the inlet filters on the fill Filter clogged. valves are not clogged. Refer to the filter cleaning instructions. Supply hoses may be kinked. • Check that supply hoses are not kinked or clogged. • Make sure that the cold water tap is Insufficient water supply.
-
Page 41: Error Messages
Error Messages Symptoms Reason Solution • Close the drawer and press Start/Pause button to start the cycle. Drawer is not closed • If the drawer is closed and the drawer properly. lock error message is displayed, call for service. • Open the drawer and make sure the latch area is free of clothing or other obstructions. - Page 42 • The product is for use only in combination with LG authorized Stacking switch is not appliances. Call the customer information working properly. centre to check out LG authorized appliances. • Thaw out the supply hose using a hot Drain hose, supply hose or water cloth.
- Page 43 Memo MFL70280534_E.indd 43 2018. 10. 18. 오전 9:46...
- Page 44 Memo MFL70280534_E.indd 44 2018. 10. 18. 오전 9:46...
- Page 45 Memo MFL70280534_E.indd 45 2018. 10. 18. 오전 9:46...
- Page 46 MFL70280534_E.indd 46 2018. 10. 18. 오전 9:46...
- Page 47 Cela simplifiera l'installation et assurera que le produit soit installé correctement et en toute sécurité. Conserver ces instructions à proximité du produit après installation pour référence ultérieure. www.lg.com Copyright © 2018 LG Electronics Inc. Tous droits réservés MFL70280534_F.indd 1 2018. 10. 18. 오전 9:44...
- Page 48 MFL70280534_F.indd 2 2018. 10. 18. 오전 9:44...
- Page 49 Panneau de commande ................25 Tableau des programmes ................. 26 Programme en option ................28 FONCTIONS SMART .............29 Utilisation de l'Application LG SmartThinQ ..........29 Utilisation de Smart Diagnosis™ .............. 32 MAINTENANCE ..............33 Nettoyage de la lave-linge ................ 33 Nettoyage de le tambour ................34 Nettoyage du filtre d'entrée d'eau .............
-
Page 50: Consignes De Sécurité
CONSIGNES DE SÉCURITÉ Les consignes de sécurité suivantes sont destinées à éviter les risques ou dommages imprévus issus d'une utilisation dangereuse ou incorrecte de l'appareil. Les consignes sont séparées en 'AVERTISSEMENT' et 'ATTENTION' comme décrit ci-dessous. Ce symbole s'affiche pour indiquer des problèmes et des utilisations qui peuvent présenter des risques. - Page 51 Pour une utilisation en Europe : Cet appareil peut être utilisé par des enfants âgés de 8 ans et plus et par des personnes ayant des capacités physiques, sensorielles ou mentales réduites ou bien manquant d'expérience et de connaissances, s'ils sont surveillés ou ont reçu des instructions relatives à...
- Page 52 •Si le câble d'alimentation est endommagé ou si les trous de la prise sont lâches, ne pas utiliser le cordon d'alimentation et contacter un centre de service agréé. •Cet appareil ne doit pas être installé derrière une porte verrouillable, une porte coulissante ou une porte avec une charnière du côté...
- Page 53 Toute utilisation incorrecte peut provoquer un incendie ou une explosion. •En cas d'inondation, débrancher la fiche électrique et contacter le centre d'information client LG Electronics. •Ne pas trop s’appuyer trop fort sur le tiroir lorsque celui-ci est ouvert.
- Page 54 •Ne pas toucher la porte au cours d'un programme haute température. •Ne pas utiliser de gaz inflammables et de substances combustibles (benzène, essence, diluant, pétrole, alcool, etc.) près de l'appareil. •Si le tuyau de vidange ou d'arrivée est gelé en hiver, n'utiliser qu'après dégel.
- Page 55 Maintenance •Brancher correctement le cordon d'alimentation dans la prise de courant après avoir enlevé complètement toute humidité et poussière. •Débrancher le cordon d'alimentation avant de nettoyer l'appareil. •Ne jamais débrancher l'appareil en tirant sur le câble d'alimentation. Toujours saisir fermement la prise électrique et la tirer tout droit pour la sortir de la prise de courant.
-
Page 56: Installation
INSTALLATION Pièces Porte Tuyau d'approvisionnement en eau Tambour Fiche d'alimentation Panneau de commande Tuyau de vidange d'eau Pieds réglables MFL70280534_F.indd 10 2018. 10. 18. 오전 9:44... -
Page 57: Accessoires
Accessoires Tuyau Raccordement Tuyau de vidange Raccord de Raccord de d'approvisionnement d'un tuyau d'eau tuyau tuyau de vidange en eau d'approvisionnement d'approvisionnement d'eau (pour eau froide) en eau Plaques Gobelet Supports (avant) Supports (arrière) Clé antidérapantes doseur de lessive (2 EA) (2 EA) (2 EA) * Vis... -
Page 58: Exigences Du Lieu D'installation
Exigences du lieu d'installation • Ne pas installer l'appareil dans des pièces qui puissent atteindre une température négative. Des tuyaux gelés peuvent éclater sous la pression. La Emplacement fiabilité de l'unité de commande électronique peut être altérée à des températures inférieures au 135 cm point de congélation. -
Page 59: Encastrer Le Mini Lave-Linge
Encastrer le mini lave-linge Type 1. La partie inférieure de la machine à laver principale est argenté. • Premièrement, assemblez le support d'appairage à l'aide de 2 vis type-A incluses dans la boîte d'accessoires du Mini lave-linge, puis chaque support à l'aide de 7 Supports vis de type A incluses dans la boîte (avant) - Page 60 Placez la machine à laver principale par- Tirer le bloc de mousse et le conserver pour dessus le mini lave-linge. une utilisation ultérieure. • Assurez-vous que les 4 pieds sont totalement • Si, à l'avenir, le lave-linge doit être déplacé, verrouillés et que les trous du mini lave-linge le bloc de mousse aidera à...
-
Page 61: Raccordement D'un Tuyau D'alimentation
Raccordement d'un tuyau Raccordement d'un tuyau au robinet d'eau d'alimentation • La pression d'alimentation en eau doit être Raccordement d'un tuyau de type vissé à comprise entre 0,1 MPa et 0,8 MPa (1,0‒8,0 kgf/ un robinet avec filetage Visser le raccord du tuyau au robinet d'alimentation •... - Page 62 Raccordement d'un tuyau à deux Raccordez le tuyau d’alimentation fourni avec la machine à laver principale au connecteur du lave-linge tuyau d’alimentation en eau et au robinet d'eau. Connectez le raccord du tuyau d’alimentation Raccord du tuyau en eau au tuyau d'alimentation de la machine à d'alimentation en eau laver principale.
-
Page 63: Installation Du Tuyau De Vidange
Installation du tuyau de vidange Utilisation du raccord de tuyau de vidange • Le tuyau de vidange ne doit pas être placé à plus de 100 cm au-dessus du sol. Il se peut que l'eau Insérez les bandes de serrage dans l'extrémité de l'appareil ne se vidange pas ou se vidange du tuyau d’évacuation de la machine à... -
Page 64: Mise À Niveau De L'appareil
Mise à niveau de l'appareil ATTENTION • Réglez les bandes de serrage pour éviter que les Si le sol est inégal, tourner les pieds réglables tuyaux ne se détachent ou pour empêcher des selon les besoins (ne pas insérer de morceaux de fuites. - Page 65 Utilisation de patins antidérapants REMARQUE (en option) • Vous pouvez obtenir des patins antidérapants auprès du centre de service LG. Si vous installez l'appareil sur une surface glissante, il peut se déplacer en raison des vibrations excessives. Une mauvaise mise à niveau peut provoquer un dysfonctionnement avec du bruit et des vibrations.
-
Page 66: Utilisation
UTILISATION Utilisation de l'appareil Choisir le cycle de lavage souhaité. • Appuyer sur le bouton du cycle à plusieurs reprises jusqu'à ce que le programme désiré Trier le linge et charger les articles. soit sélectionné. • Trier le linge par type de textile, niveau de salissure, couleur et capacité... -
Page 67: Trier Le Linge
Trier le linge Soin avant chargement. • Ne pas laver le « fil mémoire » sur les Rechercher les étiquettes de soins sur vos sous-vêtements femmes (comme un vêtements. soutien-gorge), car cela peut endommager d'autres vêtements ou le lave-linge et créer •... -
Page 68: Fermer La Porte Et Le Tiroir
Fournir de nouveau de l'alimentation ou de sécurité. contacter le centre de service LG. • Fermer le tiroir avant d'avoir fermé complètement • Si la porte ne peut pas s'ouvrir en raison d'une la porte peut rayer la vitre de la porte. -
Page 69: Ajouter Des Produits De Nettoyage
Ajouter des produits de Ajouter de la lessive nettoyage Mesurer la lessive avec le distributeur lessive et la verser dans la cuve. Dosage de la lessive • La lessive doit être utilisée conformément aux instructions du fabricant de la lessive et choisie selon le type, la couleur, la salissure du tissu et la température de lavage. - Page 70 Ajout d'assouplissant REMARQUE • Ne pas verser l'assouplissant directement sur les vêtements. Ajouter un assouplissant • L'assouplissant peut également être dilué avec de CAS 1. Lorsque la machine sonne : l'eau et ajouté directement dans le tambour. Ne Appuyer sur Départ/Pause pour interrompre le pas verser l'assouplissant non dilué...
-
Page 71: Panneau De Commande
Panneau de commande Bouton Marche/Arrêt Bouton Départ/Pause • Appuyer sur le bouton Marche/Arrêt pour • Ce bouton Départ/Pause est utilisé pour mettre le lave-linge sous tension. démarrer le cycle de lavage ou mettre en pause le cycle de lavage. • Si un arrêt temporaire du cycle de lavage est nécessaire, appuyer sur le bouton Départ/ Affichage Pause. -
Page 72: Tableau Des Programmes
Tableau des programmes Programme de lavage Charge Programme Description Remarque maximale Utiliser ce programme pour • Pour changer le réglage pendant le Light Soil laver des articles normaux lavage, changez le réglage après (Légèrement légèrement sales, à 2,0 kg avoir appuyé sur le bouton Départ/ sale) l'exception de tissus délicats Pause. - Page 73 Charge Programme Description Remarque maximale • Le poids de lavage doit être inférieur à 1 kg pour éviter Utilisez ce programme pour d’endommager le tissu. laver la laine thermorétractable • Utilisez uniquement un détergent ou des articles nécessitant naturel ou un détergent approuvé Hand Wash des soins délicats.
-
Page 74: Programme En Option
Programme en option Verrouillage enfant Utiliser cette option pour désactiver les Spin Only (Essorage seul) commandes. Cette fonction peut empêcher les enfants de change de cycle ou d'utiliser l'appareil. Utilisez cette option pour l’essorage. Verrouillage du panneau de commande Tub Clean (Nettoyage de la cuve) Pressez et maintenez les boutons Extra Rinse et Tub Clean en même temps pendant trois Utiliser cette option pour conserver le tambour... -
Page 75: Fonctions Smart
: est-elle allumée ? Installation de LG SmartThinQ • LG SmartThinQ ne saurait être tenu responsable Chercher l’application LG SmartThinQ dans Google en cas de problèmes de connexion au réseau, ou Play Store & Apple App Store sur un smartphone. - Page 76 • Lorsque le mode Démarrage à distance est activé, vous pouvez lancer un cycle à partir de l'application Smartphone ThinQ LG Smart. Si le cycle n'est pas démarré, la machine attendra pour démarrer le cycle jusqu'à ce qu'il soit éteint à...
- Page 77 Utiliser cette fonction si vous avez besoin d'un opensource.lge.com. diagnostic précis par un centre d'information client LG Electronics en cas de dysfonctionnement ou de En plus du code source, tous les termes de la panne de l'appareil. licence, ainsi que les exclusions de responsabilité...
-
Page 78: Utilisation De Smart Diagnosis
Utiliser cette fonction si vous avez besoin d'un qualité de l'appel local. diagnostic précis par un centre d'information client LG Electronics en cas de dysfonctionnement ou de • Les performances de communication seront panne de l'appareil. Utiliser cette fonction améliorées et vous pourrez recevoir un meilleur uniquement pour communiquer avec le service si vous utilisez le téléphone fixe. -
Page 79: Maintenance
MAINTENANCE Nettoyage de l'intérieur AVERTISSEMENT • Débrancher le lave-linge avant de le nettoyer afin • Utiliser une serviette ou un chiffon doux pour d'éviter tout risque de choc électrique. Le essuyer le contour de l'ouverture de la porte du non-respect de cet avertissement peut entraîner lave-linge et le verre de la porte. -
Page 80: Nettoyage De Le Tambour
Nettoyage de le tambour Nettoyage du filtre d'entrée d'eau Utiliser l'option Nettoyage de la Cuve pour garder le tambour propre. • Fermer le robinet d'arrêt si le lave-linge doit être laissé pendant un certain temps (par exemple Appuyer sur le bouton Marche/Arrêt. vacances), surtout s'il n'y a pas d'évacuation au sol (rigole) à... -
Page 81: Attention Au Gel Pendant L'hiver
Attention au gel pendant l'hiver Comment gérer le gel • Une fois gelé, l'appareil ne fonctionne pas Étape 1. Si la porte est congelée normalement. Veiller à installer l'appareil où il ne • Décongeler la porte à l'aide d'un chiffon d'eau gèlera pas en hiver. - Page 82 Étape 3. Si la pompe à vidange est congelée • L'icône peut clignoter à l'écran si des problèmes de pompe à vidange se produisent. Prendre les mesures suivantes. Verser 15 l d'eau chaude à moins de 50-60 °C dans le tambour jusqu'à ce que les vis papillon du lave-linge soient immergées et attendre pendant une heure.
-
Page 83: Dépannage
DÉPANNAGE L'appareil est équipé d'un système de surveillance automatique des pannes pour détecter et diagnostiquer les problèmes à un stade précoce. Si l'appareil ne fonctionne pas correctement ou ne fonctionne pas du tout, vérifier les points suivants avant d'appeler le service : Diagnostic de problèmes Symptômes Cause... - Page 84 Symptômes Cause Solution • Toujours laver les couleurs sombres séparément des couleurs claires et du blanc Les vêtements ne sont pas Taches pour empêcher la décoloration. correctement triés. • Ne jamais laver les articles très sales lavés avec des articles peu sales. Le raccordement au tuyau •...
- Page 85 Symptômes Cause Solution Le panneau de commande est • Ceci est normal. Appuyez sur le bouton hors tension en raison d'une Marche/Arrêt pour mettre en marche la inactivité. machine à laver. • S'assurer que le cordon soit bien branché Le lave-linge est débranché. dans une prise.
- Page 86 Symptômes Cause Solution • S'assurer que les filtres d'entrée sur les robinets de remplissage ne soient pas Le filtre est bouché. obstrués. Se reporter aux instructions de nettoyage du filtre. Les tuyaux d'alimentation • Vérifier que les tuyaux d'alimentation ne peuvent être pliés.
-
Page 87: Messages D'erreur
Messages d'erreur Symptômes Cause Solution • Fermez le tiroir et pressez sur le bouton Départ/Pause pour commencer le cycle. Le tiroir n’est pas fermé • Si le tiroir est fermé et le message d'erreur correctement. de verrouillage du tiroir s'affiche, appeler le service. - Page 88 LG. • Ce produit est destiné à une utilisation en association uniquement avec des appareils Le commutateur d'empilage ne approuvés LG. Contactez le centre fonctionne pas correctement. d'information à la clientèle pour vérifier les appareils approuvés LG.
- Page 89 Note MFL70280534_F.indd 43 2018. 10. 18. 오전 9:44...
- Page 90 Note MFL70280534_F.indd 44 2018. 10. 18. 오전 9:44...
- Page 91 MFL70280534_F.indd 45 2018. 10. 18. 오전 9:44...
- Page 92 MFL70280534_F.indd 46 2018. 10. 18. 오전 9:44...
Need help?
Do you have a question about the F8K5XNK4 and is the answer not in the manual?
Questions and answers