Advertisement
Table of Contents
MUSIC
TECHNOLOGY
®
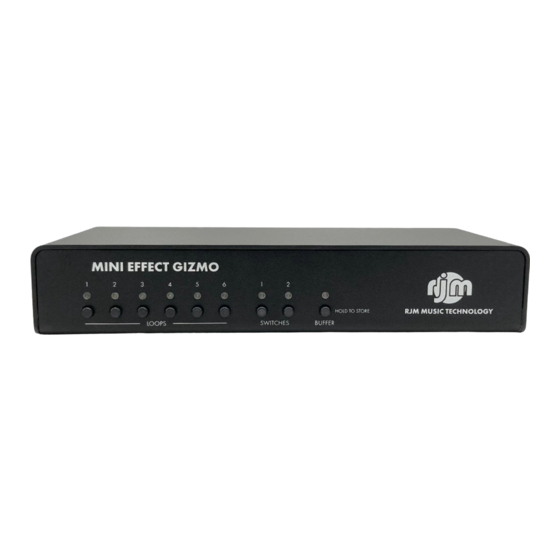
Loops 1 through 6 - These buttons turn audio loops 1 through 6 on and off. Each button lights up to indicate that the
corresponding audio loop is active. Audio loops are used to switch your pedals in and out of the signal path.
Switches 1 and 2 - These buttons turn function switches 1 and 2 on and off. Each button lights up to indicate that the
corresponding function switch is active. Function switches are used to control amp channel switching or other features.
Buffer - When pressed briefly, this button will turn the input buffer on and off. The LED is green when the buffer is on and
yellow when it's off. When held down for 3 seconds, this button stores the current state of all switches to non-volatile
memory. The buttons will flash to confirm that the state has been stored. Please note that the store function doesn't work
until a preset has been selected from a MIDI controller.
RJM Music Technology, Inc.
www.rjmmusic.com
TUNE OUT
SND1
IN
RTN1
Guitar
OUT
In this basic 6 pedal configuration, all you need to do is connect each loop send to a pedal input, and each loop return to
the same pedal's output. Then, connect your guitar, amp and MIDI controller and you're ready to go!
The MIDI In and MIDI Out connectors can accept either 5-pin or 7-pin MIDI cables. 7-pin cables are only needed if you want
to phantom power a compatible MIDI controller. With the included power supply, the Mini Effect Gizmo X can power a MIDI
controller that takes 9VDC at up to 800mA of current.
Please note! When phantom powering a Mastermind GT, use the Mastermind GT's power supply to power the Mini Effect
Gizmo X. The power supply included with the Mini Effect Gizmo isn't powerful enough to power the Mastermind GT.
MINI EFFECT GIZMO X QUICK START
MINI EFFECT GIZMO
1
2
3
4
5
LOOPS
SND2
SND3
SND4
RTN2
RTN3
RTN4
IN
OUT
IN
OUT
IN
OUT
IN
Front Panel
6
1
2
HOLD TO STORE
SWITCHES
BUFFER
Mini Effect Gizmo X Wiring Diagram
Connections
SND5
SND6
FN SW
RTN5
RTN6
OUT
OUT
IN
OUT
IN
6 pedals in front of amp
This is the simplest connection method, 6 pedals wired
in front of an amp's input.
RJM MUSIC TECHNOLOGY
MIDI OUT
MIDI IN
9VDC
200mA
MIDI Controller Out
To MIDI input of
next MIDI device
(if any)
Footswitch input
(optional connection)
AC Adapter
7/29/21
Advertisement
Table of Contents

Subscribe to Our Youtube Channel
Related Manuals for RJM MINI EFFECT GIZMO X


Summary of Contents for RJM MINI EFFECT GIZMO X
- Page 1 MUSIC MINI EFFECT GIZMO X QUICK START TECHNOLOGY ® Front Panel MINI EFFECT GIZMO RJM MUSIC TECHNOLOGY HOLD TO STORE LOOPS SWITCHES BUFFER Loops 1 through 6 - These buttons turn audio loops 1 through 6 on and off. Each button lights up to indicate that the corresponding audio loop is active.
- Page 2 Programming The Mini Effect Gizmo X is set up to receive on MIDI channel 1 by default. If your MIDI controller is set up to send program changes on MIDI channel 1, the Mini Effect Gizmo will automatically respond to it. If you need to change the Mini Effect Gizmo’s MIDI channel, please refer to the Setup Mode section below.
Need help?
Do you have a question about the MINI EFFECT GIZMO X and is the answer not in the manual?
Questions and answers