Table of Contents
Advertisement
Quick Links
Advertisement
Table of Contents

Related Manuals for Aviom A360-MEE


Summary of Contents for Aviom A360-MEE
- Page 1 User Guide 9310 1027 0001F rev 1.2 © 2015 Aviom, Inc.
-
Page 2: Important Safety Instructions
15. No on/off power switches are included in the system. The external power supply should be used to control power to an Aviom device. This power supply should remain readily operable. 16. The solid line over dashed line symbol ( ) indicates that the input voltage must be a DC voltage. - Page 3 Connect the equipment into an outlet on a circuit different from that to which the receiver is connected. • Consult the dealer or an experienced radio/TV technician for help. Changes or modifications to the product not expressly approved by Aviom, Inc. could void the user’s FCC authority to operate the equipment. CAUTION: •...
-
Page 4: Certifications
Aviom, Inc. Trademarks Aviom, A Net, the A Net icon, Pro16, Pro16e, Pro64, One-Touch Ambience, Dual Profile Channel, Enhance, Stereo Placement, and Network Mix Back are trademarks of Aviom, Inc. All other trademarks are the property of their respective owners. -
Page 5: Aviom, Inc. Limited Warranty
Quality Assurance label has been damaged, modified, or removed. If a defect is discovered, first write or call Aviom, Inc. to obtain a Return Authorization number. No service will be performed on any product returned without prior authorization. Aviom, Inc. will, at its option, repair or replace the product at no charge to you. -
Page 6: Warranty Information
Authorized Aviom Repair Station, check the Aviom web site at www.aviom.com. To fulfill warranty requirements, your Aviom product should be serviced only at an authorized Aviom service center. The Aviom serial number label must appear on the outside of the unit, or the Aviom warranty is void. -
Page 7: Table Of Contents
Certifications ....... iv Aviom, Inc. Limited Warranty ..... . . v Warranty Information . - Page 8 Tone Control — Bass and Treble ..... 20 Channel Volume ......21 Stereo Placement .
- Page 9 Mode Switch ....... 45 Pro16 Mode ......46 Default Mode .
-
Page 10: A360 Personal Mixer
Feature Overview The A360 Personal Mixer is part of Aviom’s Pro16® Series of products; it can be combined with Pro16® and Pro16e™ analog input devices, console cards, and/or the Pro64® ASI A-Net® Systems Interface to create personal mixing systems for applications in live performance, recording, and broadcast. -
Page 11: Conventions Used In This Document
• USB storage for saving and loading mixer configurations • Seamless integration with existing Aviom personal mixing systems Conventions Used in this Document Using Personal Mixers When referring to the use of the Personal Mixers in a personal mixing system in general, the term Personal Mixer is used to describe a case where an A360 Personal Mixer, A320 Personal Mixer, A-16II Personal Mixer, or an A-16R Rack-mount Personal Mixer (with or without the optional A-16CS Control Surface) can be used. -
Page 12: Package Contents
A360 Channel Manager software, available free from the Aviom website Also included with the system is a Warranty Registration, found within this User Guide. Be sure to fill out the form and return it to Aviom, Inc. via mail or fax as soon as possible. About A-Net A-Net®... -
Page 13: Compatibility
Compatibility The A360 Personal Mixer is compatible with Pro16, Pro16e, and Pro64 A-Net devices as detailed below. Pro16 Products The A-N from the following Pro16 devices may be connected to the A360 Personal Mixer’s port: • AN-16/i v.2 Input Module •... -
Page 14: About Category 5
Aviom products. Cat-5e Cables Any standard Cat-5e UTP cable may be used with your Aviom products. If you need a longer cable for a particular application, any computer store should be able to supply you with an appropriate cable. A qualified technician should be able to build custom cables to any length. -
Page 15: Cable Lengths
Cable Lengths For Pro16 applications—connecting one Pro16 device to another—the Cat-5e cables used with your Aviom products may be up to 500 feet (approximately 150 meters) in length between devices. For example, connecting an AN-16/i-M Mic Input Module to an AN-16/o Output Module is a Pro16-to-Pro16 connection. -
Page 16: Ac Line Conditioning
AC Line Conditioning Aviom products are digital devices and as such are sensitive to sudden spikes and drops in the AC line voltage. Changes in the line voltage from lightning, power outages, etc. can sometimes damage electronic equipment. To minimize the chance of damage to your equipment from sudden changes in the AC line voltage, you may want to plug your equipment into a power source that has surge and spike protection. -
Page 17: Cleaning And Maintenance Information
Cleaning and Maintenance Information The exterior of your Aviom products should be cleaned with a dry, soft, lint-free cloth. For tougher dirt, you can use a cloth slightly dampened with water or with a mild detergent. When cleaning your Aviom products, never spray cleaners directly onto the product surfaces. Instead, spray a small amount of the cleaning solution onto a clean cloth first. -
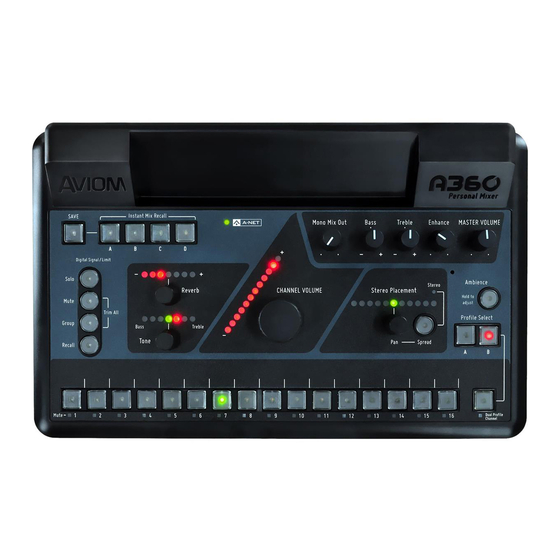
Page 18: A360 Front Panel
A360 Front Panel Mix Channels Function Channel Label Strip Channel Buttons with LED – green Channel Mute LEDs – yellow Dual Profile Channel™ Button Profile Select Buttons for the Dual Profile Channel One-Touch Ambience™ Button and Built-in Ambience Mic A360 P ersonAl ixer... -
Page 19: Channel Label Strip
The channel label strip is designed to accept 1/2-inch (13 mm) wide artist’s tape or custom-made labels. A spreadsheet style channel label template is available on the Aviom website. A sample appears on page 71. Do not use permanent adhesives or tapes with your Aviom product. -
Page 20: Channel Mute Leds
Channel 5-6 are stereo linked at a Pro16 input device; the rear panel mode switch is set to Pro16. Channel Mute LEDs Each standard mix channel plus the Dual Profile Channel has a Mute LED below its channel select button. The yellow Mute LED indicates that a channel is muted in the current mix. -
Page 21: Dual Profile Channel
Any number of mix channels may be muted while making a mix. Channel mutes are saved when a Mix Preset is created. To quickly mute all mix channels temporarily, double-click the m button. The yellow LED in the Mute button and those under the channel buttons will blink. Press the m button again to return to normal operation. -
Page 22: What Gets Stored In A Profile
What Gets Stored in a Profile The A and B Profiles save all channel-level settings per Profile, including: • Channel Volume • Reverb level • Tone level • Spread positioning for stereo channels • Pan position for mono and stereo channels Changes to the channel settings can be made at any time: simply press the Profile A or B button and begin editing. -
Page 23: Using The Dual Profile Channel As A Mix Channel
Using the Dual Profile Channel as a Mix Channel The A360’s powerful Custom mode allows the user to go beyond the sequential channel mapping of Default mode, allowing each Personal Mixer’s channel assignments to be customized to suit the needs of the performers. -
Page 24: One-Touch Ambience
One-Touch Ambience A common complaint amongst in-ear monitor users on stage (and headphone users in the studio) is that they feel cut off from their surroundings, and that it’s more difficult to interact with other performers and hear audience reactions. Removing a monitoring device like custom ear monitors is somewhat time consuming and not always practical in a performance situation. -
Page 25: Setting The Ambience Level
Setting the Ambience Level To set the One-Touch Ambience level: 1. Hold the A button down; its LED will be on. mBIeNCe 2. Within a second, the Channel Volume LEDs will start to blink, displaying the current level (if no level is shown, the Ambience level is currently set to zero). 3. -
Page 26: Using Network Audio For One-Touch Ambience
Using Network Audio For One-Touch Ambience As with the Dual Profile Channel, the A360’s Custom mode allows the user to go beyond the sequential channel mapping of the Default mode, customizing each Personal Mixer’s channel assignments to suit the needs of the performers. With the A360 rear-panel mode switch set to C , One-Touch Ambience uStom can also be assigned to any available network source from the (up to) 64-channel Pro16e A-Net stream. - Page 27 Once assigned as a network audio channel, the One-Touch Ambience retains the mix-level properties of the onboard mic—only its Channel Volume can be changed. Reverb, Tone and Pan/Spread are not available. See the previous section, starting at page 16. Assigning the Ambience channel to network content is ideal if you need to bring a mix of mono or stereo ambient microphones hung in a performance space into the Personal Mixers.
-
Page 28: Channel Controls Section
Channel Controls Section Each mix channel has separate Reverb, Tone, Volume and Pan/Spread settings available. Function Reverb Knob and Reverb Level LEDs Bass/Treble Tone Knob and Tone LEDs Channel Volume Knob and Level LEDs Stereo Placement Pan Knob and Pan/Spread LEDs Stereo LED Spread Button... -
Page 29: Channel Controls
Channel Controls The individual channel control functions are available whenever one of the 16 standard mix channels or the Dual Profile Channel is selected. All channel settings are saved with a Mix Preset. Volume, pan, tone and reverb can be set for each mix channel. Reverb Reverb can be added to any mix channel (including the Dual Profile Channel) to provide added space and depth to the mix. -
Page 30: Channel Volume
To add a bass boost to the selected channel, turn the t knob to the left. Two LED brightness levels are used for the red LEDs to allow for the maximum number of boost amounts to be displayed. To remove a bass boost turn the t knob to the right which will move the Tone LEDs back towards the green center (flat) position. -
Page 31: Stereo Placement
Stereo Placement The A360 Personal Mixer offers a unique treatment of the stereo positioning controls for each channel in a mix. Every audio source can be heard in full stereo fidelity without taking up additional space on the mixer, creating a more realistic monitor mix environment for performers wearing stereo earbuds and headphones. -
Page 32: Using A Pro16 Input Device
When a single 16-channel Pro16 input device (including the original AN-16/i Input Module, AN-16/i-M Mic Input Module, Y1 A-Net Card for Yamaha®, or the console cards built by Aviom partners that use the Pro16 A-Net technology) is connected to an A360 Personal Mixer, stereo channels are mapped to adjacent channel pairs. -
Page 33: Understanding Pan And Spread
Understanding Pan and Spread On the A360, Spread is used to indicate the distance between the left and right sides of a stereo channel. The default spread for a stereo source is full left and full right. The default spread for a stereo source To change the Spread for a stereo channel, press the S button;... - Page 34 Stereo Guitar LEFT RIGHT Stereo Piano LEFT RIGHT Stereo Drums LEFT RIGHT Three stereo channels are shown panned to various locations within the stereo image. Stereo Guitar Stereo Piano Stereo Drums LEFT RIGHT The effects of stereo Spread plus panning: a stereo guitar is panned left, a stereo piano is panned right. With stereo drums panned less than full left/right, the stereo imaging is improved.
-
Page 35: Editing Controls Section
Editing Controls Section The Mute, Solo, Group, and the Trim All functions are available in this section, along with the Digital Signal/Limit LED indicator. Function Digital Signal/Limit LED, bi-color green/red Solo Button Mute Button Group Button Trim All Function (Mute + Group buttons) A360 P ersonAl... -
Page 36: Digital Signal/Limit
Digital Signal/Limit The A360 includes custom limiting circuitry to maximize headroom and minimize clipping in the digital domain. A bi-color Digital Signal/Limit LED is provided to help maintain a high fidelity, distortion-free mix. The LED lights green under normal circumstances. As channel mix levels begin to increase, peaks (especially those from percussive sources) will begin to light the red LED to indicate that some limiting has started to occur. -
Page 37: Mute Button
Mute Button Use the Mute function to silence a channel or Group in a mix without having to edit its volume. Mute is a simple way to eliminate elements from a mix; the state of the channel mute for each mix channel (including the Dual Profile Channel) is saved when a Mix Preset is stored. - Page 38 When using Pro16 Mode on the A360, stereo links are treated as pairs of adjacent odd-even channels. Double-clicking either the left or right side of the stereo pair will add or remove it from a Group. It is not possible to add only one side of a stereo pair to a Group. In this example, mix channels 2, 4, 5, 6, and 8 are grouped together.
-
Page 39: Mixing With Groups
Mixing With Groups Once a Group has been configured, pressing any mix channel button that is part of a Group will light the channel button LEDs in all Group members plus the Group button LED. The C knob on hANNel olume the A360 will then adjust the overall level for the selected Group. -
Page 40: Stereo Links And Groups
Stereo Links and Groups The following rules apply when using Pro16 mode and working with stereo channels in Groups. • Turning a stereo link on when only one channel of the new stereo pair is in a Group will cause the companion channel to be added to the Group. •... - Page 41 After using the Trim All function to eliminate clipping as described above, you may need to raise the Master Volume level to compensate for the lower overall mix level. The effect of using the Trim All function is seen for channel 6. All other mix channel levels are reduced by the same amount. A360 P ersonAl ixer...
-
Page 42: Master Section
Master Section The master section of the A360 Personal Mixer’s interface includes the A-Net LED and the global master volume and tone controls. Function A-Net LED, bi-color green/red Mono Mix Out Volume Control Bass Tone Control Treble Tone Control Enhance Tone Control Master Volume Control... -
Page 43: Master Section Functions
Master Section Functions Master Volume The m control sets the level for the 1/8-inch and 1/4-inch Stereo Mix Out jacks on the rear ASter olume panel. It also sets the level of the mix sent to the Mono Mix Out jack on the rear panel. When using only the Mono Mix Out, start with the m at 12 o’clock and adjust the m t knob as needed. -
Page 44: Bass Tone Control
Master Volume determines the mix level available to the Mono Mix Out. The A360 automatically generates a mono mix regardless of any stereo placement and/or panning used in the stereo mix heard at the S jacks. The Mono Mix Out level is not saved as part of a Mix tereo Preset. -
Page 45: A-Net Led
To experience the Enhance feature, slowly rotate the Enhance knob while listening to a mix. The amount of the Enhance tone control is a global setting and is not saved in a Mix Preset. A-Net LED The A-Net LED lights whenever a valid Pro16 or Pro16e A-Net signal is connected to the A360. When the 16-channel Pro16 version of A-Net is connected, the LED lights green;... -
Page 46: Mix Presets
Mix Presets Mixes created on the A360 can be saved to the four Instant Mix Recall locations or to the sixteen mix channel button locations— for a total of 20 mixes. Function Save Button Instant Mix Recall™ Buttons A, B, C, and D Recall Button Channel Button Memory Locations A360 P... -
Page 47: Saving Mix Presets
Saving Mix Presets The A360 Personal Mixer can save up to 20 Mix Presets—16 are stored using the channel select buttons numbered 1-16 as storage locations while an additional four can be saved in the Instant Mix Recall™ locations A-D. Mixes are retained in the A360 even when the mixer is powered down. When a Mix Preset is created, the A360 stores the channel-level settings for the 16 standard mix channels and the Dual Profile Channel, plus the level setting for the One-Touch Ambience button. -
Page 48: Instant Mix Recall Buttons
The Save button is used for both Instant Mix Recall locations and standard mix locations. The Save button cannot be activated if a channel is in Solo. Instant Mix Recall Buttons As their name implies, the four Instant Mix Recall™ locations allow a saved mix preset to be recalled with one button press. -
Page 49: To Recall An Instant Mix Preset
A mix is saved to Instant Mix Recall location B. To Recall an Instant Mix Preset Once mixes have been saved to one of the four Instant Mix Recall locations, they can be instantly recalled by simply pressing the A, B, C, or D buttons. The new mix may be used immediately. Recall Button The Recall button is used only with the Mix Presets that have been saved to one of the 16 channel button locations, it is not required when using the Instant Mix Recall presets. -
Page 50: Clear A Mix
Press the Recall button followed by a channel button to recall a mix. Mixes cannot be saved or recalled if a channel is in Solo mode, as indicated by the flashing green Solo LED. Clear a Mix The current mix can be cleared and reset by holding the r button and then pressing the m eCAll button, returning all channel level settings to their default values. -
Page 51: What Gets Saved In A Mix Preset
What Gets Saved in a Mix Preset The following settings are saved when a Mix Preset is created: • Channel Mapping type - Pro16 or Pro16e • Channel Volume • Channel Reverb level • Channel Tone setting • Channel Pan •... -
Page 52: A360 Personal Mixer Rear Panel
A360 Personal Mixer Rear Panel A-Net In Mono Mix Out 24VDC Regulated 500 mA Stereo Mix Out Data PROGRAM CUSTOM DEFAULT Pro16 Function Stereo Mix Out – 1/8-inch and 1/4-inch TRS Mono Mix Out – XLR male USB Data Port Mode Switch –... -
Page 53: Rear Panel Features
Rear Panel Features This section details the function of each of the rear panel features on the A360 Personal Mixer. Stereo Mix Out Both 1/8-inch and 1/4-inch TRS Stereo Mix Out jacks are provided for simplified connections to earbuds and headphones. Both outputs can be used at the same time if needed, but note that the impedance of both devices should be similar to avoid a volume imbalance. -
Page 54: A360 Modes
XLR mono output. A360 Modes The A360 can be integrated into new or existing Aviom personal mixing systems along with A-16II and A-16R Personal Mixers, or it can be used in a system specifically designed to take advantage of the higher channel count that Pro16e A-Net offers. -
Page 55: Pro16 Mode
Pro16 Mode Set the mode switch to P 16 for systems with 16 or fewer channels when a single Pro16 input device is used. Channels are laid out on the A360 as they are on the A-16II and A-16R Personal Mixers. There is a one- to-one correspondence between the input device’s channel patching assignment and the Personal Mixer’s channels, and this channel order cannot be changed. - Page 56 Mono Mono Mono Mono Mono Mono Mono Mono A-Net In Mono Stereo Mono Stereo Mono Stereo Mono Stereo Mono Stereo Mono Stereo Mono Stereo Mono Stereo Power Each channel pair of an input module provides either a mono or stereo source for an A360 mix button, as determined by the Mono/Stereo link switch on the AN16/i v.2.
-
Page 57: How Stereo Links Work
How Stereo Links Work When channels are stereo linked on an input module, both channels appear on the A360 as a stereo pair, using one mix channel button. The table shows the default mapping of 32 input sources to an A360. AN-16/i v.2 Default A360 Channel Bank... -
Page 58: Program Mode
The free A360 Channel Manager application (available from the Aviom website) is used to create and save mixer configurations as well as back up Mix Presets. Once saved, mixer configurations can be copied to a USB memory stick for loading into the A360 Personal Mixer. - Page 59 A custom channel configuration is shown in the A360 Channel Manager software. A360 P ersonAl ixer Uide...
-
Page 60: Usb Data Port
USB Data Port The A360’s USB data port is designed to use a PC-formatted USB memory stick (thumb drive) to update its firmware and save/recall mixer configurations and Mix Presets. It is not designed to work with external hard drives or any other types of peripherals that connect via USB. See page 52 for information about creating and loading mixer configurations. -
Page 61: Loading A Mixer Configuration
Loading a Mixer Configuration A USB memory stick can hold up to 16 different mixer configurations, numbered 1 through 16, that have been created using the A360 Channel Manager software or saved directly from an A360 Personal Mixer. Custom channel maps and Mix Presets travel together as a single unit—the configuration file; the underlying components of a configuration cannot be individually loaded. -
Page 62: Updating Firmware
Mac partition will be ignored. Once a firmware update has been downloaded from the Aviom website, extract the files from the .zip archive and copy the contents to the root level of the USB memory stick (the extracted archive will have all... -
Page 63: Firmware Update Error Warnings
Firmware Update Error Warnings Warning Description After pressing the S and S The A360’s firmware is up to date; the buttons, the channel select button LEDs light briefly, current version of the firmware is already installed. and the Personal Mixer returns to the pre-update (normal mixing) state. -
Page 64: A-Net In
The DC Power jack accepts a 24VDC power supply when the A360 is not being powered over the Cat-5 cable from an A-Net distributor. Use only an approved 24VDC, regulated 500mA supply such as the optional Aviom PS-120 Power Supply. A360 P... -
Page 65: Personal Mixing System Setup
This section explains how the A360 Personal Mixer integrates with other Pro16 devices (sold by Aviom or third-party partners) to create a personal mixing system. See the detailed User Guides that came with the Aviom products mentioned in this section for complete information about their use, features, and setup. - Page 66 Analog input module or digital console card To Additional Personal Mixers A typical daisy chained Pro16 personal mixing system with six A-16II mixers is shown. One A360 Personal Mixer may be added to a daisy chain personal mixing system, but only at the end of the daisy chain—the A360 has only an A-N port and must be the last device in a daisy chain.
-
Page 67: Parallel Connections
Parallel Connections An A-Net Distributor simplifies the connection or expansion of an existing Pro16 personal mixing system with A360 Personal Mixers. As with the daisy chained system, a single analog input module or digital console card is used to generate a 16-channel A-Net signal that is distributed to the Personal Mixers. Using one or more A-Net Distributors allows any number of A360 Personal Mixers to be integrated into a personal mixing system along with A320, A-16II and A-16R Personal Mixers. - Page 68 Pro16e Personal Mixing Systems The A360 Personal Mixer can make use of the enhanced version of A-Net, Pro16e, which allows up to 64 audio slots to be included in the network pool by using up to four input devices. Each A360 in a personal mixing system may be programmed to use any combination of these network slots.
-
Page 69: Slot Range Setup
Slot Range Setup Each input device in a Pro16e-based personal mixing system supplies one bank of 16 channels to the network. The Slot Range switches on the AN-16/i v.2 are used to set the assignment for each; the physical location of the device within the daisy chain does not matter as long as the Slot Range switch settings are correct. - Page 70 Channels 1-16 Channels 1-16 AN-16/i Channels 17-32 Channels 17-32 AN-16/i Channels 33-48 Channels 33-48 AN-16/i AN-16/i Channels 49-64 Channels 49-64 Select A360 mix channels from all Select A360 mix channels from all 64 network channels ( 64 network channels ( mode) mode) USTOM...
-
Page 71: Using Legacy Input Devices
Using Legacy Input Devices One legacy input device or Pro16 console card may be used in a multiple input device configuration—it will default to supplying the first 16 slots to the network and must be connected to the A-N of the first Pro16e device in the system. -
Page 72: Connecting Monitoring Devices
Connecting Monitoring Devices Headphones, wired in-ear monitors, wireless in-ear transmitter systems, powered speakers, subwoofers, and tactile bass shakers can be connected to the A360 Personal Mixer separately or in combination. This section details the connection of these devices to the A360’s outputs. A-Net In A-Net In Mono Mix Out... -
Page 73: Stereo Wireless In-Ear Systems
Stereo Wireless In-Ear Systems The A360’s Stereo Mix Out may be connected to the left/right inputs of a wireless transmitter used for in-ear monitoring. A Y-cable that splits the TRS stereo output to a pair of TS mono left and right outputs is required. -
Page 74: Stereo Speakers
Stereo Speakers The Stereo Mix Out may be connected to a set of powered stereo monitor speakers using a Y-cable that splits the TRS stereo output to a pair of TS mono left and right outputs. A-Net In Mono Mix Out 24VDC Regulat 500 mA... -
Page 75: Connecting To The Mono Mix Out
Connecting to the Mono Mix Out In addition to the 1/4-inch and 1/8-inch Stereo Mix Outs, the A360 has a dedicated Mono Mix Out that is always available. The Mono Mix Out can be used alone—connected to a powered wedge, for example—or in conjunction with a stereo monitoring device such as headphones where the mono out is connected to a subwoofer or tactile bass shaker device. -
Page 76: Subwoofers
No editing is required to create the mono output. The A360 automatically sums stereo channel and pan information to mono, even if the inputs have been stereo linked at the input modules. Subwoofers When a subwoofer is used to supplement a performer’s monitor mix, the Stereo Mix Out and Mono Mix Out are used simultaneously. -
Page 77: Tactile Shaker Devices
Tactile Shaker Devices In addition to subwoofers, which are speakers designed to output primarily low frequencies, there is another category of low frequency devices designed to supplement a mix and enhance the listening and mixing experience of the user. These tactile devices are known as bass shakers, butt kickers, or throne shakers depending on how they are implemented. -
Page 78: Network Mix Back
Network Mix Back The A360 Personal Mixer offers a special feature—Network Mix Back—that allows its stereo mix to be sent back through the Cat-5 cable to a D800 or D800-Dante A-Net Distributor. The D800 products have a special port labeled Mixes Out that can be used with an AN-16/o v.4 Output Module to simplify the connection to wireless in-ear transmitter systems. -
Page 79: Analog Cabling
Analog Cabling Connect the m port from the D800 to A-N on the AN-16/o v.4 Output Module with a Cat-5 IxeS cable. Analog connections for the inputs to the wireless transmitter units are available on two DB25 multipin connectors on the AN-16/o v.4 (wired to the Tascam analog standard). The Mixes Out port on a D800 connects to A-Net In on the AN-16/o v.4. -
Page 80: Dante Patching
Dante Patching The eight Network Mix Back stereo mixes from the A360 Personal Mixers are also available in the Dante stream as D800 transmit channels 1-16 when using the D800-Dante A-Net Distributor. This allows you to route the signals into Dante-enabled consoles, processors, etc. using the Dante Controller routing software. -
Page 81: Specifications
Specifications 1/4” TRS stereo, headphone or line level; Audio Outputs 1/8” TRS stereo, headphone or line level; XLR balanced mono, line level Tip: Audio Left; Ring: Audio Right; Stereo Mix Outputs, Headphone/Line Sleeve: Ground Mono Mix Output Pin 2: Hot, Pin 3: Cold; Pin 1: Ground; impedance balanced 1 A-Net In, Neutrik EtherCon RJ45 connector;... -
Page 82: Dimensions
Dimensions 7.154 in. 181.712 mm 6.900 in. 175.26 mm 11.000 in. 279.4 mm 1.835 in. 46.609 mm 1.155 in. 29.337 mm A-Net In Mono Mix Out 24VDC 2.049 in. Regulated 52.0446 mm 500 mA Stereo Mix Out Data PROGRAM CUSTOM DEFAULT Pro16 A360 P... -
Page 83: Mixer Label
Mixer Label Use this template as a starting point for creating custom Personal Mixer labels for the A360. It is shown actual size. A360 P ersonAl ixer Uide... -
Page 84: Cat-5 Cable Pinout
Cat-5 Cable Pinout The tables below detail the two wiring pinout variations for Cat-5 cables. When making custom cables, either pinout can be used, but both ends of a cable must use the same wiring pattern. T568A RJ45 Pin Wire Color White/Green Green White/Orange... - Page 85 Index Symbols AN-16/o Output Module 4, 6 1/4-inch Stereo Mix Out 44 AN-16/o v.4 Output Module 69 1/4” TRS stereo 72 AN-16SBR System Bridge 6 1/8-inch Stereo Mix Out 44 A-Net 3, 72 1/8” TRS stereo 72 Pro16 vs. Pro16e 38 1-16 Slot Range 62 A-Net Cable 72 A-Net Distributor 2, 4, 56, 57, 60, 69...
- Page 86 Create a Group 28 crossover cables 5 custom channel mapping 17 Cable Length 6, 72 Pro16e 6 Custom Mode 12, 14, 17, 23, 40, 42, 45, 47, 48, 49, 59 Cables 5 Cat-5 5 Cat-5 A-Net In 55 Cat-5 Cable Pinout 75 D400 A-Net Distributor 2, 3, 4 Cat-5e 2 D400-Dante A-Net Distributor 2, 4...
- Page 87 earbuds 15, 63, 68 imaging 24 EB-1 Extension Bracket 72 impedance 44, 63 Edit a Group 30 Impedance Editing Controls 26 headphone 72 Enhance 2 line out 72 Enhance Tone Control 33, 35, 42 in-ear monitor 2 default setting 35 in-ear monitors 64 EQ 20 wired 63...
- Page 88 Monitoring Device 63 mono 46 Mono Channel 22 Mac 53 mapped mono input 44 stereo channels 10 Mono Mix Out 22, 33, 34, 44, 66, 67, 68 Mapping A360 Master Volume 45 Mono Mix Out knob 34 channel 48 Mono Mix Out level 42, 66 Loading a Mixer Configuration 52 Mono Mix Output 72 Master Bass tone control 42...
- Page 89 Package Contents 3 Range switch 60 Pan 24, 42 rear-panel mode switch 10 Pan knob 22, 24, 25 Recall 37 Pan Knob 19 Recall an Instant Mix Preset 40, 41 Pan LEDs 22 Recall a Standard Mix Preset 40 Panning Stereo Channels 24 Recall Button 37, 40 Pan-Spread 2 Recall configuration 52...
- Page 90 Solo Button 26, 27 master section 42 Solo button rules 27 Tone knob 21 Solo LED 27, 41 Tone LEDs 20, 54 splitter cable 44 transmitter 64 Spread 10, 13, 42 treble boost 21 Spread amount 13 Treble Tone Control 20, 33, 35 Spread button 22, 23, 24 Trim All 27, 32 Spread Button 19...
- Page 91 XLR balanced 72 XLR cable 67, 68 XLR input 64 XLR mono out 34, 43, 45 XLR output 66 X/Y stereo pair ambient mics 18 Y1 A-Net Card 4, 23, 62 Yamaha 23 Y-cable 44, 64, 65 zero mic level 16 zero a mix 41 A360 P ersonAl...
-
Page 92: Warranty Registration
Warranty Registration Please take a moment to fill in this warranty registration form. Return it to Aviom via mail or fax. All information will be kept confidential. Model Product Serial Number Model Product Serial Number Model Product Serial Number Model... - Page 93 1157 Phoenixville Pike, Suite 201 • West Chester, PA 19380 USA Voice: +1 610.738.9005 • Fax: +1 610.738.9950 • www.Aviom.com...
Need help?
Do you have a question about the A360-MEE and is the answer not in the manual?
Questions and answers