Table of Contents
Advertisement
Quick Links
Advertisement
Table of Contents

Subscribe to Our Youtube Channel
Related Manuals for Joovv Mobile Stand System


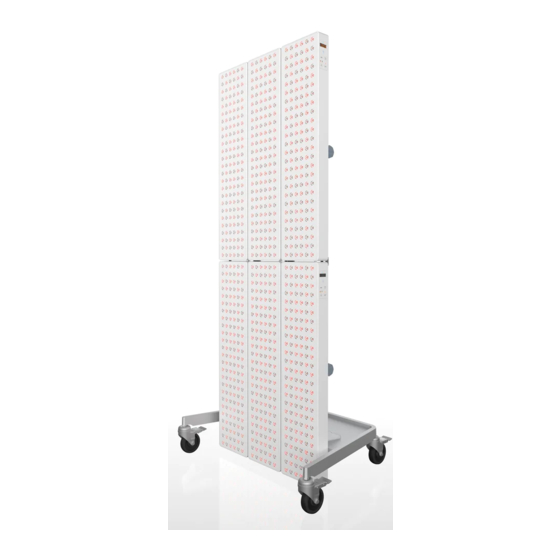
Summary of Contents for Joovv Mobile Stand System
- Page 1 Mobile Stand System Assembly Guide...
-
Page 2: Notices
Warnings and Safety Please review the following safety information prior to assembling your Joovv Mobile Stand. Attempting to assemble and use this equipment without fully understanding its features and functions may result in unsafe operating conditions. Some Warnings and Cautions are also inserted within the manual where they are most meaningful. -
Page 3: Table Of Contents
Table of Contents Notices ................................2 Parts List ...............................4 Install Wheel Casters and Adjust Leveling Nuts ................5 2 Pole Setup ...............................6 3 Pole Setup .............................. 12 Adding Spacers to Mounted Devices ....................18 Revision History ............................19 Warranty ..............................19 Return Policy ............................. 19 Contact Information .......................... -
Page 4: Parts List
Parts List Pole Upright Mobile Base Wheel Caster x4 Slider Mount Boot Bracket Boot Washer Top Bracket 2 Pole Bottom Bracket 2 Pole Top Bracket 3 Pole Bottom Bracket 3 Pole M6 Screw M10 Screw M10 Screw (boot bracket) M4 Allen Key M6 Allen Key Vertical Alignment Plug 4 Plug... -
Page 5: Install Wheel Casters And Adjust Leveling Nuts
Install Wheel Casters and Adjust Leveling Nuts Install each Wheel Caster onto the Mobile Base. To level Mobile Base, adjust leveling nuts where needed. LEVELING AM INCLUDING THIS ADDITIONAL VIEW INDICATING NUT ADJUSTMENT DIFFERENT THAN FIRST. IF NEEDED. -
Page 6: Pole Setup
2 Pole Setup Quad... - Page 7 Step 1 Step 2 Connect each Pole Upright to the Secure Boot Bracket to each Pole Upright. To do so, attach the bracket Mobile Base. To do so, place the Boot Bracket Washer on the Mobile Base on the side of the pole that is marked and connect using screws K and L as with the J label.
- Page 8 Step 3 Step 4 Install top and bottom brackets using Install Slider Mounts to Pole Uprights and adjust to the desired heights. screws K and L. FOR QUAD CONFIGURATION, FOR MAX CONFIGURATION, SLIDE SLIDE THE TOP MOUNTS ONTO THE TOP MOUNTS ONTO THE THE POLE UPRIGHT SO (4) HOLES POLE UPRIGHT SO (16) HOLES ARE FOR QUAD AND ELITE...
- Page 9 Step 5 To adjust the Slider Mount, turn the knob counterclockwise ~1 turn and pull out. Slide the mount up or down based on your desired height. To secure the Slider Mount tighten the knob by turning it clockwise until hand tight. PULL OUT TURN TO LOOSEN...
- Page 10 Step 6 While holding the device as shown below, align the device over the Slider Mount keyholes and slide the device down onto the Slider Mount to secure. MOUNT BOTTOM FIRST When mounting devices, mount bottom devices first.
- Page 11 Step 7 To remove the Solo or Mini Device from the Slider Mount, follow the steps illustrated below. TO MOVE LOCATION OF A SOLO OR MINI UNIT ON THE DOOR MOUNT: STEP 2 STEP 1 LIFT DEVICE WHILE PUSH HANDLE PUSHING SAFETY HANDLE LIFT PUSHING...
-
Page 12: Pole Setup
3 Pole Setup Step 1 Step 2 Secure Boot Bracket to each Pole Connect each Pole Upright to the Mobile Upright. To do so, attach the bracket on Base. To do so, place the Boot Bracket the side of the pole that is marked with Washer on the Mobile Base and connect the J label. - Page 13 Step 3 Install Slider Mounts to Pole Uprights and adjust to the desired height. FOR QUAD AND ELITE CONFIGURATIONS, SLIDE THE MOUNT ONTO THE (7) HOLE (4) HOLES SHOWING ABOVE THE MOUNT FOR ELITE CONFIGURATION, SLIDE THE TOP MOUNTS ONTO THE POLE UPRIGHTS SO (4) HOLES ARE 4 HOLES SHOWING ABOVE THE MOUNTS...
- Page 14 Step 4 Install top and bottom brackets using screws K and L.
- Page 15 Step 5 To adjust the Slider Mount, turn the knob counterclockwise ~1 turn and pull out. Slide the mount up or down based on your desired height. To secure the Slider Mount tighten the knob by turning it clockwise until hand tight. PULL OUT TURN TO LOOSEN...
- Page 16 Step 6 While holding the device as shown below, align the device over the Slider Mount keyholes and slide the device down onto the Slider Mount to secure. MOUNT BOTTOM FIRST When mounting devices, mount bottom devices first.
- Page 17 Step 7 To remove the Solo or Mini Device from the Slider Mount, follow the steps illustrated below. TO MOVE LOCATION OF A SOLO OR MINI UNIT ON THE DOOR MOUNT: STEP 2 STEP 1 LIFT DEVICE WHILE PUSH HANDLE PUSHING SAFETY HANDLE LIFT PUSHING...
-
Page 18: Adding Spacers To Mounted Devices
Spacers help keep the separate devices aligned and immobile. See illustration below for Spacer insert locations. When using the spacer kit with the Joovv Mini, utilize the included O-Rings with your spacer kit before inserting. Slide the O-Ring onto the spacer plug... -
Page 19: Revision History
Ver.0 Release to market Warranty All Joovv mounting accessories are covered by a 2-year limited warranty. Please visit our website at https://joovv.com/pages/warranty for details of the limited warranty. To register your product, visit https://joovv.com/pages/warranty for instructions. Failure to register will not affect your limited warranty rights. - Page 20 JV-MKT-DOC-2806 Ver.0...
Need help?
Do you have a question about the Mobile Stand System and is the answer not in the manual?
Questions and answers