Advertisement
Quick Links
Advertisement

Related Manuals for CanDock JETSLIDE G2


Summary of Contents for CanDock JETSLIDE G2
- Page 1 INSTALLATION AND USE OF THE ETSLIDE G2 from ANDOCK...
- Page 2 With the numerous varieties of boats on the market, it is possible that certain types will not be compatible with our system. Candock Inc. cannot be held responsible for this fact. It is impossible for us to be able to test all the existing types of boats in the world.
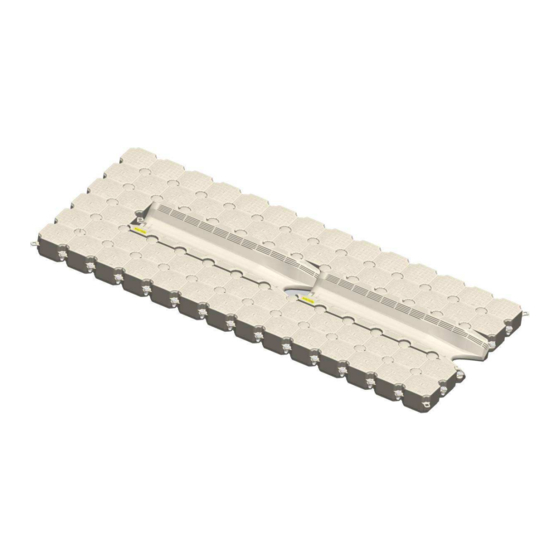
- Page 3 ETSLIDE INSTALLATION & USE OF THE 1) ASSEMBLY Advices : Assemble on a flat surface rather than water. It will be easier that way. Assemble the cubes around the JetSlide. If you attach it to a dock, make sure the plugs are facing the shore.
- Page 4 JetSlide. The JetSlide can be added to an existing Candock dock. Make sure that the dock is anchored well enough to resist the forward and backward movement generated by the watercraft when it enters or goes down the JetSlide.
- Page 5 3) USING THE JETSLIDE Approach the JetSlide at idle, keeping the craft straight and centred with the JetSlide. When the bow of the craft will be in contact with the JetSlide, give small throttle strokes that will make the craft align with the JetSlide.
- Page 6 JetSlide and the resulting damage will not be covered by the warranty. Contact Candock for more information. The depth of water at the back of the system must be 1m / 3' minimum at all time to avoid damage to the boats.
- Page 7 All distributors are held responsible for giving training to the customers on the complete use of the system, theoretical and practical with the watercraft of the customer. Candock Inc. will not be held responsible for all damage resulting from the fact that the operator did not receive the adequate training.
-
Page 8: Stabilizer Bar
Candock Inc. disclaims all liability for accidents if the V plate is not installed. Tighten screws included with the plate in the inserts for that purpose on the JetSlide. BEWARE, THIS PLATE MUST NOT BE INSTALLED ON THE FIRST JETSLIDE BUT FROM THE SECOND. - Page 9 CD075 SAFETY PLATE 1 CUBE CD076 SAFETY PLATE 2 CUBES CD077 SAFETY PLATE 3 CUBES LK 703016 SPACER CANDOCK LK 703013 BLACK SLIDING NUT LK 703015JETSLIDE JETSLIDE BOLT *According to an independent installation with plugs forward. Installation Steps : 1 – Place sliding nut on cube tabs.
- Page 10 In use, the plate can deform slightly and keep this deformation. This deformation is expected and normal. Please note that the surface of the safety plate can be slippery. 4) PNEUMATIC AIR ASSISTED SYSTEM : AIR ASSIST. For all boats over 1360kg / 3000lbs, pneumatic assistance...
- Page 11 This winch is composed of a pulley and a fixing ring attaching to the side of the dock system as shown in the photo: Turn the handle of the winch until the boat is enough in the water that it can back off on its own power.
-
Page 12: Warranty
5 years limited warranty. The CANDOCK warranty is strictly subject to the conditions set forth below which form an integral part hereof. 1. The CANDOCK warranty applies to the product being used exclusively for its intended purpose, being a modular drive-on system for boats and watercrafts. - Page 13 CANDOCK warranty. 5. IN NO EVENT SHALL CANDOCK BE LIABLE FOR ANY SPECIAL, INCIDENTAL, OR CONSEQUENTIAL DAMAGES (INCLUDING, WITHOUT LIMITATION, LOST...
- Page 14 DAMAGES RESULTING FROM MISUSE OR MODIFICATION OF YOUR CANDOCK PRODUCT. Warranty will be void if Candock inc. does not receive this warranty certificate signed by client within 30 days after date of purchase, as well as a picture confirming the proper installation of the product.
- Page 15 Tel.: (819) 847-2599 (888) 547-2599 Fax: (819) 847-3250 candock@candock.com www.candock.com...
- Page 16 ANNEXE A :...
- Page 18 ANNEXE B :...
Need help?
Do you have a question about the JETSLIDE G2 and is the answer not in the manual?
Questions and answers