
Related Manuals for Star MKK


Summary of Contents for Star MKK
- Page 1 Deutsche Star Anleitung für Linearmodule MKK Instructions pour Modules linéaires MKK Instructions for Linear Modules MKK Istruzioni per Linearmoduli MKK Montage Montage Wartung Entretien Mounting Montaggio Maintenance Manutenzione RDEFI 82 471/01.97...
- Page 2 Quick Reference for Replacements Schnellübersicht Austausch MKK 15-65 Mounting Groups Baugruppen MKK 15-65 Dismantling/mounting the MKK 15-65 sealing strip 25 Abdeckband MKK 15-65 demontieren/montieren Replacing the MKK 15-65 fixed bearing MG BG Festlager MKK 15-65 austauschen Replacing the MKK 15-65 floating bearing MG...
- Page 3 (GC) per linearmodulo MKK 15-65 protection en plastique pour MKK 15-65 Sostituzione gruppo cuscinetto di vincolo Echange de l’ensemble palier fixe pour MKK 15-65 radiale (GC) per linearmodulo MKK 15-65 Echange de l’ensemble palier libre pour MKK 15-65 Sottogruppi (GC) di ricambio per Echange d’ensembles (E)
- Page 4 Sicherheit und Systematik Safety and Symbols 1.1 Sicherheitshinweise und deren Bildzeichen 1.1 Safety Notes and their symbols Als Sicherheitshinweise werden folgende Bildzeichen The following symbols are used to identify safety notes. verwendet. WARNUNG! WARNING! Verletzungsgefahr durch scharfe Kanten! Risk of injury due to sharp edges! Handschuhe tragen! Wear gloves! Saubere Handschuhe verwenden!
- Page 5 Sécurité et symboles Sicurezza e sistematicità 1.1 Prescriptions de sécurité et symboles 1.1 Avvertenze per la sicurezza e relative indicazioni grafiche Les symboles ci-dessous sont utilisés comme symboles de sécurité. Fare riferimento ai simboli grafici sottostanti come avvertenze per la sicurezza. DANGER! AVVERTIMENTO! Risque de blessure par arêtes coupantes!
- Page 6 MKK 15-65 Kugelgewindetrieb (KGT) 2.1 Typenübersicht Die Linearmodule mit KGT sind in 4 Baugrößen erhältlich. Die größte Ausführung MKK 35-165 wird mit MKK 20-80 Faltenbalg-Abdeckung geliefert. Die anderen Größen werden mit Bandab- deckung geliefert. (Genaue Daten und Maße siehe aktuelle Kataloge).
- Page 7 Linear Modules with BSD are available ment par VAB sont disponibles en 4 disponibili in 4 grandezze. La versione in 4 sizes. The largest version, MKK 35- tailles. La plus grande exécution, MKK più grande, MKK 35-165, viene fornita 165, is supplied with protective bellows, 35-165, est livrée avec un recouvre-...
- Page 8 Linearmodul befestigen Spannstücke Nutensteine Clamping fixtures Slot blocks 3.1 Bohrbilder Pièces de bridage Réglettes de rainure Die Befestigung der Linearmodule Staffe Tasselli erfolgt mit verschiedenen Befestigungs- elementen: – Spannstücke 15-65 (empfohlene Anzahl: 3 Stück/Meter) 15-65 20-80 25-110 – Nutensteine ab Profilkennmaß -110 20-80 25-110 35-165...
- Page 9 Mounting the Linear Module Fixation du module linéaire Fissaggio del linearmodulo 3.1 Drilling patterns 3.1 Image de trous 3.1 Schema posizione dei fori Linear Modules are fixed in place using La fixation des modules linéaires s’effec- I linearmoduli vengono vincolati various components: tue à...
- Page 10 Montage Anbauteile 4.1 Übersicht Auf Wunsch können folgende Kompo- nenten bei STAR einsatzfertig montiert werden. Eine Nachrüstung ist jederzeit möglich. Schalter: Dose mit Stecker Mechanischer Schalter Induktiver Schalter Schaltwinkel Kabelkanal Motoren: Motor mit Riemenvorgelege Motor mit Flansch 4.2 Schalter und Kabelkanal montieren/demontieren Schalter und Zubehör kann jederzeit...
- Page 11 Assemblaggio dei componenti 4.1 Overview 4.1 Aperçu 4.1 Gamma If required, STAR will pre-mount the Sur demande, les composants suivants following components ready for use. peuvent être montés en usine. Un ré- A richiesta possono essere montati da These components can also be retro- équipement est possible à...
- Page 12 Kabelkanal montieren: Der Kabelkanal faßt maximal zwei Kabel für mechanische Schalter und drei Kabel für induktive Schalter. Bei Linearmodulen mit Profilkennmaß -65, -80, -110 vor der Befestigung beachten: • Zunächst Linearmodul ausrichten und mit Spannstücken befestigen. • Länge des Kabelkanals messen. •...
- Page 13 Mounting the cable duct: Pose du chemin de câbles: Montaggio della canalina per cavi: The cable duct holds a maxi- Le chemin de câbles peut com- la canalina per cavi può ospitare mum of two cables for mechanical porter au maximum deux câbles d’inter- al massimo due cavi per interruttori switches and three cables for proximity rupteurs mécaniques et trois d’interrup-...
- Page 14 4.3 Motor mit Flansch montie- ren/demontieren Maximales Drehmoment und Drehzahl des Motors dürfen die Grenzwerte des Linearmoduls nicht überschreiten! Motor montieren: • Flansch an Modul anschrauben. • Kupplung in den Flansch auf den Antriebszapfen des Moduls soweit schieben, bis Befestigungsschraube erreichbar ist.
- Page 15 4.3 Mounting/dismantling the 4.3 Montage/démontage 4.3 Motore con flangia: motor with motor mount des moteurs à lanterne montaggio/smontaggio d’accouplement The maximum torque and Il momento torcente massimo e speed of the motor must not exceed Le couple moteur maximum et il numero di giri del motore non the limits for the linear module! la vitesse de rotation ne doivent pas...
- Page 16 Die Vorspannkraft F ist von den Größen der Module, Motoren, Riemenrädern sowie vom Drehmoment abhängig. Vorspannwerte bitte bei STAR nachfragen. 4.4. 2 Bei i = 1,5 oder i = 2: • Vor Montage des Motors zunächst kleineres Riemenrad mit Spannsatz auf Zapfen des Motors befestigen.
- Page 17 La forza di tensionamento F dipende sprockets and the torque. dalla grandezza del modulo, dai motori, Prendre contact avec Almé-STAR pour Please consult STAR for precise details. obtenir les valeurs de précharge. dalle pulegge dentate e dal momento torcente. Per i valori di tensionamento, contattare Star Mikron.
- Page 18 4.5 Motor mit Riemenvorgelege und Gegenlager montieren/ demontieren Gegenlager montieren: (nur MKK 15-65, MKK 20-80) • Gehäuse montieren 4.4. 1 • Riemenrad mit aufgelegtem Zahn- riemen und Spannsatz auf Zapfen des Moduls befestigen. • Ersten Sicherungsring auf Spindelende als Anschlag aufbringen.
- Page 19 - courroie et e cuscinetto aggiunto: contre-palier montaggio/smontaggio Mounting the abutment: (applies to MKK 15-65, MKK 20-80 only) Montage du contre-palier: Montaggio cuscinetto aggiunto: (solo (uniquement pour MKK 15-65 et per linearmodulo MKK 15-65, MKK 20-80) • Mount the housing.
- Page 20 Wartung (Schmierung) Die Wartung beschränkt sich auf das Schmieren der Schienenführung, des Kugelgewindetriebes (KGT) und dem Ölen des Abdeckbandes. Das Abdeckband vor Inbetriebnahme und bei jedem Schmierintervall mit einem Ölfilm versehen. 5.1 Schmieren der Schienen- führung und des Kugel- gewindetriebes •...
- Page 21 5. Manutenzione (lubrificazione) The only maintenance required is L’entretien se limite à la lubrification du La manutenzione del linearmodulo MKK lubrication of the guideway, the ball rail de guidage, de la vis à billes et de la si limita all’ingrassaggio della guida e screw drive (BSD) and oiling of the bande de protection.
- Page 22 Austausch Baugruppen (BG) MKK 15-65 Echange d’ensembles (E) MKK 15-65 6.1 Schnellübersicht Austausch 6.1 Aperçu rapide des éléments remplaçables MKK 15-65 Replacement Mounting Sottogruppi (GC) di ricambio per Groups (MG) linearmoduli MKK 15-65 6.1 Quick Reference for Replacements 6.1 Rappresentazione esplosa (Nm) RDEFI 82 471/01.97...
- Page 23 Baugruppen MKK 15-65 Ensembles MKK 15-65 MKK 15-65 Mounting Groups Gruppi di componenti per linearmodulo MKK 15-65 Pos Baugruppe (BG), Ensembles (E), Anleitung Instructions Verschleißteil (VT) Pièce d’usure (PU) siehe Abschnitt voir le chapitre Item Mounting Group (MG), Gruppo di componenti (GC),...
- Page 24 6.2 Abdeckband MKK 15-65 demontieren/montieren Abdeckband demontieren: Vor der Demontage Stromver- sorgung unterbrechen! • Gewindestifte der Bandhalterung (1) lösen. • Haltebleche (2) entfernen. • Endblech (Loslagerseite) abschrauben. • BG Umlenkungen (3) abschrauben. 6.2. 1 • Bandhalterung (Loslagerseite) abziehen. • Kunststoffband vom Hauptkörper abheben und aus Tischteil herausziehen.
- Page 25 6.2 Dismantling/mounting the 6.2 Montage/démontage de 6.2 Lamina in plastica di MKK 15-65 sealing strip la bande de protection en protezione per linearmodulo plastique pour MKK 15-65 MKK 15-65: Dismantling the sealing strip: smontaggio/montaggio Démontage de la bande en plastique:...
- Page 26 6.3 BG Festlager MKK 15-65 austauschen Demontage: GEFAHR bei Vertikaleinbau! Absturz des Tischteils mit Aufbauten verhindern! Bei Beschädigung des Fest- lagers muß die komplette Baugruppe ausgetauscht werden! • Motor demontieren. 4.3 oder 4.5 • Abdeckband demontieren. • Gewindering abschrauben. • 2 Gewindestifte aus Nutmutter lösen.
- Page 27 6.3 Replacing the MKK 15-65 6.3 Echange de l’ensemble palier 6.3 Sostituzione gruppo cusci- fixed bearing MG fixe pour MKK 15-65 netto di vincolo assiale (GC) per linearmodulo MKK 15-65 Dismantling: Démontage: Smontaggio: DANGER in the case of vertical DANGER pour les montages installation! Take precautions to pre- verticaux: prévenir la chute du...
- Page 28 6.4 BG Loslager MKK 15-65 austauschen Loslager demontieren: • Abdeckband demontieren. • Tischteil bis ca. 500 mm an Loslager heranfahren. • BG Festlager lösen. Nutmutter und Gewindering können aufgeschraubt bleiben! • Loslager aus Lagerbock herausziehen: Kompletten KGT mit Tischteil und BG Festlager ca.
- Page 29 6.4 Replacing the MKK 15-65 6.4 Echange de l’ensemble palier 6.4 Sostituzione gruppo cuscinetto floating bearing MG libre pour MKK 15-65 di vincolo radiale (GC) per linearmodulo MKK 15-65 Dismantling the floating bearing: Démontage de l’ensemble palier libre: • Remove the sealing strip.
- Page 30 MKK 20-80, MKK 25-110 MKK 20-80, MKK 25-110 7.1 Schnellübersicht Austausch 7.1 Aperçu rapide des éléments remplaçables MKK 20-80, MKK 25-110 Replacement Sottogruppi (GC) di ricambio per Mounting Groups (MG) linearmoduli MKK 20-80, MKK 25-110 7.1 Quick Reference for Replacements 7.1 Rappresentazione esplosa...
- Page 31 Baugruppen MKK 20-80, MKK 25-110 Ensembles MKK 20-80, MKK 25-110 MKK 20-80, MKK 25-110 Mounting Groups Gruppi di componenti per linearmoduli MKK 20-80, MKK 25-110 Pos Baugruppe (BG), Ensembles (E), Anleitung Instructions Verschleißteil (VT) Pièce d’usure (PU) siehe Abschnitt voir le chapitre...
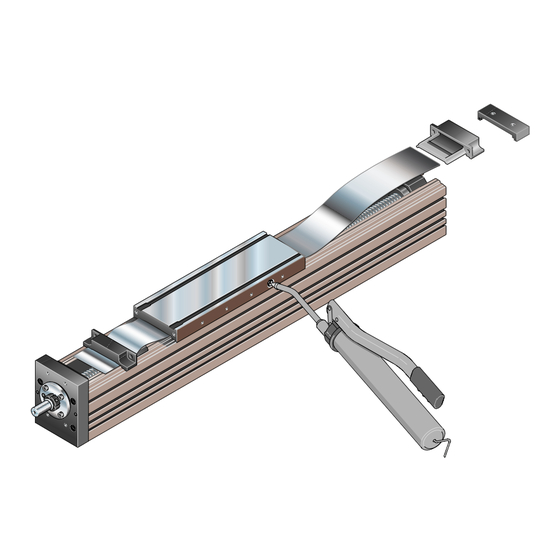
- Page 32 7.2 Bandabdeckung MKK 20-80, MKK 25-110 demontieren/ montieren Stahlband demontieren: Vor der Demontage Stromver- sorgung unterbrechen! • Gewindestifte der Bandhalterung (1) lösen. • BG Umlenkungen (2) abschrauben und aus dem Tischteil herausziehen. Dadurch hebt sich gleichzeitig das Stahlband vom Hauptkörper ab.
- Page 33 7.2 Lamina di protezione per MKK 20-80, MKK 25-110 la bande de protection pour linearmoduli MKK 20-80, sealing strip MKK 20-80 et MKK 25-110 MKK 25-110: smontaggio/montaggio Dismantling the steel strip: Démontage de la bande en acier: Smontare la lamina in acciaio: Always shut down the power Couper l’alimentation électrique...
- Page 34 7.3 BG Festlager MKK 20-80 und MKK 25-110 austauschen BG Festlager demontieren: GEFAHR bei Vertikaleinbau! Absturz des Tischteils mit Aufbauten verhindern! • Motor demontieren. 4.3 oder 4.5 • Abdeckband demontieren. • 2 Gewindestifte aus Nutmutter lösen. • Nutmutter abschrauben. • Zylinderschrauben abschrauben und 2 Stifte herausziehen.
- Page 35 7.3 Replacing the MKK 20-80 7.3 Echange de l’ensemble 7.3 Sostituzione gruppo and MKK 25-110 fixed palier fixe pour MKK 20-80 cuscinetto di vincolo assiale bearing MG et MKK 25-110 (GC) per linearmoduli MKK 20-80 e MKK 25-110 Dismantling the fixed bearing MG: Démontage de l’ensemble palier fixe:...
- Page 36 BG Festlager montieren: BG Festlager genau fluchtend mit KGT montieren! • Tischteil ohne Abdeckband bis 10 mm an die Festlagerseite heranfahren. • BG Festlager auf Spindel des KGT schieben. • 4 Zylinderschrauben (1) festschrau- ben. • Zylinderstifte (2) eintreiben. 7.3. 4 Nur bei neuer Endplatte oder neuem Hauptkörper: DIN 7978...
- Page 37 Mounting the fixed bearing MG: Montage de l’ensemble palier fixe: Montare il gruppo cuscinetto di vincolo assiale (GC): Mount the fixed bearing MG Monter le nouveau palier fixe en so that it is precisely aligned with alignement avec la VAB! Montare il gruppo cuscinetto di the BSD! vincolo assiale allineato corretta-...
- Page 38 7.4 BG Loslager MKK 20-80 und MKK 25-110 austauschen Loslager demontieren: • Abdeckband demontieren. • Tischteil bis ca. 500 mm an Loslager heranfahren. • BG Festlager lösen. Nutmutter kann aufgeschraubt bleiben! • Loslager aus Lagerbock herausziehen: Kompletten KGT mit Tischteil und BG Festlager ca.
- Page 39 7.4 Replacing the MKK 20-80 7.4 Echange de l’ensemble 7.4 Sostituzione gruppo and MKK 25-110 floating palier libre pour MKK 20-80 cuscinetto di vincolo radiale bearing MG et MKK 25-110 (GC) per linearmoduli MKK 20-80 e MKK 25-110 Dismantling the floating bearing: Démontage de l’ensemble palier libre:...
- Page 40 Austausch Baugruppen (BG) MKK 35-165 Echange d’ensembles (E) MKK 35-165 8.1 Schnellübersicht Austausch 8.1 Aperçu rapide des éléments remplaçables MKK 35-165 Replacement Mounting Sottogruppi (GC) di ricambio per Groups (MG) linearmoduli MKK 35-165 8.1 Quick Reference for Replacements 8.1 Rappresentazione esplosa (Nm) RDEFI 82 471/01.97...
- Page 41 Baugruppen MKK 35-165 Ensembles MKK 35-165 MKK 35-165 Mounting Groups Gruppi di componenti per linearmodulo MKK 35-165 Pos Baugruppe (BG), Ensembles (E), Anleitung Instructions Verschleißteil (VT) Pièce d’usure (PU) siehe Abschnitt voir le chapitre Item Mounting Group (MG), Gruppo di componenti (GC),...
- Page 42 Hand von unten nachgreifen. Nicht am Faltenbalg reißen! • Faltenbalg vom Tischteil (2) abschrau- ben. Faltenbälge in umgekehrter Reihen- folge montieren. 8.3 BG Festlager MKK 35-165 austauschen BG Festlager demontieren: GEFAHR bei Vertikaleinbau! Absturz des Tischteils mit Aufbauten verhindern! •...
- Page 43 Mount the bellows in the reverse sequenza opposta a quella seguita inverse des opérations. order. per lo smontaggio. 8.3 Replacing the MKK 35-165 8.3 Echange de l’ensemble 8.3 Sostituzione gruppo cusci- fixed bearing MG palier fixe pour MKK 35-165 netto di vincolo assiale (GC) per...
- Page 44 8.4 BG Loslager MKK 35-165 austauschen Loslager demontieren: • Faltenbalg Loslager demontieren. u ts D -9 t u m l. 0 ta r • Tischteil bis ca. 20 mm an Loslager - 2 6 /9 3 e in 0 - 1...
- Page 45 8.4 Replacing the MKK 35-165 8.4 Echange de l’ensemble 8.4 Sostituzione gruppo cusci- floating bearing MG palier libre MKK 35-165 netto di vincolo radiale (GC) per linearmodulo MKK 35-165 Dismantling the floating bearing: Démontage de l’ensemble palier libre: • Remove the bellows on the floating •...
- Page 46 Austausch größenunab- hängig 9.1 Kugelgewindetrieb (KGT) austauschen KGT demontieren: Der KGT darf nur komplett mit Mutter gewechselt werden! Abneh- men der Mutter führt zu deren Zerstörung (Verlust der Kugeln)! • Abdeckband oder Faltenbalg demontieren. 6.2, 7.2, 8.2 • BG Festlager demontieren. 6.3, 7.3, 8.3 9.1.
- Page 47 Replacement instructions Echanges indépendants Sostituzione dei compo- common to all sizes de la taille nenti non dipendenti dalla lunghezza 9.1 Replacing the ball screw 9.1 Echange de la vis à billes drive (BSD) (VAB) 9.1 Sostituzione della vite a sfere Dismantling the BSD: Démontage de la VAB: Smontaggio vite a sfere:...
- Page 48 Anziehdrehmomente Gewindering: MKK 15-65 = 19 Nm MKK 20-80 = 25 Nm MKK 25-110 = 51 Nm MKK 35-165 = 80 Nm 9.1. 4 • Komplette Einheit vorsichtig mit dem Loslager voran in den Hauptkörper einführen. Tischteil auf Führungsschiene...
- Page 49 = 25 Nm MKK 20-80 = 25 Nm MKK 20-80 = 25 Nm MKK 25-110 = 51 Nm MKK 25-110 = 51 Nm MKK 25-110 = 51 Nm MKK 35-165 = 80 Nm MKK 35-165 = 80 Nm MKK 35-165 = 80 Nm •...
- Page 50 9.3 Kugelschienenführung austauschen (Führungs- schiene) Führungsschiene demontieren: • Vor dem Ausbau Maß B ermitteln. • Abdeckkappen abhebeln. • Zylinderschrauben herausschrauben. • Führungsschiene aus dem Haupt- körper hebeln und auf eine flache Unterlage über die ganze Länge ablegen. Verbiegen vermeiden! Bei Größen 20-80, 25-110, 35-165: T-Nutenleiste (1) kann im Hauptkörper verbleiben.
- Page 51 9.3 Replacing Ball Rail Systems 9.3 Guidage à billes sur rail 9.3 Guida a sfere su rotaia (guide rail) (échange du rail) (sostituzione della rotaia) Dismantling the guide rail: Démontage du rail de guidage: Smontare la rotaia: • First measure dimension B. •...
- Page 52 (0 97 21) 9 37-250 Telefax +49 -97 21-9 37-250 (direkt) (direct) Anleitung für Linearmodule MKK Montage, Wartung, Austausch RDEFI 82 471/01.97 Cette documentation a été établie avec le plus grand Diese Druckschrift wurde mit großer Sorgfalt erstellt. soin. L'exactitude de toutes les indications a été...
Need help?
Do you have a question about the MKK and is the answer not in the manual?
Questions and answers