Table of Contents
Advertisement
Quick Links
CARE AND MAINTENANCE
Store outdoor furniture indoors or cover well when it is not in use.
Dust regularly with small brush or vacuum. Spills should be taken
care of immediately before they harden or stain with a slightly
dampened sponge.
NOTICE
Please make sure that you have all parts indicated before you
begin assembly of this item.
Part List and Hardware List
PIECE
DESCRIPTION
PICTURE
A
Leg chair
Right seat
B
Right back
C
D
Right side
E
Left seat
F
Left back
G
Left side
QUANTITY
PIECE
DESCRIPTION
I
2x
Foot top
1x
J
Foot leg
1x
K
Table top
1x
L
Table leg
1x
H1
Allen bolt
H2
Allen screw
1x
H3
Extra bolt
1x
H4
Allen key
H5
Wrench
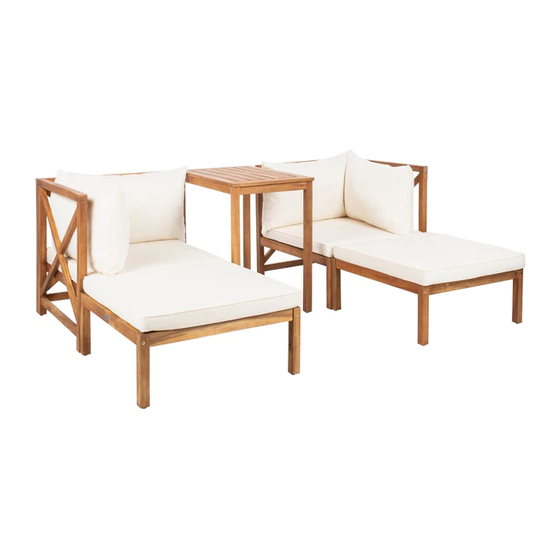
MODEL# PAT6762
Corner chair dimension: 26.97"W x 26.97"D x 26.77"H
Footrest dimension
Table dimension
Weight capacity : 300 lbs
Warning : Do not stand on the chair
Warning : Do not torque bolts / screws
PICTURE
QUANTITY
2x
4x
1x
4x
14x
M6x70
4x
M6x65
1x
M6x50
1x
1x
: 25.59"W x 25.59"D x 10.63"H
: 26.77"W x 17.72"D x 26.77"H
Advertisement
Table of Contents

Subscribe to Our Youtube Channel
Related Manuals for Safavieh Outdoor PAT6762


Summary of Contents for Safavieh Outdoor PAT6762
- Page 1 Dust regularly with small brush or vacuum. Spills should be taken care of immediately before they harden or stain with a slightly dampened sponge. NOTICE MODEL# PAT6762 Corner chair dimension: 26.97”W x 26.97”D x 26.77”H Footrest dimension : 25.59”W x 25.59”D x 10.63”H...
- Page 2 PREPARATION Before beginning the assembly of the product, make sure all parts are present. Compare the parts with the package contents list and hardware contents list. If any parts are missing or damaged, do not attempt to assemble the product. Tool required for assembly (included): Allen Key and Wrench.
- Page 3 Step 3: attach the Left side (G) to the chair as shown on the picture. Using the Allen screw (H2) and Allen nut ( H1) to assembly the Left side (G) to the seat (E) and back (B) as shown on the picture. Tighten by the allen key (H4) and Extra bolt (H3) .
- Page 4 PREPARATION Before beginning the assembly of the product, make sure all parts are present. Compare the parts with the package contents list and hardware contents list. If any parts are missing or damaged, do not attempt to assemble the product. Tool required for assembly (included): Allen Key and wrench.
- Page 5 Step 6: attach the Right side (D) to the chair as shown on the picture. Using the Allen screw (H2) and Allen nut ( H1) to assembly the Right side (D) to the Right seat (B) and back (B) as shown on the picture. Tighten by the allen key (H4) and extra bolt (H3) .
- Page 6 PREPARATION Before beginning the assembly of the product, make sure all parts are present. Compare the parts with the package contents list and hardware contents list. If any parts are missing or damaged, do not attempt to assemble the product. Tool required for assembly (included): Allen Key and wrench.
- Page 7 PREPARATION Before beginning the assembly of the product, make sure all parts are present. Compare the parts with the package contents list and hardware contents list. If any parts are missing or damaged, do not attempt to assemble the product. Tool required for assembly (included): Allen Key and wrench.
Need help?
Do you have a question about the PAT6762 and is the answer not in the manual?
Questions and answers