Table of Contents
Advertisement
Quick Links
Advertisement
Table of Contents

Related Manuals for DecorQuip Dream Range


Summary of Contents for DecorQuip Dream Range
- Page 1 THE DREAM RANGE USER’S GUIDE MOTORISATION MADE EASY...
-
Page 2: Table Of Contents
CONTENTS DREAM RANGE PRODUCT SPECIFICATION............ 5 1. DREAM MOTORS..................... 6 1a. ROLLER MOTORS....................6 FUNCTIONAL FEATURES.................. 7 INSTALLATION..................... 8 CHARGING......................8 1b. ROMAN AND PLEATED MOTOR..............8 FUNCTIONAL FEATURES.................. 9 INSTALLATION..................... 9 POWER SOURCE....................CHARGING......................10 2. DREAM CONTROLS..................10 2a. - Page 3 CONTENTS PROGRAMMING INSTRUCTIONS - CONTROLS..........21 2. DREAM MULTI-CHANNEL REMOTE (ADDITIONAL FUNCTIONS)....21 HIDE OR UNHIDE CHANNEL FUNCTIONS........... 21 UNI-DIRECTION/BI-DIRECTION SWITCHING MODE......... LOCK/UNLOCK MODE..................21 3. DREAM HUB-PRO AND DREAM HUB-MINI..........CONNECTOR APP DOWNLOAD INSTRUCTIONS........4. DREAM SIGNAL BOOSTER................22 SETUP INSTRUCTIONS..................
-
Page 5: Dream Range Product Specification
PRODUCT SPECIFICATION... -
Page 6: Dream Motors
1.DREAM MOTORS The Dream Motors come in a few shapes and sizes but the setup and programming options are identical for all of them. For programming options go to page 10. 1a. ROLLER MOTORS ROLLER 38 BATTERY MOTOR 191723 504mm 510mm TECHNICAL SPECIFICATION - ROLLER 38 BATTERY MOTOR 191723 TECHNICAL SPECIFICATION... -
Page 7: Functional Features
ROLLER 55 BATTERY MOTOR 191711 760mm 838mm TECHNICAL SPECIFICATION CONTROL TYPE RADIO RATED VOLT AGE 12 V IP RATING IP44 CONTROL TYPE RADIO RATED VOLT AGE 12 V IP RATING IP44 OUTPUT SPEED 28RPM RATED CURRENT2 .20A LIMITS ELECTRONIC RATED POWER 26 W LIFTING CAPACITY 10.9 Kg... -
Page 8: Installation
INSTALLATION CHARGING APPLICABLE FOR BATTERY MOTORS ONLY he Dream Motors have a built-in battery that utillises a mains charger 191692 or solar panel 191682 to recharge. 1b. ROMAN/PLEATED MOTORS ROMAN BLIND LV BATTERY MOTOR 191695 PLEATED BLIND LV BATTERY MOTOR 191699 205mm TECHNICAL SPECIFICATION CONTROL TYPE... -
Page 9: Functional Features
FUNCTIONAL FEATURES • Bi-Directional Functionality • Mains / Solar battery charging • Electronic Limit Setting • Mains power option with a power adapter • Jog Mode • Built-in Radio Receiver • Program / Operation Button (P1) • Favourite Stop Position •... -
Page 10: Charging
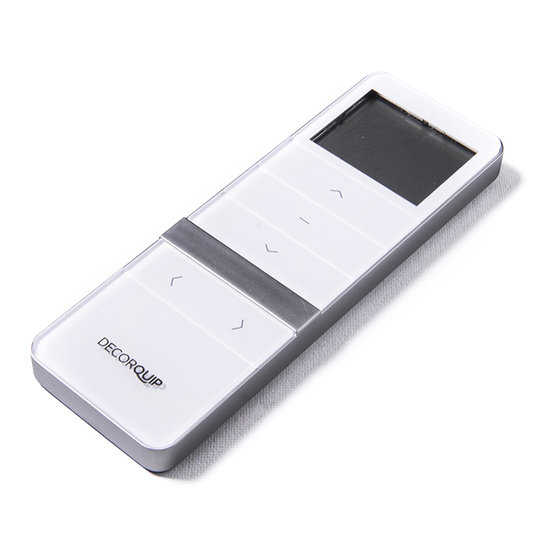
CHARGING Li-ion rechargeable battery utillises a mains charger 191692 or solar panel 191682 to recharge. 2.DREAM CONTROLS 2a. DREAM 15-CHANNEL REMOTE 191679 The remote is compatible with all bi-directional Dream Motors and older uni-directional motors. For programming and paring options go to page 10. For programming the additional wall switch’s features go to page 17. -
Page 11: 2B. Dream 15-Channel Wall Switch
FUNCTIONAL FEATURES • Bi-directional functionality • Button lock/unlock option • Uni-directional functionality • Hide/Unhide channel option • 15 channels • Standard CR2450 cell battery • Pair up to 20 motors per channel • Magnetic wall bracket • Channel ‘0’ to operate all paired Bi-directional functionality •... -
Page 12: 2C. Dream Hub-Pro
2c. DREAM HUB-PRO 191726 The Dream Hub works with all Dream Motors, by connecting them to your Wi-Fi network to allow you to operate your blinds via smartphone with the free Connector app or voice control devices. For Connector App download instructions go to page 18. 72mm 132mm USB Port... -
Page 13: 2E. Dream Signal Booster
2e. DREAM SIGNAL BOOSTER 191716 The Dream Signal Booster works with all Dream Motors and control devices. When plugged in between a control device and blinds extends the signal range up to 200m. For set up instructions go to page 18. 64mm TECHNICAL SPECIFICATION POWER INPUT: DC 4.8V - 5.2V... -
Page 14: Programming Instructions - Motors
PROGRAMMING INSTRUCTIONS... -
Page 15: Dream Motors And Multi-Channel Remote
1. DREAM MOTORS/MULTI-CHANNEL REMOTE CONTROL Every motor in our Dream range is equipped with bi-directional technology that only a� ords them some very clever functionality when they’re coupled with smart devices, but also makes set up and operation with our Dream Multi-Channel Handheld Remote Control a quick and easy process. -
Page 16: Sleep Mode
Switching direction using the P1 button is only available once a remote has been paired with the motor. RESTORING FACTORY SETTINGS Motor jogs x4 Beeps x4 FACTORY SETTINGS RESTORED Hold P1 for 14sec Visit our YouTube channel for video equivalent of these instructions. DREAM RANGE PROGRAMMING INSTRUCTIONS - OVERVIEW AND P1 FUNCTIONALITY... -
Page 17: 1C. Pairing A Remote And Initial Settings
1c. PAIRING A REMOTE AND INITIAL SETTINGS Before starting the process of pairing a handheld remote to a Dream motor, choose the channel to which it is to be paired. Channel Zero is reserved for simultaneously controlling all blinds paired to a remote and cannot be used for pairing, programming or other adjustments If using a battery powered motor, ensure that it is suffi ciently charged to complete the set-up process. -
Page 18: Setting The Top Limit
To switch to jog mode, see ADVANCED FUNCTIONALITY - SWITCHING BETWEEN JOG MODE AND CONTINUOUS MODE on page 15. Visit our YouTube channel for video equivalent of these instructions. DREAM RANGE PROGRAMMING INSTRUCTIONS - PAIRING A REMOTE AND INITIAL SETTINGS 1d. ADVANCED SETTINGS SWITCHING FROM CONTINUOUS MODE TO JOG MODE... -
Page 19: Switching From Jog Mode To Continuous Mode
SWITCHING FROM JOG MODE TO CONTINUOUS MODE Motor Motor jogs x2 jogs x1 Beeps x3 CONTINUOUS MODE Hold together Press for for 5sec 1sec Note: When in jog mode, holding the up or down buttons will provide continuous-moving temporarily. INCREASING MOTOR SPEED BATTERY MOTORS ONLY Motor jogs x1 Motor jogs x1... -
Page 20: Clearing A Favourite Stop Position
Beeps x1 REMOTE PAIRED Press P2 Press P2 for 1sec for 1sec Hold for 2sec Existing remote control device Remote control device to add/remove Visit our YouTube channel for video equivalent of these instructions. DREAM RANGE PROGRAMMING INSTRUCTIONS - ADVANCED FUNCTIONALITY... -
Page 21: Programming Instructions - Controls
2. DREAM MULTI-CHANNEL REMOTE CONTROL ADDITIONAL FUNCTIONS HIDE/UNHIDE CHANNEL FUNCTION Allows the user to hide or unhide unused or used channels. By selecting a channel, i.e. channel 5, channels 1,2,3,4 and 5 will remain active while the other 10 unused channels will become hidden. Factory default: 15 channels unhidden Channel 15 appears on the screen... -
Page 22: Dream Hub-Pro And Dream Hub-Mini
3. DREAM HUB-PRO/DREAM HUB-MINI 1. Download the Connector app to pair and operate your Dream Hub and devices. Connector is a free app, developed by our partner Shade Connector, and is available for iOS and Android. 2. If using the Connector app for the first time, create an account and sign in. 3. -
Page 23: Sun Sensor
5. SUN SENSOR PAIRING A SENSOR WITH A SINGLE BLIND Within 4sec SENSOR PAIRED Press P2 Press P2 button x1 button x2 PAIRING A SENSOR WITH MULTIPLE BLINDS Within 4sec SENSOR PAIRED Select Press P2 Press P2 a blind button x1 button x2 SWITCHING BETWEEN SENSOR MODES MODE 1... -
Page 24: Modes Indication
2 mins. CONFORMITY DECLARATION Decorquip Ltd. hereby declare that the Dream Range products are in confirmity with the essential requirements of the applicable European Directives and, in particular, the Electromagnetic Compatibility Directive 2014/30/EU, Machinery Directive 2006/42/EC and Radio Directive 2014/53/EU.
Need help?
Do you have a question about the Dream Range and is the answer not in the manual?
Questions and answers
Changed the battery in my remote and now won’t pair and seems to be locked
To unlock and pair the remote for the DecorQuip Dream Range after changing the battery, follow these steps:
1. Ensure the Remote is Powered: Insert a new CR2450 battery into the remote.
2. Unlock the Remote (if locked): Use the button lock/unlock option if the remote is locked.
3. Choose the Channel: Select the desired channel on the remote (avoid Channel Zero, as it is for simultaneous control).
4. Pairing Process:
- Press and hold the P1 button on the motor for 2 seconds, then release.
- Within 10 seconds, press and hold the P1 button on the remote for 2 seconds.
- The motor will jog twice and beep once, then jog once more and beep three times, indicating successful pairing.
Your remote is now paired and ready for use.
This answer is automatically generated