Table of Contents
Advertisement
Quick Links
INSTRUCTION MANUAL MODEL XR-30 EXTENDED RANGE
WIRELESS BARBECUE THERMOMETER
Introduction
Congratulations on your purchase of the XR-30 EXTENDED RANGE WIRELESS BARBECUE Thermometer,
a programmable radio frequency food thermometer. You will now be able to remotely monitor the
temperature of grilling food and the temperature inside your grill from anywhere in your home.
Components
1. 1– Receiver unit
2. 1– Transmitter unit
3. 1– Detachable stainless steel FOOD probe
4. 1– Detachable stainless steel BARBECUE probe with clip
5. 4– AAA batteries
6. 1– Instruction manual
7. 1- Phillips head screw driver
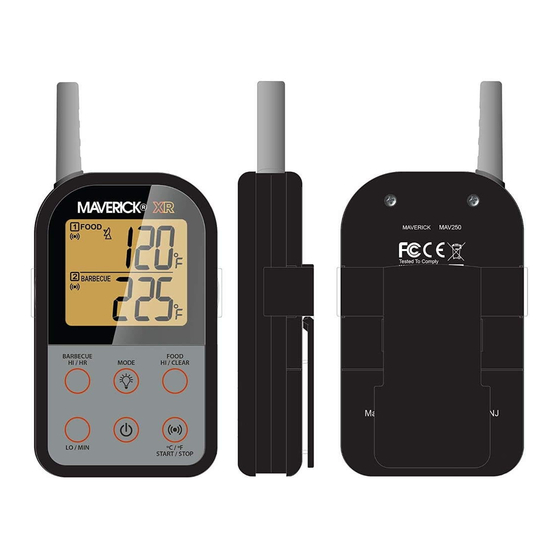
Receiver Features
BARBECUE
BARBECUE
FOOD
HI / HR
MODE
HI / CLEAR
LO / MIN
ºC / ºF
START / STOP
LCD(LiquidCrystal Display) – Displays all icons, temperature and time.
CLIP –Removable clip allowing you to have the receiver hang.
BATTERY COMPARTMENT – Holds 2 AAA batteries.
STAND (Removable Clip) – Swings out and allow you to stand the receiver on tabletop.
Buttons
1. HI/HR – In THERMOMETER MODE, press and hold until the digits
maximum BARBECUE temperature. Press and hold for 2 seconds to increase 10 degrees per
second. In TIMER MODE, when the TIMER is stopped, press to set the hour. Press and hold for 2
seconds to increase 10 hours per second.
2. LO/MIN – In THERMOMETER MODE, press and hold until the digits
minimum BARBECUE temperature. Press and hold for 2 seconds to increase 10 degrees per
second. In TIMER MODE, when the TIMER is stopped, press to set the minute. Press and hold for
2 seconds to increase 10 minutes per second.
3. LIGHT/MODE – Press to turn on the LCD back light for 5 seconds. Press and hold for 2 seconds
to select THERMOMETER MODE or TIMER MODE.
4. HI/CLEAR – In THERMOMETER MODE, press and hold until the digits
the maximum FOOD temperature. Press and hold for 2 seconds to increase 10 degrees per
second. In TIMER MODE, when the timer is stopped, press to clear the timer setting back to
0:00.
5. ALERT, ºC /ºF, START/STOP –Press and hold for 2 seconds to switch between ºC and ºF display. In
THERMOMETER MODE, press to turn ON/OFF the alarm. In TIMER MODE, press to start or stop the
timer countdown or count up.
6. Power – Press to turn ON/OFF the receiver.
Transmitter Features
LCD(Liquid Crystal Display) – displays temperature of both FOOD and BARBECUE. It will
automatically switch between FOOD and BARBECUE displays.
(Note: Press the re-sync button
to switch the display between ºC and ºF.)
WIRE STAND – Allows you to stand the receiver on tabletop or it can be reversed and used as
a hanger.
●
BATTERY COMPARTMENT – holds 2 AAA batteries.
●
1 FOOD – Plug-in for stainless steel FOOD probe.
●
2 BARBECUE –Plug-in for stainless steel BARBECUE probe.
Buttons
1. Re-sync
– Transmit manually, terminates the auto registration process. Press and hold for 2
seconds to register the radio frequency with the receiver.
Press to select the temperature unit between ºC and ºF.
2. Power
– Press and hold for 2 seconds to turns ON/OFF the transmitter.
XR - 30
2 x AAA 1.5V battery
D218
press to increase the
press to increase the
press to increase
Installing batteries
Open the battery compartment of the receiver and insert two "AAA" batteries with correct
polarity. Open the battery compartment of the transmitter by removing the two small screws
with Phillips head screw driver, and then insert two "AAA" batteries with correct polarity.
Registering Receiver & Transmitter
The transmitter and receiver are registered as a pair at the factory, our new INSTA-SYNC
and should not require registration even when the batteries are replaced.
1. Plug the stainless steel probe sensors into the corresponding plug in of the transmitter.
Note: The FOOD probe is 6 inches long with pointed end while the BARBECUE probe is 3 inches
long with a grill rack clip.
2. Turn on the receiver by pressing the power button
3. Turn on the transmitter by pressing the power button
transmitter. This needs to be done within 120 seconds of turning on the receiver in order for the
receiver to receive the temperature data from the transmitter. If it doesn't beep within 5-10 seconds
and the "---" shown on LCD is solid, press any button on receiver to re-sync the transmitter again.
4. Re-sync is completed when the unit beeps and the probe temperatures will appear on LCD.
Note it does not matter which component you turn on first receiver or transmitter.
If you want to register the Receiver to another Transmitter, or lost link for whatever reason, you
may proceed as follows to register the unit again.
1. In normal mode, press & hold HI/HR and HI/CLEAR buttons on receiver for 2 seconds to enter
the registration mode,the "---" shown on LCD is flashing.
2. Press and hold the Re-sync button
Receiver unit.
3. Registration is completed when the unit beeps and the probe temperatures will appear on LCD.
Note the Receiver shall quit the registration mode if no transmitter is paired successfully in 120
seconds.
Loss link alert
If the receiver is taken out of range or there is abnormal external interference or after shutting OFF
the transmitter, the receiver may not be able to receive the transmission from the transmitter. If this
happens over 36 seconds, the unit will alert you by beeping once for every 4 seconds and last for 120
seconds to tell you to re-sync the signal. Pressing any button on Receiver will stop the Loss Link beep.
To regain transmission signal, move the receiver close to the transmitter, re-sync process shall be done
automatically in 12 seconds, otherwise, press any key on receiver shall re-sync the transmitter again.
Remarks:
According to FCC Part 15.231(e) rule, the RESYNC button can be activated once every 12
seconds manually. If the re-synchronization doesn't succeed 1st time, wait for 12 seconds before
pressing & hold the RESYNC button again. Or you can press and hold the power button 2
seconds to turn OFF the Transmitter and then turn back ON again. It will produce the same result.
THERMOMETER MODE
In Thermometer Mode, the LCD will show a
BARBECUE icon in the lower part of the display. You can follow processes below to gain your
desired settings.
Setting HI (Maximum) FOOD Temperature
1. Press the HI/ CLEAR button to display the maximum FOOD temperature, which will only be
displayed for 5 seconds. The FOOD temperature range is 32 ºF - 572 ºF and the default setting
is 176 ºF.
2. Press and hold the HI/ CLEAR button until the digits
3. Press the HI/ CLEAR button to set your desired temperature. It will increase one with each
press. Press and hold the HI/ CLEAR button to fast increase.
4. Press the LIGHT/MODE button to
Note: Press HI/CLEAR to read your set maximum FOOD temperature.
To destroy harmful bacteria like Salmonella and E Coli the USDA recommends the following
minimum internal temperatures:
(Beef, Veal, Lamb Steaks & Roasts and Fish) to be 145 ºF
(Egg Dishes, Pork and Ground Beef Veal & Lamb) to be 160 ºF
(Turkey, Chicken & Duck Whole, Pieces & Ground) to be 165 ºF
Setting HI (Maximum) BARBECUE Temperature
1. Press the HI/HR button to display the maximum BARBECUE temperature, which will only be
displayed for 5 seconds. The maximum BARBECUE temperature range is 140 ºF – 572 ºF and the
default setting is 176 ºF.
Note: The unit will not allow you to set the maximum BARBECUE temperature below the
minimum BARBECUE temperature.
2. Press and hold the HI/HR button until the digits
3. Press the HI/HR button to set your desired temperature. It will increase one with each press.
Press and hold the HI/ CLEAR button to fast increase.
4. Press the LIGHT/ MODE button to
Note: Press the HI/HR button to read your set maximum BARBECUE temperature.
Setting LO (Minimum) BARBECUE Temperature
1. Press the LO/MIN button to display the minimum BARBECUE temperature, which will only be
displayed for 5 seconds. The minimum BARBECUE temperature range is 32 ºF – 554 ºF and the
default setting is 50 ºF.
Note: The unit will not allow you to set the minimum BARBECUE temperature above the
maximum BARBECUE temperature.
2. Press and hold the LO/MIN button until the digits
3. Press the LO/MIN button to set your desired temperature. It will increase one with each press.
Press and hold the LO/MIN button to fast increase.
4. Press the LIGHT/MODE button to
Note: Press the LO/MIN button to read your set minimum BARBECUE temperature.
Activating the temperature alarm
You can press the ALERT, ºC /ºF, START/STOP button to activate the temperature alarm for
BARBECUE and FOOD. The alarm icons will appear beneath the
The receiver will beep with the alarm icon and probe temperature
a) The actual FOOD temperature has exceeded your set maximum FOOD temperature. ( Beep
twice in every second)
b) The actual BARBECUE temperature has exceeded your set maximum BARBECUE temperature.
(Beep once in every second)
2 seconds.
2 seconds, found on the back of the
on transmitter for 2 sec will re-synchronize with the
FOOD icon in the upper part of the display and a
the setting.
the setting.
the setting.
FOOD and
BARBECUE icons.
if:
Technology,
TM
Advertisement
Table of Contents

Subscribe to Our Youtube Channel
Related Manuals for Maverick XR-30


Summary of Contents for Maverick XR-30
- Page 1 INSTRUCTION MANUAL MODEL XR-30 EXTENDED RANGE WIRELESS BARBECUE THERMOMETER Introduction Congratulations on your purchase of the XR-30 EXTENDED RANGE WIRELESS BARBECUE Thermometer, Installing batteries a programmable radio frequency food thermometer. You will now be able to remotely monitor the Open the battery compartment of the receiver and insert two “AAA” batteries with correct temperature of grilling food and the temperature inside your grill from anywhere in your home.
- Page 2 5. Stand/ hang the transmitter away from heat source of barbecue. DO NOT put transmitter on Customer Service by email or mail for instruction on how to pack and ship the XR-30 EXTENDED closed cover or under the cover. The transmitter is water proof for use in rain.
Need help?
Do you have a question about the XR-30 and is the answer not in the manual?
Questions and answers