
Related Manuals for Tektronix K475


Summary of Contents for Tektronix K475
- Page 1 Instructions K475 Workstation Tower 070-8847-02 www.tektronix.com *P070884702* 070884702...
- Page 2 Copyright © Tektronix, Inc. All rights reserved. Tektronix products are covered by U.S. and foreign patents, issued and pending. Information in this publication supercedes that in all previously published material. Specifications and price change privileges reserved. Tektronix, Inc., P.O. Box 500, Beaverton, OR 97077...
- Page 3 Tektronix, with shipping charges prepaid. Tektronix shall pay for the return of the product to Customer if the shipment is to a location within the country in which the Tektronix service center is located. Customer shall be responsible for paying all shipping charges, duties, taxes, and any other charges for products returned to any other locations.
-
Page 5: Table Of Contents
................K475 Workstation Tower Instructions... -
Page 6: General Safety Summary
H When rolling the tower up or down ramps. Do Not Top-Load the K475 Do not load the top shelves of the K475 while leaving the bottom shelves empty. That makes the tower top-heavy and easier to tip over. Load the top shelves only if the bottom shelves are also loaded. -
Page 7: Contacting Tektronix
This phone number is toll free in North America. After office hours, please leave a voice mail message. Outside North America, contact a Tektronix sales office or distributor; see the Tektronix web site for a list of offices. K475 Workstation Tower Instructions... - Page 8 Preface K475 Workstation Tower Instructions...
-
Page 9: Introduction
The Tektronix K475 Workstation Tower requires some assembly. This manual tells how to assemble and use the tower. You can assemble the K475 Workstation Tower by yourself, but it is easier if you have another person to help you. You will need a large flat area to assemble the tower. The area should be level and large enough to move the various parts into place. - Page 10 Introduction Press-On Probe Holder Circular Bubble Level Short Rail 1/2 inch Split Lockwasher 1/4 inch Tooth Lockwasher 1/4- - 20 Button Head Screw, 1/2 inch length 3/16 inch Allen Wrench Figure 1: Identification of Small Parts K475 Workstation Tower Instructions...
- Page 11 Small Parts in Bag 1/2 inch Split Lockwashers 1/4- - 20 Cap Head Screws, 1/2 inch length 1/4 inch Tooth Lockwashers Weld Nuts Press-On Probe Holder Small Tools in Bag 3/16 inch Allen Wrench Circular Bubble Level K475 Workstation Tower Instructions...
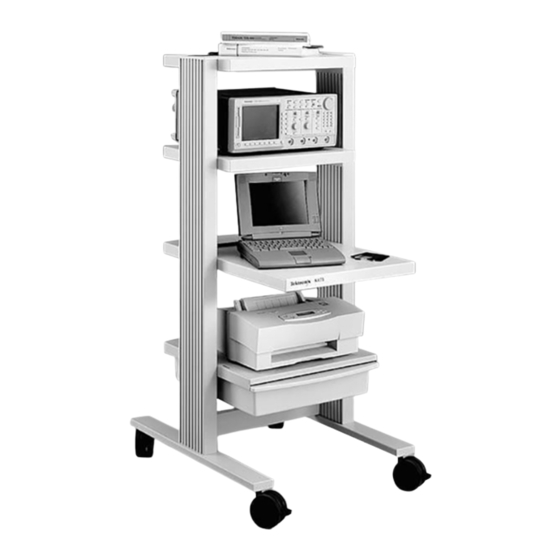
- Page 12 Introduction Leg Cap Half Shelf Leg Assembly Half Shelf Keyboard Shelf Drawer Shelf Drawer Strut Non-Locking Caster Front Locking Caster Figure 2: The K475 Workstation Tower K475 Workstation Tower Instructions...
-
Page 13: Base Assembly
1. Prepare the strut as shown in Figure 3. Position the short rail with the raised threaded flange toward the strut. Leave each screw assembly loose; do not screw the short rail onto the button head screw more than one full turn. K475 Workstation Tower Instructions... - Page 14 This button is on the inside of the tower, at the back. Position the leg assemblies as shown in Figure 4. Leave a space between the leg assemblies about equal to the length of the strut. K475 Workstation Tower Instructions...
- Page 15 4. Place extrusion on top of leg tube oriented so the caster nuts are on the bottom as shown in Figure 4. K475 Workstation Tower Instructions...
- Page 16 12. Identify which casters are locking and which are non-locking. The locking casters, which go on the front of the cart, have an extra tab that you step on to lock the wheels. K475 Workstation Tower Instructions...
- Page 17 Tighten the casters using the wrench only until they are snug. 15. Return the tower to the upright position. K475 Workstation Tower Instructions...
-
Page 18: Drawer Shelf And Drawer
Leave each screw assembly loose; do not screw the weld nut onto the cap head screw more than one full turn. Weld Nut 1/4 inch Tooth Lockwasher 1/4- - 20 Cap Head Screw Figure 6: Preparing the Drawer Shelf K475 Workstation Tower Instructions... - Page 19 2. Position the drawer shelf horizontally between the leg assemblies, as shown in Figure 7. Position the shelf so the open edge is to the front of the tower. Front Figure 7: Aligning the Drawer Shelf K475 Workstation Tower Instructions...
- Page 20 4. Use the 3/16 inch Allen wrench to tighten the cap head screws. Tighten them first snugly, then go back and tighten them firmly. Figure 8: Installing the Drawer K475 Workstation Tower Instructions...
- Page 21 6. Use your thumb to press into place the two press-stud retainers at the bottom of the drawer rails, as shown in Figure 9. Insert Press-Stud Retainer Into Hole on Bottom of Drawer Shelf (one each side) Figure 9: Installing the Press-Stud Retainers K475 Workstation Tower Instructions...
-
Page 22: Keyboard Shelf
H 4 Weld Nuts You will use the 3/16 inch Allen wrench and the circular bubble level included with your tower. Position the keyboard shelf with the largest shelf area to the front of the tower. K475 Workstation Tower Instructions... -
Page 23: Half Shelf
Leave each screw assembly loose; do not screw the weld nut onto the button head screw more than one full turn. Weld Nut 1/4 inch Tooth Lockwasher 1/4- - 20 Cap Head Screw Front Figure 10: Preparing the Half Shelf K475 Workstation Tower Instructions... - Page 24 4. Use the 3/16 inch Allen wrench to tighten the cap head screws. Tighten them first snugly, then go back and tighten them firmly. K475 Workstation Tower Instructions...
-
Page 25: Second Half Shelf
You will use the 3/16 inch Allen wrench and the circular bubble level included with your tower. Position the half shelf so that it extends farther back from the leg assemblies than it protrudes in front. K475 Workstation Tower Instructions... -
Page 26: Leg Caps
Press a leg cap into the top of each leg assembly as shown in Figure 12. You may need to press them into place with the heel of your hand. Figure 12: Installing the Leg Caps K475 Workstation Tower Instructions... -
Page 27: Nylon Straps
This routing allows you to tighten the strap around an instrument by pulling on the free end of the strap. To loosen a strap, pull up on the tab of the buckle. Figure 13: Installing the Nylon Straps with Buckles K475 Workstation Tower Instructions... -
Page 28: Customization
WARNING. Changes in shelf location and loading can affect the balance of the tower. If you arrange the shelves differently from the configuration described in this manual, test the tower carefully for stability before using it. K475 Workstation Tower Instructions... -
Page 29: Specifications
Specifications The K475 Workstation Tower meets the specifications in Table 2. Table 3 shows additional characteristics. Table 2: Performance Specifications Parameter Specification Loading Limit, 16 kg (35 lb) Top Shelf Loading Limit, 34 kg (75 lb) Middle and Keyboard Shelves Loading Limit, 6.8 kg (15 lb) -
Page 30: Replaceable Parts
United States and Canada, you can call the National Marketing Center toll-free at 1-800-426-2200 (within Oregon, call 503-690-3915). You can order the following parts to repair the K475 Workstation Tower: H Locking Caster, Tektronix part number 401-0691-00. H Non-Locking Caster, Tektronix part number 401-0690-00. - Page 31 Tektronix 連絡先 ........
-
Page 32: 安全にご使用いただ く ために
棚板や引 き 出 し の位置を変え る と 台車のバ ラ ン ス に影響す る こ と があ り ます。 本マニ ュ アルで説明 さ れてい る 位置 と 異な る 位置に棚板を取 り 付 け る 場合は、 安定性を十分確認 し てか ら 使用 し て く だ さ い。 K475 型イ ン ス ト ラ ク シ ョ ン... -
Page 33: Tektronix 連絡先
サービ ス ・ サポー ト 電子メール:techsupport@tektronix.com テ ク ニ カル ・ サポー ト 1-800-833-9200、オプション 3 を選択 * 6:00 a.m. ~ 5:00 p.m. 太平洋標準時 * この番号は、北米におけるトールフリー・ダイヤルです。営業時間外 の場合は、ボイス・メールにメッセージを録音してください。 北米以外からの場合は、Tektronix の営業所または代理店にお問い合 わせください。営業所のリストについては、Tektronix のウェブ・サ イトを参照してください。 K475 型イ ン ス ト ラ ク シ ョ ン... - Page 34 Tektronix 連絡先 K475 型イ ン ス ト ラ ク シ ョ ン...
-
Page 35: は じ めに
ツール 台車の組み立てには、 19 mm (3/4 イ ンチ ) オープンエ ン ド ・ レ ンチ、 ま た はサ イ ズ調整可能な レ ンチが必要です。 他に必要な ツールは、 K475 型台車に付属 し てい ます。 付属す る ツール は、 3/16 イ ンチの六角レ ンチお よ び水準器です。 パーツの確認 K475 型台車を構成す る 主要部品は個別に梱包 さ れてダ ン ボール箱に収容... - Page 36 1/4 イ ン チ ロ ッ ク ワ ッ シ ャ 1/4 – 20 ボ タ ンヘ ッ ド 型ネジ 1/2 イ ン チ長 3/16 イ ン チ 六角レ ン チ 図 1: 小 さ いパーツの確認 K475 型イ ン ス ト ラ ク シ ョ ン...
- Page 37 1/4 イ ンチ ロ ッ ク ワ ッ シ ャ ナ ッ ト プ レ ス オ ン ・ プ ロ ーブ ・ ホルダ 取付工具 (袋入 り ) 3/16 イ ンチ 六角レ ンチ 水準器 K475 型イ ン ス ト ラ ク シ ョ ン...
- Page 38 キーボー ド 用 棚板 引出 し 用 棚板 引出 し ス ト ラ ッ ト キ ャ ス タ 前方向 キ ャ ス タ (ロ ッ ク付) 図 2: K475 型台車 K475 型イ ン ス ト ラ ク シ ョ ン...
-
Page 39: ベース部の組み立て
シ ョ ー ト ・ レール 4 個 3/4 イ ンチ (19 mm) レ ンチ と 台車付属の 3/16 イ ンチの六角レ ンチを使用 し ます。 1. 図 3 に示すようにストラットを準備します。ストラットに対してナッ トを図に示す位置に固定します。ネジは固く締めずにゆるめにしてお きます。ナットを1回転以上締めないでください。 K475 型イ ン ス ト ラ ク シ ョ ン... - Page 40 1/4 イ ン チ ロ ッ ク ワ ッ シ ャ 1/4-20 ボ タ ンヘ ッ ド 型ネジ 図 3: ス ト ラ ッ ト の準備 2. 脚部アセンブリの水平バーに小さいプラスチックのボタンがついてい ることを確認します。このボタンが台車の後部方向内側になります。 図 4 に示すように、脚部アセンブリを置きます。脚部アセンブリ間の スペースがストラットの長さにほぼ等しい程度にしておきます。 K475 型イ ン ス ト ラ ク シ ョ ン...
- Page 41 で薄 く マーキ ン グ し て あ る 方が支柱の内側にな る よ う に し ます。 脚部 アセ ンブ リ を 2 本組み立て ます。 4. 図 4 に示すように、脚の上に支柱を置 き 、 キ ャ ス タ 取付部が下に向 く よ う に し ます。 K475 型イ ン ス ト ラ ク シ ョ ン...
- Page 42 12. ロ ッ ク 機能付 と 機能な し のキ ャ ス タ を区別 し てお き ます。 ロ ッ ク 機能 付のキ ャ ス タ は、 台車の前部方向に取 り 付け ら れ、 車輪を ロ ッ ク す る ための タ ブが付いてい ます。 K475 型イ ン ス ト ラ ク シ ョ ン...
- Page 43 14. ロ ッ ク 機能な し のキ ャ ス タ に、 1/2 イ ンチの ス プ リ ッ ト ・ ロ ッ ク ワ ッ シ ャ を通 し 、 脚部アセ ンブ リ の後部にあ る 穴に取 り 付け ます。 キ ャ ス タ を レ ンチで締め ます。 15. 台車を元の状態に戻 し ます。 K475 型イ ン ス ト ラ ク シ ョ ン...
-
Page 44: 引き出 し と 棚板
1. 図 6 に示すように棚板を準備します。 棚板の両側面の 4 つの穴に、 取付 ネジ、ロックワッシャ、ナットを図に示すように取り付けます。スク リューは固く締めずにゆるめにしておきます。ナットを1回転以上締 めないでください。 ナ ッ ト 1//4 イ ン チ ロ ッ ク ワ ッ シ ャ 1/4-20 キ ャ ッ プヘ ッ ド 型ネジ 図 6: 棚板の準備 K475 型イ ン ス ト ラ ク シ ョ ン... - Page 45 引き出 し と 棚板 2. 図 7 に示すように、脚部アセンブリ間で、棚板を水平に位置決めしま す。棚板の端がオープンになっている方を台車の前方向に向けます。 前方向 図 7: 棚板の位置決め K475 型イ ン ス ト ラ ク シ ョ ン...
- Page 46 てい る 間に、 ネジ を締め ます。 単独で台車を組み立ててい る 場合は、 両側のネジ を交互に締めてい き 、 次に高 さ が適切にな る よ う に調整 し ます。 4. 3/16 イ ンチの六角レ ンチを使用して、キャップヘッド型ネジを締めま す。最初は軽く締め、次に固く締めます。 図 8: 引出 し の取 り 付け K475 型イ ン ス ト ラ ク シ ョ ン...
- Page 47 プ レ スス タ ッ ド ・ リ テ イ ナを 引出 し の下の穴に差 し 込みます。 (両側に 1 個ずつ) 図 9: プ レ スス タ ッ ド ・ リ テ イ ナの取 り 付け K475 型イ ン ス ト ラ ク シ ョ ン...
-
Page 48: キーボー ド 用棚板
1/4 イ ンチ ロ ッ ク ワ ッ シ ャ 4 個 ナ ッ ト 4 個 台車付属の 3/16 イ ンチの六角レ ンチ、 お よ び水準器を使用 し ます。 キーボー ド 用棚板の面が広い方が前を向 く よ う に配置 し ます。 K475 型イ ン ス ト ラ ク シ ョ ン... -
Page 49: ハー フサイ ズ棚板
1回転以上締めないでください。 ナ ッ ト 1/4 イ ン チ ロ ッ ク ワ ッ シ ャ 1/4-20 キ ャ ッ プヘ ッ ド 型ネジ 前方向 図 10: ハー フ サイ ズ棚板の準備 K475 型イ ン ス ト ラ ク シ ョ ン... - Page 50 てい る 間に、 取付ネジ を締め ます。 単独で台車を組み立て てい る 場合 は、 両側の取付ネジ を交互に締めてい き 、 次に高 さ が適切にな る よ う に調整 し ます。 4. 3/16 イ ンチの六角レ ンチを使用して、キャップヘッド型ネジを締めま す。最初は軽く締め、次に固く締めます。 K475 型イ ン ス ト ラ ク シ ョ ン...
-
Page 51: ハー フサイ ズ棚板 (2 枚目
1/4 イ ンチ ロ ッ ク ワ ッ シ ャ 4 個 ナ ッ ト 4 個 台車付属の 3/16 イ ンチの六角レ ンチ、 お よ び水準器を使用 し ます。 棚板は、 前方向に出ている部分よりも後ろ方向に大きく張り出すように 取り付けます。 K475 型イ ン ス ト ラ ク シ ョ ン... -
Page 52: 脚部用キ ャ ッ プ
脚部アセ ンブ リ の上端にキ ャ ッ プを取 り 付け ます。 キ ャ ッ プの取 り 付け には、 付属の ツールは必要あ り ません。 図 12 に示す よ う にキ ャ ッ プ を押 し 込みます。 図 12: キ ャ ッ プの取 り 付け K475 型イ ン ス ト ラ ク シ ョ ン... -
Page 53: ナ イ ロ ン ・ ス ト ラ ッ プ
図 13 に示す よ う にナ イ ロ ン ・ ス ト ラ ッ プ を取 り 付け ます。 図 13: ナ イ ロ ン ・ ス ト ラ ッ プの取 り 付け K475 型イ ン ス ト ラ ク シ ョ ン... -
Page 54: カ ス ト マ イ ズ
があ り ます。 本マニ ュ アルで説明 さ れてい る 位置 と 異な る 位置に棚板を 取 り 付け る 場合は、 安定性を十分確認 し てか ら 使用 し て く だ さ い。 K475 型イ ン ス ト ラ ク シ ョ ン... -
Page 55: 仕 様
仕 様 K475 型台車は表 2 の仕様を満足 し ます。 表 3 は、 機械的仕様を示 し ま す。 表 2: K475 型仕様 項 目 仕 様 16 kg (35 lb) 積載質量 天板 34 kg (75 lb) 積載質量 中間棚お よ び... -
Page 56: 交換用部品 リ ス ト
交換用部品 リ ス ト 交換用部品のご注文は、 当社ま たは販売店ま でご連絡 く だ さ い。 K475 型台車の修理用パーツ と し て以下の も の を購入で き ます。 ロ ッ ク 機能付キ ャ ス タ 当社部品番号 401-0691-00 キ ャ ス タ ( ロ ッ ク 機能な し ) 当社部品番号 401-0690-00 ナ... - Page 57 Mouser Electronics Authorized Distributor Click to View Pricing, Inventory, Delivery & Lifecycle Information: Tektronix K475...
Need help?
Do you have a question about the K475 and is the answer not in the manual?
Questions and answers