Table of Contents
Advertisement
Quick Links
Advertisement
Table of Contents

Related Manuals for Megavoice Envoy 3 Equip Plus


Summary of Contents for Megavoice Envoy 3 Equip Plus
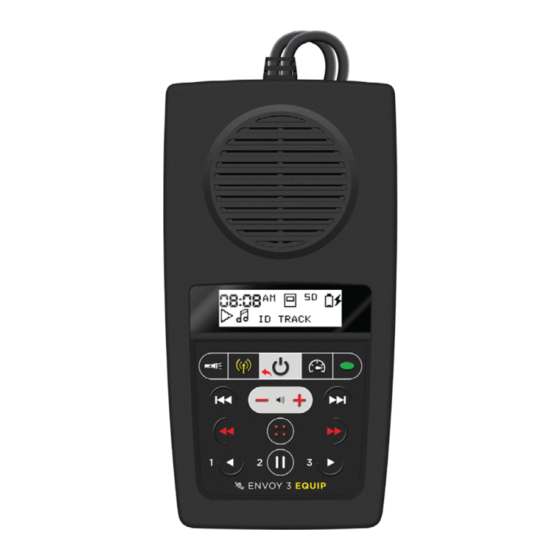
- Page 1 ENVOY 3 EQUIP PLUS SOLAR AUDIO PLAYER USER MANUAL...
-
Page 2: Table Of Contents
TABLE OF CONTENTS Pausing/Bookmarking Earphones, Speakers and Volume Easy Start Using the MicroSD Card Turning the Player On/Off Resetting Player Defaults The LCD Screen Full Player Reset Selecting Playback Channels The Menu System Navigating During Playback The Menu System Screens Playback Screen Charging Instructions File Playback Information... -
Page 3: Easy Start
EASY START Press and hold the power button until the player chimes and the LCD screen turns on. The player will begin to play automatically. -
Page 4: Turning The Player On/Off
TURNING THE PLAYER ON/OFF THE LCD SCREEN This player is unique in that it provides complete information and control via the LCD Press in the top center of the keypad for 2 seconds to turn the player on (the LCD screen with an interactive menu system. -
Page 5: Selecting Playback Channels
SELECTING PLAYBACK CHANNELS When in playback from onboard or microSD memory, a 2-second press on together will navigate to Channel 000 in onboard memory (if present). The player supports up to 3 Channels for onboard memory and up to 2 Channels From Radio Mode, a 2-second press on will resume at the prior position in onboard for microSD. -
Page 6: Playback Screen
During “press and hold”, a scale will be displayed on the bottom line of the screen Click to skip backward or forward one Book. A 2-second press will skip showing the current playback position within the total play time of the current file. 5 Books at a time. -
Page 7: File Playback Information
• Album Info: + ID3 Album Name Paused - If ID3 Album Name is blank or missing, the field is skipped Icon representing Battery capacity • Artist info: + ID3 Artist Name type of file indicator: four - If ID3 Artist Name is blank or missing, the field is skipped information bars = 81%-100% •... -
Page 8: Radio
When the scan reaches the beginning/end of the band’s frequency range the player RADIO will chime. An additional click will loop and continue the scan from the beginning/end respectively. To stop an active scan , click on When in playback mode, a 2-second press on will put the player in radio mode (player will chime). -
Page 9: Radio Screen
RADIO SCREEN SPEED CONTROL A 2-second press on will emit a chime and place the player in speed control mode, AM/PM (or blank Current band: FM, microSD is loaded Battery capacity allowing you to adjust the audio playback speed. when 24-hour) AM, or SW indicator: four bars = 81%-100%... -
Page 10: Speed Control Screen
The Speed setting persists when changing modes or after turning the player off. SPEED CONTROL SCREEN The Speed setting applies to both onboard and microSD playback. Current speed setting: from -8 to +8 Identifies Speed settings screen The Speed Control button is only active during audio playback and may be set while playback is active or paused. -
Page 11: Led Torch
LED TORCH To resume, click again. The icon is displayed. For both onboard and microSD memory, the player automatically bookmarks the last to control the LED Torch and its intensity. Each click will change the intensity as file played and the position within that file when the mode is changed or the player is follows: turned off. -
Page 12: Using The Microsd Card
When an audio device is removed during audio playback, the player enters Pause Mode. While an audio device is connected, the earphone icon is displayed on the screen. Some earphones with built-in controls may not work properly. Click to decrease or increase volume one level. Volume level (00) is muted. - Page 13 You can view, format and prepare an SD card while loaded in the player’s microSD card reader when the player is connected to a Computer using a USB to micro-USB cable. You may also do the same with the card loaded in a microSD adaptor connected to a Computer.
-
Page 14: Resetting Player Defaults
RESETTING PLAYER DEFAULTS FULL PLAYER RESET The player’s default settings may be reset at any time and at the following levels: To perform a full reset of the player do the following: • Onboard Playback: delete all onboard bookmarks • Click to enter the Main Menu. -
Page 15: The Menu System
Movement among a menu’s items can loop to reduce button clicks. For example, a click THE MENU SYSTEM while highlighting the last (right-most) icon will move to the first (left most) icon The player provides an interactive menu system that works together with the LCD in the menu. -
Page 16: The Menu System Screens
THE MENU SYSTEM SCREENS Player Settings Menu Main Menu Radio settings Speed Control Clock settings Firmware details Onboard playback Radio mode microSD playback settings Return to previous Player settings Return to previous Mode reset mode (selected) menu menu (selected) - Page 17 Mode Reset Screen Radio Settings Screen (for band spacing) When highlighted, use volume up/down Highlight and click Menu button to Previous menu FM band (selected) AM band SW band to select the mode for reset confirm selected mode reset Cancel and return to previous menu •...
- Page 18 Radio Band Spacing Screen • Once the spacing value is set, scanning within that band will skip by the value specified. Previous menu FM band identified Spacing value (selected): available values • This menu is typical for all 3 radio bands. The spacing options for each band are as change using volume up/down follows: FM: 100, 200 kHz...
- Page 19 Speed Control Settings Screen Clock Settings Screen Current speed setting: from -8 to +8 Identifies Speed settings screen • Adjust speed setting using • Select the item desired using • Click to exit and save the setting. • Once the item is selected , use to adjust the value.
-
Page 20: Charging Instructions
• To verify that your player has the most recent firmware update and that you have the ˄˅ symbols will appear above and below the item to indicate that the current user manual, please visit: megavoice.com/audio-bible/envoy-3-equip buttons are active. Firmware Details Screen CHARGING INSTRUCTIONS With proper care, the player’s Lithium-Ion battery should perform well for several years. -
Page 21: Charging Screen
while connected to an external power source. For solar charging, place the player with the solar panel facing bright sunlight for at least a full day . When solar charging, there is no charge indication. BATTERY CARE Actual charge time will vary according to the power source and current battery capacity. •... -
Page 22: Charging/Communication Modes
• If stored for extended periods, it is recommended to recharge the player at least every When the player is on and a charge-only cable is connected: 6 months, in order to prevent the battery from losing its ability to recharge. •... -
Page 23: Problems With The Player
• When the cable is disconnected, the player remains off. PROBLEMS WITH THE PLAYER? When the player is on and a data-only or SLS cable is connected: If the unit will not turn on, please try the following: • The current function will continue uninterrupted but the charge icon is displayed. -
Page 24: Warnings
or clothing exposed to battery liquid and avoid swallowing or contact with eyes. In the WARNINGS case of swallowing or contact with eyes, seek medical care immediately. • Care must be taken to set the volume at the lowest level that can be heard RESET BUTTON comfortably. - Page 25 © 2021 MegaVoice Ltd. Made in China MV - Envoy 3 Equip Plus - UM - Book - Eng - 2021.07.11-1.1.0...
Need help?
Do you have a question about the Envoy 3 Equip Plus and is the answer not in the manual?
Questions and answers