Advertisement
Quick Links
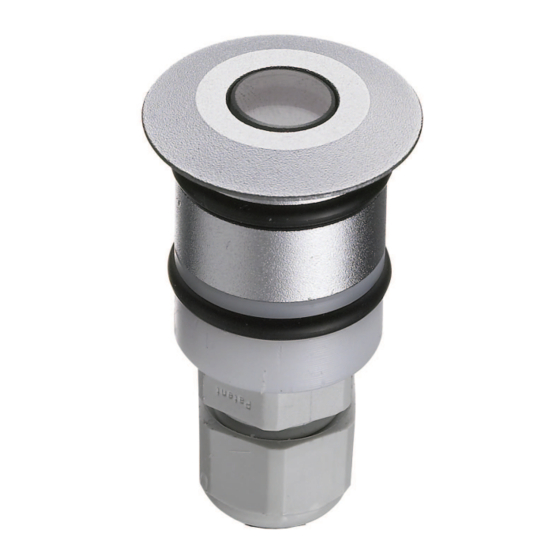
SMALL SPOTLIGHTS
OUTDOOR
Lux 12 - Lux 12S gen.2 ISTRUZIONI DI MONTAGGIO / INSTALLATION INSTRUCTIONS
Lux 12 walk over - BLUX0501017_CS
Lux 12 walk over - BLUX0501017_TF
Lux 12S - BLUXS501017_CS
OUT
-
+
La morsettiera di alimentazione non è inclusa/the terminal block not included
Esempio di collegamento (connessione in serie)/
Example of connection (serial connection)
110V-240V*
50/60 Hz
L
N
WALIMLED08350
10W - 350mA
* Verificare la tensione di ingresso supportata dagli alimentatori / Verify the input tension supported from drivers
-L'installazione deve essere fatta da personale qualificato.
-Installation should be carried out by a suitable qualified installer.
-Non aprire il faretto
-Do not open the spot.
-In caso di guasti, previa autorizzazione al reso di ILTI Luce, il prodotto non
dovrà essere aperto, il pressacavo non deve essere smontato e il cavo deve
essere tagliato lasciandone almeno 10/15cm.
-In case of failure,upon a return authorization of ILTI LUCE, the product will
not have to be opened,the cable gland must not be removed and the cable
must be cut leaving at least 10/15cm
-Tutte le operazioni di cablaggio e manutenzione vanno eseguite con
l'interruttore generale in posizione OFF.
-All wiring and maintenance must be performed with the main switch
in the OFF position.
ILTI LUCE srl ·
Lungo Dora P. Colletta, 113/9· 10153 Torino (Italy); tel (39) 011 765 73 01; fax (39) 011 853855; www.iltiluce.com; ilti@signify.com
L
XX350mA
N
max n°8 spots 1,2W
-
+
-
1
+
2
-
+
20m (40m tot.)
sez.cavo/cable section
1mm2
1,2W
si consiglia la conservazione delle seguenti istruzioni - we suggest you to keep this copy for your files
IN
Alimentatori/ LED Drivers (SELV)
Codice/Code
non inclusi/not included
WALIMLED01350
-
WALIMLED03350
WALIMLED08350
+
WALIMLED12350
WALI/DIMM/JOLLY
WBOKVAR
-Togliere tensione prima di eseguire operazioni di manutenzione.
-Disconnect main voltage before maintenace operation.
-Pulire periodicamente la superficie frontale del faretto.
Non utilizzare detersivi a base acida.
-Periodically clean the frontal part of the spot.
Do not use acid substances.
-Per un corretto funzionamento, l'apparecchio necessita di
relativo vetro di protezione integro.
-For a proper operation, thefitting requires its protective
undamaged glass.
IP65
IP68
IP68
IP65
CALPESTABILE
NON CALPESTABILE
WALK OVER
NOT WALK OVER
ø 26
ø 20,8
ø 24
n. faretti/
Caratteristiche/
n.spots
Specifications
2W - 350mA
1
4W - 350mA
3
10W - 350mA
min5-max8
min8-max12
15W - 350mA
15W - 350mA - dimm
min8-max12
variatore/dimmer 1/10V
/
max
35˚C
0,12
-20˚C
MADE in ITALY_10 - 2018 (M)
(mm)
Advertisement

Related Manuals for Ilti Luce Lux 12

Summary of Contents for Ilti Luce Lux 12
- Page 1 -Do not open the spot. -Periodically clean the frontal part of the spot. -In caso di guasti, previa autorizzazione al reso di ILTI Luce, il prodotto non Do not use acid substances. dovrà essere aperto, il pressacavo non deve essere smontato e il cavo deve essere tagliato lasciandone almeno 10/15cm.
- Page 2 SMALL SPOTLIGHTS OUTDOOR Lux 12 - Lux 12S gen.2 ISTRUZIONI DI MONTAGGIO / INSTALLATION INSTRUCTIONS IP67-68 application 90° drenaggio dreinage tubo per cablaggio tube for cables cassaforma(ABS) ILTILUCE boxskill(ABS ) ILTILUCE cemento concrete per utilizzo in immersione è consigliabile applicare uno strato di silicone tra cassaforma e faretto.
Need help?
Do you have a question about the Lux 12 and is the answer not in the manual?
Questions and answers