Advertisement
Quick Links
Advertisement

Subscribe to Our Youtube Channel
Related Manuals for Walker Edison B46MCMSB


Summary of Contents for Walker Edison B46MCMSB
- Page 1 Item # : B46MCMSB Assembly Instructions Please visit our website for the most current instructions, assembly tips, report damage, or request parts. www.walkeredison.com Revised 26/05/2020 (I) Walker Edison ® Copyright 2020 b Walker Edison Furniture Co., LLC. All rights reserved. ©...
-
Page 2: General Assembly Guidelines
Wipe away excess glue immediately. A Phillips head screwdriver is required for the assembly of this product . VII. Power tools should not be used to assemble this product. Copyright 2020, by Walker Edison Furniture Co., LLC. All rights reserved. ©... -
Page 3: Parts List
Parts List Copyright 2020 b Walker Edison Furniture Co., LLC. All rights reserved. ©... -
Page 4: Hardware List
Glue tube Philips head screwdriver required for assembly (not included) The hardware quantities listed above are required for proper assembly. Some extra hardware may also have been included. Copyright 2020 b Walker Edison Furniture Co., LLC. All rights reserved. ©... - Page 5 Step 1 Insert wooden dowel (A) into parts (7,8), then using Handle bolt (F) secure Handle (E) into part (8) with Philips head Screwdriver as per diagram. Copyright 2020 b Walker Edison Furniture Co., LLC. All rights reserved. ©...
- Page 6 Step 2 Insert wooden dowel (A) into part (4) as per diagram. Copyright 2020 b Walker Edison Furniture Co., LLC. All rights reserved. ©...
- Page 7 Step 3 Secure Cam bolt (B) into parts (5,6) with Philips head screwdriver as per diagram. Copyright 2020 b Walker Edison Furniture Co., LLC. All rights reserved. ©...
- Page 8 Step 4 Using screw (G) attach part (4) into parts (7,8) with Philips head screwdriver as per diagram. Copyright 2020 b Walker Edison Furniture Co., LLC. All rights reserved. ©...
- Page 9 Step 5 Using cam lock(C) secure part (5) to parts (4,7,8) with Philips head screwdriver as per diagram. Copyright 2020 b Walker Edison Furniture Co., LLC. All rights reserved. ©...
- Page 10 Step 6 Repeat the last step as per diagram. Copyright 2020 b Walker Edison Furniture Co., LLC. All rights reserved. P.10 ©...
- Page 11 Step 7 Using bolt (H) attach part (2) to part (4) with Hex key (J) as per diagram. Copyright 2020 b Walker Edison Furniture Co., LLC. All rights reserved. P.11 ©...
- Page 12 Step 8 Place sticker (D) cover the holes as per diagram . Copyright 2020 b Walker Edison Furniture Co., LLC. All rights reserved. P.12 ©...
- Page 13 Step 9 Using Screw (L) attach Hinge (K) to part (3) with Philips head screwdriver as per diagram. Copyright 2020 b Walker Edison Furniture Co., LLC. All rights reserved. P.13 ©...
- Page 14 Step 10 Using Screw (L) attach Hinge (K) to part (7) with Philips head screwdriver as per diagram. Copyright 2020 b Walker Edison Furniture Co., LLC. All rights reserved. P.14 ©...
- Page 15 If the gap between the part (3) and side panels need to be adjusted, please first loosen the screws fixing hinge (K) to the part (3).Finally adjust one side of the side panel up or down, and then lock the hinge (M,N). Copyright 2020 b Walker Edison Furniture Co., LLC. All rights reserved. P.15 ©...
- Page 16 Step 12 Put part (1) as per diagram. Copyright 2020 b Walker Edison Furniture Co., LLC. All rights reserved. P.16 ©...
-
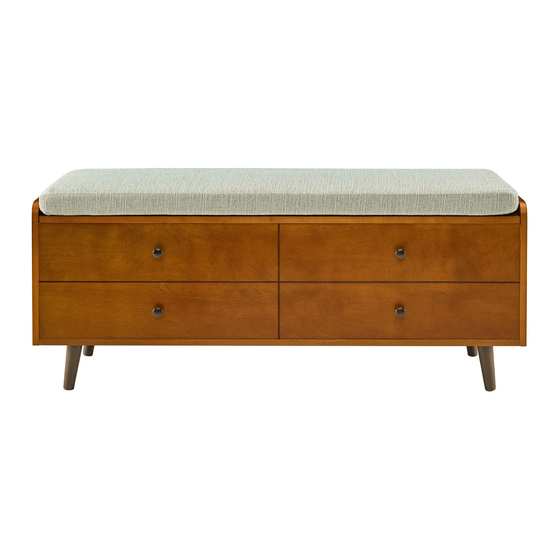
Page 17: Final Assembly
Step 13 Final Assembly Copyright 2020 b Walker Edison Furniture Co., LLC. All rights reserved. P.17 ©...
Need help?
Do you have a question about the B46MCMSB and is the answer not in the manual?
Questions and answers