
Related Manuals for Thinkware SNAP G


Summary of Contents for Thinkware SNAP G
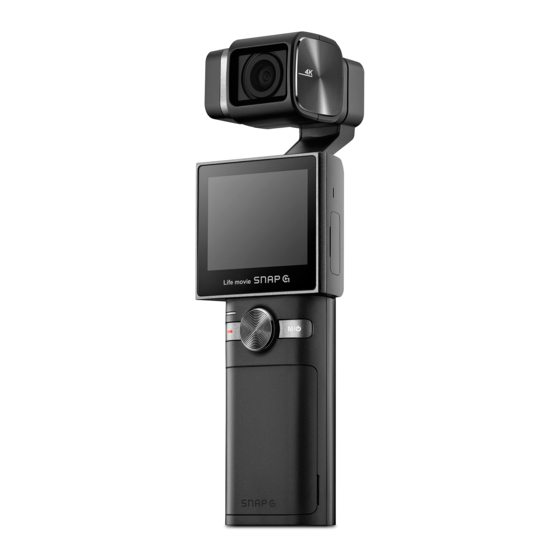
- Page 1 USER GUIDE SNAP G is a portable gimbal camera that combines ease of use and functionality.
-
Page 2: Table Of Contents
Contents 1. Basic information overview 3 4. Using the SNAP G app 19 1.1 Included items 3 4.1 Downloading the SNAP G app 19 1.1.1 Standard items 3 4.2 Using live streaming 19 1.1.2 Accessories (sold separately) 3 4.3 Updating firmware with the SNAP G app 21 1.2 Part names 4 1.2.1 Main unit (front/back view) 4 1.2.2 Main unit (side view) 4 5. Using recording modes 22 1.2.3 Main unit (top/bottom view) 5 5.1 Using video modes 22 1.3 Removing and inserting the memory card 5... -
Page 3: Basic Information Overview
Quick start guide Strap Main unit USB-C cable Battery Pouch 1.1.2 Accessories (sold separately) Mini tripod / Head tracker / Microphone / Backpack mount / Battery charger / ND filter Visit the THINKWARE homepage (http://thinkware.com) to buy extra included items and accessories. -
Page 4: Part Names
Basic information overview 1.2 Part names 1.2.1 Main unit (front/back view) Camera Pan motor M4 mount connector LED status Speaker Recording button Trigger Joystick Battery cover Strap holder Mode/Power button 1.2.2 Main unit (side view) Roll motor Microphone Microphone USB-C port USB port/SD card slot cover External microphone port microSD card slot... -
Page 5: Main Unit (Top/Bottom View)
1.4 Removing and inserting the battery • For optimal performance, use a genuine SNAP G battery. • The performance of the product may be limited and the camera performance is not guaranteed if you do not use an authentic SNAP G battery. -
Page 6: Charging The Product
• It takes 150 minutes to fully charge the battery. (You can charge two batteries at the same time by using SNAP G battery charger.) • For the fastest charging of the product, use the SNAP G charger (sold separately). • Charging time may vary depending on the charging environment. -
Page 7: Checking The Battery Level
Basic information overview 1.7 Checking the battery level The remaining battery level can be checked through the battery icon displayed at the top-right part of the LCD screen. When the product is turned on, the remaining battery level is displayed as a number, and over time, the remaining battery level is displayed as a battery icon. -
Page 8: Using The Product
2. Using the product 2.1 Overview of the LCD 2.1.1 Main menu tree The main menu tree of the product is as follows. Settings menu Preset... -
Page 9: Using The Lcd Function
Using the product 2.1.2 Using the LCD function You can use the corresponding function by sliding the LCD in each direction. • Swipe Up: Moves to the preset mode. • Swipe Down: Moves to the settings. • Swipe Left: Moves to the gimbal quick settings. •... - Page 10 Using the product Quick Setting Menu Screen Description ➊ ➊ Turning Wi-Fi on/off ➊ ➊ ➋ ➋ ➌ ➌ ➋ ➋ Turn the grid on/off (display grid in preview screen) ➌ ➌ System settings ➍ ➍ LCD brightness ➍ ➍ ➎...
-
Page 11: Using The Buttons
Using the product 2.2 Using the buttons Refer to the table below to use the product's buttons, trigger and joystick. Press button to turn on the product. Joystick Trigger Recording button M button Buttons Preview screen Recording Short press (when Sort entering the menu) Short press... -
Page 12: Overview Of Led Status And Beep
Using the product 2.3 Overview of LED status and beep LED status Sort Description Turning on / Fully charged / Stop recording LED off Recording video Red LED flickers slowly Recording photo / HDR photo Red LED flickers once Panorama Red LED flickers once per shoot Firmware update / calibration Red LED flickers quickly... -
Page 13: Overview Of Snap G Features
3. Overview of SNAP G features 3.1 Using AI tracking mode You can record people by using the AI tracking mode. Each time you press the button, it switches in the following order: AI tracking Face tracking > > Tracking mode off. -
Page 14: Face Tracking Mode
Overview of SNAP G features 3.2 Face tracking mode You can use the face tracking mode to focus on recording a person's face. Face tracking mode Swipe left on the Preview screen to open the Quick menu, then change the tracking mode to Face tracking mode. -
Page 15: Using Face Id
Overview of SNAP G features 3.3 Using FACE ID You can register the FACE ID of anyone you want and start recording. FACE ID registration Swipe left on the preview screen to open the gimbal quick menu, then touch the FACE ID button to activate the feature. -
Page 16: Using Head Tracking Mode
Overview of SNAP G features 3.4 Using head tracking mode Head-tracking mode lets you shoot vlogs naturally by letting you see both of your hands freely. Head tracker (sold separately) connection Press and hold the power button on the head tracker (sold separately) to turn it on. -
Page 17: Using Dynamic Motion Recording Mode
Overview of SNAP G features Head tacker button/buzzer operation Refer to the table below for using the head tracker button. Buzzer after connecting Product operation Button operation LED status the product Power on/connection Press for 2 seconds White LED on... -
Page 18: Updating The Firmware
For optimal operation of the product, ensure that you keep the firmware up to date. Visit www.thinkware.com/support. Save the downloaded firmware file to the product's memory card. Insert the memory card with the firmware to start updating the firmware. For more information on product updates, visit www.thinkware.com/support. -
Page 19: Using The Snap G App
You can use various functions of the product by connecting the product to the SNAP G app. 4.1 Downloading the SNAP G app On your smartphone, search for the SNAP G app in the Google Play Store or Apple App Store, or scan the QR code below to download and install the app. - Page 20 Using the SNAP G app Select the desired broadcasting platform and go to streaming settings. Sign in to your broadcasting platform account, set the transmission resolution and network items, and touch the Streaming Settings Complete button. When streaming setup is complete, the setting information is delivered to the product and the connection between the app and the product is disconnected.
-
Page 21: Updating Firmware With The Snap G App
> Check the AP SSID and password stored in the product. To change the broadcasting platform, connect to the new broadcasting platform in the SNAP G app. 4.3 Updating firmware with the SNAP G app Download and install the SNAP G app on the Google Play Store or Apple App Store. -
Page 22: Using Recording Modes
5. Using recording modes You can check the screen of each recording mode and change the settings. 5.1 Using video modes Video mode screen Preset name (Video, SNV, slow motion, hyperlapse, timelapse) Resolution · Frame/Speed/ Interval · angle of view SNV is a shooting mode optimized for night photography. -
Page 23: Using Photo Modes
Using recording modes Video recording settings Touch the Edit button to change the recording environment to the desired setting. You can set the file format, the angle of view when recording, the color temperature, and the brightness of the screen. Video setting value Slow motion setting value Settings... - Page 24 Using recording modes Switching photo modes On the preset setting screen, swipe left or right or touch the arrow to change the photo mode. You can switch to 3 different photo modes (Photo/HDR Photo/Panorama). Photo mode setting Touch the Edit button to change the recording environment to the desired setting. Photo settings value Panorama setting value Settings...
-
Page 25: Setting Presets
Using recording modes 5.3 Setting presets You can add presets with frequently used settings in photo or video mode. Touch the + button on the photo or video preset screen. Select the desired mode for setting the preset, set the detailed setting value, and touch the OK button to create a customized preset. -
Page 26: Setting The Gimbal
6. Setting the gimbal You can customize the product setting by using Gimbal settings menu. 6.1 Setting the gimbal Swipe down on the Preview screen to open the quick menu, then touch the Gimbal settings button to set the gimbal. Setting menu Description Gimbal speed... -
Page 27: Viewing Album
7. Viewing album Swipe right on the preview screen to open the album and view the photos and videos. 7.1 Overview of the Album screen Touch the thumbnails of each file to view them. Displays the number of thumbnails (files). File selection button: Select to delete the file. -
Page 28: Configuring The System Settings
8. Configuring the system settings Swipe down on the Preview screen to open the Quick menu, then touch System Settings to set the > system. 8.1 Connection settings Wi-Fi Setting menu Description Wi-Fi use Turn on/off Wi-Fi Wi-Fi information Display the information of the currently connected Wi-Fi. Wi-Fi initialize Initialize the currently connected Wi-Fi. -
Page 29: Other Settings
Configuring the system settings 8.3 Other settings Setting menu Description Auto power off Set the product to turn off automatically when the specified time is exceeded. Date & time Set the date and time. Indicator Turn on/off the indicator. 8.4 System information Setting menu Description Select the desired language among 한국어/English/中文/繁體中文/Español/Français/... -
Page 30: Specifications
About 150 minutes Screen size 2” Pan mode [-50° - 250°] / (300° applied) Tilt [-50° - 130°] / (180° applied) Gimbal Roll [-120° - 120°] / (240° applied) Gimbal mode Pan, Follow, FPV, Lock, None SNAP G - only app... - Page 31 Specifications Item Specifications Sensor 1/2.3” CMOS / 12.3M Lens FOV: 133.9° (diagonal) / F2.8 Maximum image 4,056 x 3,040 size Photo mode Photo/Panorama/Continuous/HDR/Portrait mode Video, Time lapse, Hyperlapse, Slow motion, Motion recording Video mode (Repeating, Dynamic mode) Head tracking, FACE ID auto tracking, AI tracking, Face tracking, Face multi Tracking mode tracking, Active tracking Camera...
- Page 32 FCC Statement This device complies with Part 15 of the FCC Rules. Operation is subject to the following two conditions: (1) this device may not cause harmful interference, and (2) this device must accept any interference received, including interference that may cause undesired operation. This equipment has been tested and found to comply with the limits for a Class B digital device, pursuant to Part 15 of the FCC Rules.
- Page 33 Information to user : RSS-247 This device contains licence-exempt transmitter(s)/receiver(s) that comply with Innovation, Science and Economic Development Canada’s licence-exempt RSS(s). Please be cautioned the changes or modifications not expressly approved by the party responsible for compliance could void the user’s authority to operate the equipment. Notice: Operation is subject to the following two conditions : (1) this device may not cause interference, and (2) this device must accept any interference, including interference that may cause undesired operation of the device.
- Page 34 Ver. 1.0 (Jul. 2021)
Need help?
Do you have a question about the SNAP G and is the answer not in the manual?
Questions and answers