Table of Contents
Advertisement
Quick Links
Wireless Thermo-Hygro Monitor
Content
1. Introduce ................................................................................................... 2
2. Get Started ................................................................................................ 2
2.1 Package Contents ......................................................................... 2
2.2Recommend Tools .......................................................................... 2
2.3 Thermometer Sensor Set Up ....................................................... 2
2.4 Display Console Set Up ................................................................ 4
3. Wireless Sensor Installation ................................................................... 6
3.1 Mounting with Zip Tie .................................................................... 7
4. Console Operation ................................................................................... 7
4.1 Key function .................................................................................... 7
4.2.Normal model ................................................................................. 8
4.3 Time alarm model .......................................................................... 9
4.4Min value model .............................................................................. 9
4.5Max value model ........................................................................... 10
4.6 Setting model ............................................................................... 11
4.7. Setting model for alarm clock ................... 错误!未定义书签。
5.Sensor Resynchronization ..................................................................... 10
6.Best Practices for Wireless Communication ....................................... 10
7.Specifications .......................................................................................... 12
7.1.Wireless Specifications ............................................................... 12
7.2Measurement Specifications ....................................................... 12
7.3Power Consumption ..................................................................... 12
8. Troubleshooting Guide .......................................................................... 13
Model: WH0280
1
Instruction Manual
Advertisement
Table of Contents

Related Manuals for Fine Offset Electronics WH0280


Summary of Contents for Fine Offset Electronics WH0280
-
Page 1: Table Of Contents
Instruction Manual Wireless Thermo-Hygro Monitor Model: WH0280 Content 1. Introduce ....................2 2. Get Started ....................2 2.1 Package Contents ................. 2 2.2Recommend Tools ................2 2.3 Thermometer Sensor Set Up ............2 2.4 Display Console Set Up ..............4 3. -
Page 2: Introduce
Instruction Manual 1. Introduce Thank you for your purchasing of this Wireless Indoor/Outdoor Thermometer with indoor humidity. To ensure the best product performance, please read this manual and retain it for future reference. 2. Get Started Note: The power up sequence must be performed in the order shown in this section: insert batteries in the remote sensor first, display console second. - Page 3 Instruction Manual We recommend fresh alkaline batteries for outdoor temperature ranges between -20° C and 60° C and fresh lithium batteries for outdoor temperature ranges between -40 ° C and 60 ° C. 1. Remove the battery door on the back of the sensor by sliding the compartment door down, as shown in Figure 1.
-
Page 4: Display Console Set Up
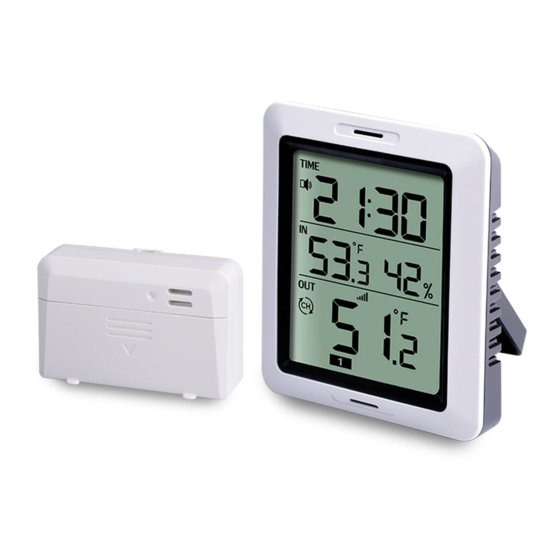
Instruction Manual 2.4 Display Console Set Up Move the remote thermometer(s) about 2 to 3m away from the display console (if the sensor is too close, it may not be received by the display console). Remove the battery door on the back of the display. Insert one AA (alkaline or lithium, avoid rechargeable) battery in the back of the display console. - Page 5 Instruction Manual While in the search mode, the reception search icon flash. Note: If the remote does not update, please reference the troubleshooting guide in Section. 2.4.1 Display Console Layout Figure 3 1.Time alarm Icon 5.Indoor Humidity 2.Indoor Temperature 6. Outdoor Reception Icon 3.
-
Page 6: Wireless Sensor Installation
Instruction Manual 3. Wireless Sensor Installation It is recommended you mount the remote sensor in a shaded area. Direct sunlight and radiant heat sources will result in inaccurate temperature readings. Although the sensor is water resistant, it is best to mount in a well-protected area, such as under an eve. 3.1 Mounting with Zip Tie Mounting the sensor with a zip tie will result in better accuracy when mounting outside, since it is not touching other objects. -
Page 7: Console Operation
Instruction Manual 4. Console Operation The console has two buttons at the back of console for easy operation. If no operation for 30s, display will return back to normal mode. Description Press and hold to enter the Setting mode. MODE ... -
Page 8: Normal Model
Instruction Manual In the Set Mode, press CH/+ key to change or scrolls the value. Hold the CH/+ key or or MODE key for 3 seconds will increase/decrease digits in great steps. 4.2 Time Alarm Mode While in normal display, short press the MODE key one time to enter Time Alarm Mode While in time alarm mode, press and hold the MODE key for 2 seconds, the alarm hour will begin flashing. -
Page 9: Min Value Model
Instruction Manual button to silence the alarm. 4.3 MIN/MAX mode While in normal display, press the MODE key two times to enter the Minimum mode, and the MIN icon and minimum records will be displayed. a. Select Channel display. If you have multiple temperature sensors, press CH/+ to shift display Min value of Channel 1, 2 or 3. -
Page 10: Max Value Model
Instruction Manual display Min outdoor temperature to the current reading 4.4 Loop display Mode While in normal display, press the CH/+ key to select the outdoor display in the following sequence: CH1-CH2-CH3- means to loop displays the current outdoor temperature value of the RF channel automatically. -
Page 11: Setting Model
Instruction Manual Wireless communication is susceptible to interference, distance, walls and metal barriers. We recommend the following best practices for trouble free wireless communication. 1. Electro-Magnetic Interference (EMI). Keep the console several feet away from computer monitors and TVs. 2. Radio Frequency Interference (RFI). If you have other 433 MHz devices and communication is intermittent, try turning off these other devices for troubleshooting purposes. -
Page 12: Specifications
Instruction Manual 7.Specifications 7.1.Wireless Specifications transmission range (in open air): 80meter Frequency: 433 MHz Update Rate: Indoor temperature/humidity 48 seconds Outdoor temperature CH1 48 seconds Outdoor temperature CH1 49seconds Outdoor temperature CH1 50 seconds 7.2 Measurement Specifications The following table provides specifications for the measured parameters. -
Page 13: Troubleshooting Guide
Instruction Manual Troubleshooting Guide Problem Solution Wireless remote If sensor communication is lost, (thermometer) not reporting dashes (--.-) will be displayed on the in to console. screen. To reacquire the signal, To resynchronize, press both the 【CH/+】 There are dashes (--.-) on the and【MODE】... - Page 14 Instruction Manual Problem Solution remote thermometer. For cold weather environments, install lithium batteries. Make sure the remote sensors are not transmitting through solid metal (acts as an RF shield), or earth barrier (down a hill). Move the display console around electrical noise generating devices, such as computers, TVs and other wireless transmitters or receivers.
- Page 15 Instruction Manual Caution! The manufacturer is not responsible for any radio or TV interference caused by unauthorized modifications to this equipment. Such modifications could void the user authority to operate the equipment. All rights reserved. This manual may not be reproduced in any form, even in part, or duplicated or processed using electronic, mechanical or chemical process without the written permission of the publisher.
Need help?
Do you have a question about the WH0280 and is the answer not in the manual?
Questions and answers