Table of Contents
Advertisement
Quick Links
USER MANUAL
UPRIGHT COOKER
TFGC919X
IMPORTANT // Please ensure that you read through this user manual prior to
installation and use. This manual contains important information to ensure optimal
performance and keep you safe. Please retain your proof of purchase, as this will be
required in the event that you require warranty service. Remember to retain this
manual for future reference.
www.tisira.com | tisira
Advertisement
Table of Contents

Related Manuals for Tisira TFGC919X


Summary of Contents for Tisira TFGC919X
- Page 1 This manual contains important information to ensure optimal performance and keep you safe. Please retain your proof of purchase, as this will be required in the event that you require warranty service. Remember to retain this manual for future reference. www.tisira.com | tisira...
- Page 2 The following symbols are used in this user manual. 1- Important information and useful hints for use 2- Warnings against the life and property risks 3- Warning against electric shock 4- Warning against fire risk 5- Warning against hot surfaces www.tisira.com | tisira...
-
Page 3: Table Of Contents
Hints on roasting ....................... 18 Hints on grill ......................18 Use of electric oven....................19 Use of the gas range....................20 Use of the electric oven .................... 22 Switching the electric oven off ...................22 Operation modes ...................... 22 www.tisira.com | tisira... - Page 4 Cleaning of the control panel..................29 Cleaning the oven .....................29 Cleaning and removal of the oven door ..............30 Replacement of the oven lamp ................. 30 7)Recommended Solutions For The Problems ............. 31 8) Wall Fixing....................32 www.tisira.com | tisira...
-
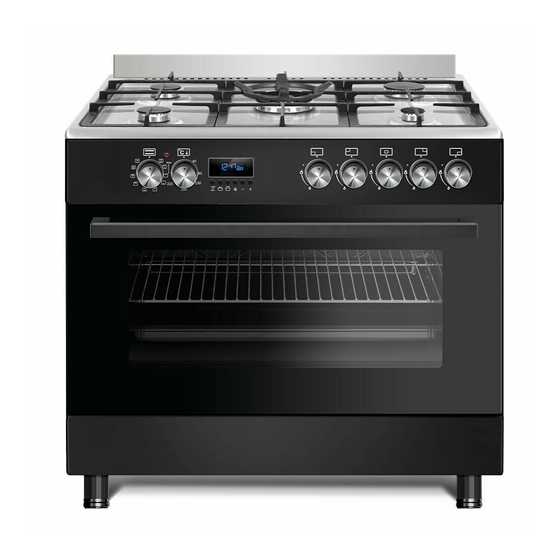
Page 5: Your Product
1) Your Product General View 1-Medium burner 2-Wok burner Small burner Large/ mini wok burner 5-Splashback 6-Control panel 7-Timer Handle Front glass (oven door) 10-Knob 11-Lower cover 12-Leg www.tisira.com | tisira... -
Page 6: Technicial Specifications
DO NOT USE OR STORE FLAMMABLE MATERIALS IN THE APPLIANCE STORAGE DRAWER OR NEAR THIS APPLIANCE. DO NOT SPRAY AEROSOLS IN THE VICINITY OF THIS APPLIANCE WHILE IT IS IN OPERATION. DO NOT MODIFY THIS APPLIANCE. DO NOT USE THIS APPLIANCE AS A SPACE HEATER. www.tisira.com | tisira... -
Page 7: Accessories
Wire grids: It can be used for frying or to set the desired rafts to be fried, roasted and stewed. Telescopic Rails: Assits with smooth sliding of the baking tray. 90x60 oven wire grid 90X60 oven tray www.tisira.com | tisira... -
Page 8: Important Safety Instructions
Always have the installation and repair operations done by authorized person. The manufacturing firm may not be held responsible for and the warranty of the product becomes invalid in case of any loss that may arise from operations performed by any unauthorized persons. www.tisira.com | tisira... - Page 9 Do not keep any flammable or combustible substance in the product. • Do not use steam cleaner. • • Do not use aggressive cleaning materials or sharp metal scrapers to clean the oven door (door) that may destroy the surface and cause www.tisira.com | tisira...
-
Page 10: Safety For Children
When the door is open, do not put any heavy object on it or do not allow the children to sit on the door. Ensure the chains on either side of the appliance are firmly anchored to the wall - refer to "Wall Fixing" Section. www.tisira.com | tisira... -
Page 11: Safety For Power Related Operations
Preparation of the installation place of the product and electric and/or gas installation is performed by the customer. Requirements specified in the related local standards with respect to power and/or gas should be observed for set-up of the product. www.tisira.com | tisira... -
Page 12: Installation And Connections
The legs of the product is not assembled during the installation oft he product. The legs of the products are packed in the bag located inside the oven. Mount the legs of your product and adjust it to the kitchen counter. www.tisira.com | tisira... -
Page 13: Power Connection
Nameplate of the product is on the rear. Connection cable of the product should comply with the technical specifications • and power consumption. Risk of electric shock! Prior to starting any work on the power installation, please disconnect the product electrically www.tisira.com | tisira... -
Page 14: Gas Connection
LPG, please contact the arisit@arisit.com for gas conversion settings. Upper tray skirt (Optional) For some versions, we use “Splash Back” located in the Lower Drawer as packed; how to mount this Panel is described below step by step: www.tisira.com | tisira... -
Page 15: Regulator
This device is fixed to prevent any failures arising from high gas pressure and regulate pressure at 1.0 kPa. ULPG - NG, NG – ULPG conversions; Figure 19.1 Figure 19.2 Figure 19.3 Figure 19 www.tisira.com | tisira... -
Page 16: Placement
When placing, make sure that the gas hose and power cable have not been damaged. Set your product to the kitchen counter as a minimum according to the dimensions shown in the Figure 8. Figure 8 www.tisira.com | tisira... -
Page 17: Disposal Of The Product
You may refer to your authorized dealer or waste collection center of your municipality for due disposal of the product. Always cut the power plug and break the door lock, if any, so that the children may not be exposed to any danger. www.tisira.com | tisira... -
Page 18: Initial Preparation
Select the static position. Select the highest temperature; see Use of the electric oven. Operate about 30 minutes. Switch off the oven; see Use of the electric oven. Smell and smoke occurs during the first heating. Ensure well-ventilation. www.tisira.com | tisira... -
Page 19: Use Of The Oven
Fire risk arising from the food not suitable for grill Only grill the food suitable for intensive grill flame. Do not position the food much to the rear of the grill. Here is the hottest space and the oily food may burst into flame. www.tisira.com | tisira... -
Page 20: Use Of Electric Oven
Selection of temperature and operation mode Function switch Signal lamp Thermostat switch Digital timer Gas valve www.tisira.com | tisira... -
Page 21: Use Of The Gas Range
Size of the flat-bottomed pan should match the size of the burner flame and recommended sizes in the diagram above. Adjust the gas flame in such a way that it will not protrude from the container base. Put the container on the pot carrier by centering. www.tisira.com | tisira... - Page 22 10.8 * 1 MJ/h 11.2 * 1 MJ/h Large burner (RM) 0.65 mm 1.20 mm 5.5 * 2 MJ/h 6.9* 2 MJ/h Medium burner (RM) 0.50 mm 0.95 mm 3.24 * 1 MJ/h 4.53 * 1 MJ/h Small burner (RM) www.tisira.com | tisira...
-
Page 23: Use Of The Electric Oven
Upper + lower and turbo motor heating is on. The food ensures more homogenous heating thanks to turbo motor. It is, for example, suitable for cakes, pies or cakes in the cooking moulds and casserole. Do the cooking with single trays. www.tisira.com | tisira... -
Page 24: Grill
Heavy grill + turbo fan Heavy grill (upper and grill resistor) turbo motor heating is on. Turbo motor guarantees more homogenous heating for the food. For example, it is suitable for casseroles. Do the cooking with a single tray. www.tisira.com | tisira... -
Page 25: Use Of The Oven Timer
By this function, you may make the alarm ring at the end of the time you have set. 1) Select the alarm time 2) Enter the time by using + or 3) After several seconds, the setting mode. – keys (e.g.: 5 minutes) display comes back to show the time. www.tisira.com | tisira... - Page 26 4) After several seconds, the display will start to show the crurent time, indicating that the food is cooked. www.tisira.com | tisira...
- Page 27 The display to appear when the cooking starts: process completes. When the cooking program completes, the audio warning is enabled and if it is not silenced it will operate for 7 minutes. Switch the oven off. Reset the oven timer. www.tisira.com | tisira...
- Page 28 3) Now the screen will be at the brightness level you left last. Note: The default screen brightness is at the brightest level. When the mains power is off, if the screen brightness level was changed, it will come back to the default setting. www.tisira.com | tisira...
-
Page 29: Cooking Duration Table
Bring to 150ºC after minutes maximum». Grilling by the electric grill Food Shelf position Grill time (approximately) Fish 30…40 minute* Chicken in part 40…50 minute* Lamb chops 40…50 minute* Steak 40…50 minute* Veal chops 40…50 minute* *depends on thickness. www.tisira.com | tisira... -
Page 30: Maintenance And Cleaning
Cleaning the oven No oven cleaner or other special cleaning agents are required to clean the oven. It is recommended to wipe the oven by use of a damp cloth when it is still lukewarm lukewarm. www.tisira.com | tisira... -
Page 31: Cleaning And Removal Of The Oven Door
If your oven has a round lamp: 1. Disconnect the mains power. 2. Trun the glass door anticlockwise and remove. 3. Turn the oven lamp anticlockwise and replace with the new one. 4. Put the glass door in place again. www.tisira.com | tisira... -
Page 32: Recommended Solutions For The Problems
Oven light is damaged. Replace the oven light. If the problem is not eliminated although you have applied the instructions given in this section, consult to the dealer. Do not try to repair the any failed product yourself. www.tisira.com | tisira... -
Page 33: Wall Fixing
18,5 786,5 786,5 65,5 Use the same height on the wall to drill the holes for fastening the brackets. The distance between the centres of the holes is given in the diagram above. www.tisira.com | tisira... - Page 34 Before tightening the brackets fully to the wall, check that the index on brackets the same height as the index on the back of the appliance. Position the appliance, taking care that the brackets are correctly inserted. www.tisira.com | tisira...
- Page 35 F // 09 302 0077 sales@aristonappliances.co. nz TISIRA IS COMMITTED TO ONGOING RESEARCH AND DEVELOPMENT. EVERY EFFORT HAS BEEN MADE TO ENSURE ALL INFORMATION IN THIS USER MANUAL 15 CORRECT AT TIME OF GOING TO PRINT DIMENSIONS SHOULD BE USED AS A REFERENCE ONLY AND ACTUAL DIMENSIONS SHOULD BE TAKEN FROM THE PHYSICAL PRODUCT ONLY MANUFACTURER RESERVES THE RIGHT TO CHANGE SPECIFICATIONS WITHOUT NOTICE.
Need help?
Do you have a question about the TFGC919X and is the answer not in the manual?
Questions and answers