
Summary of Contents for King Canada POWER FORCE K-X7500
- Page 1 GENERATOR HOME CONNECTION KIT MODEL: K-X7500 INSTRUCTION MANUAL COPYRIGHT © 2019 ALL RIGHTS RESERVED BY KING CANADA TOOLS INC.
-
Page 2: Warranty Information
Contact your retailer or visit our web site at www.kingcanada.com for an updated listing of our authorized service centers. In cooperation with our authorized serviced center, King Canada will either repair or replace the product if any part or parts covered under this warranty which examination proves to be defective in workmanship or material during the warranty period. -
Page 3: Specific Safety Instructions
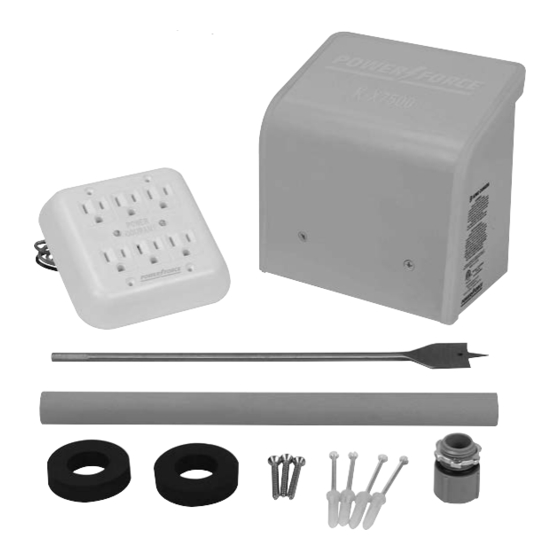
SPECIFIC SAFETY INSTRUCTIONS SPECIFIC RULES FOR SAFE OPERATION 1) WARNING! RISK OF ELECTRIC SHOCK. Do not start the generator until the cord is connected to the inlet and the generator. Any terminal may be energized when the cord is connected. Shut down the generator prior to disconnecting the cord from this inlet and the generator. - Page 4 INTRODUCTION & INSTALLATION CONSIDERATIONS INTRODUCTION If you experience a power failure, this Generator Home Connection Kit will allow you to run a portable generator safely OUTDOORS, to keep dangerous exhaust fumes out of your home, and conveniently connect appliances INDOORS. This kit transfers the 15 Amp.
-
Page 5: Installation
INSTALLATION INSTALLATION DRILLING THROUGH THE WALL- INDOORS NOTE: A 1-1/4” spade bit (A) Fig.1 is supplied with this kit. It is used to drill through drywall, wood paneling, plywood, wood studs, insulation panels, outside wood, vinyl, aluminum, hardy plank, and all other non-masonry materials. - Page 6 INSTALLATION INSTALLATION CUTTING CONDUIT AND INSTALLING WALL ANCHORS 1. Remove PVC conduit from the hole in the wall. 2. Straighten and then insert the 4 wires at the rear of the 6 outlet power panel through the PVC conduit. 3. Secure the end of the PVC conduit (A) Fig.4 FIGURE 4 tightly into the cradle (B) at the rear of the 6 outlet power panel, see Fig.4.
- Page 7 INSTALLATION INSTALLATION INSTALLING PVC SLEEVE CONNECTOR TO GENERATOR POWER INLET bOX 1. Remove the power inlet box cover (A) Fig.8 by removing the two front screws (B). Slide the cover off by sliding it upwards. 2. Slide the NEMA plug assembly (A) Fig.9 out of the power inlet box as shown.
- Page 8 INSTALLATION INSTALLING GENERATOR power inlet box TO PVC CONDUIT continued... 2. Insert the 4 wires from the outlet power panel through the PVC sleeve connector. 3. Insert the PVC conduit into the PVC sleeve connector at the back of the power inlet box. See Fig.12.
-
Page 9: Operation
OPERATION USING YOUR GENERATOR HOME CONNECTION KIT DURING A POWER FAILURE 1. Connect a generator power cord (NEMA L14-30/ 10 AWG, 30 Amp.- Not included) to your generator. 2. Connect the other end of the generator power cord to the NEMA L14-30 plug underneath the power inlet box installed on the outside of your home.
Need help?
Do you have a question about the POWER FORCE K-X7500 and is the answer not in the manual?
Questions and answers
Yeah, I just hooked up a 750 KX 7500 and it doesn’t work. The lights don’t come on, but they come on if you plug something in to draw power, but it still doesn’t work.
If the King Canada POWER FORCE K-X7500 does not work despite the lights coming on when something is plugged in, possible issues could include:
1. Improper Generator Connection – Ensure the generator is properly connected to the outdoor power inlet box and the transfer switch.
2. Incorrect Wiring – Verify that all wiring connections, including copper wire use and conduit size, match the installation instructions.
3. Faulty Outlet Power Panel – Check if the indoor power outlet panel is securely mounted and properly wired.
4. Generator Not Running – Ensure the generator is turned on and supplying power to the system.
5. Overloaded Circuit – Confirm that only one appliance is plugged into each receptacle and avoid using extension cords or multi-plug adapters.
If the issue persists, inspecting the installation and wiring may help identify the problem.
This answer is automatically generated