Table of Contents
Advertisement
Quick Links
HC8000T Sump Pump Switch
With Run-Time Adjustment and Built-in Alarms
Overview:
The HydroCheck HC8000T Electronic Sump Pump Float Switch with Programmable Cycle Length and Built-in Alarms is a universal float
switch that works with all types of sump pumps. Use the Smart Button to easily program a precise cycle length for your sump pump that will be-
gin when water reaches the sensor tip. See Troubleshooting section for Smart Button, LED and Alarm specifications. This product is not rated
for outdoor use.
READ PRIOR TO INSTALLATION:
1.
The "piggyback plug" attached to the mechanical float switch cannot be used with the HC8000T. It must be disconnected and
remain disconnected.
2.
If your sump pump has internal float switch wiring, i.e. does not have a "piggyback plug", then you must secure the float in an
upward position as if the pit were full. This assures that the internal switch is always closed and that the pump is enabled.
Step-by-Step Installation
Step 1
Unplug the sump pump from the back of "piggyback plug".
Step 2
Unplug the "piggyback plug" from the 120 VAC and set aside. The
HC8000T completely replaces this component.
Step 3
Secure the sensor (A) to the discharge pipe (D) with the tie wrap
(E) where the pump is intended to turn on.
NOTE: Recommended height for the sensor is slightly below the
Drain Tile (Water Inlet Pipe).
Step 4
Plug the control module (B) into a 3-prong 120 VAC outlet.
Step 5
Plug the sump pump power cord (C) into the control module (B).
Step 6
Adjust run time by following Run Time Adjustment steps in the
table below.
NOTE: This product defaults to a 10 second run duration and can
be reprogrammed at anytime. Achieving the optimal pump cycle
length may take several attempts.
Step 7
TEST YOUR INSTALLATION BEFORE LEAVING IT FOR UNAT-
TENDED USE.
NOTE: This product will not work if tested in a cup of water. See
How the Sensor Works: Why won't my pump turn on? on Page 2 for
more information.
Run Time Adjustment
Step 1
Silence or eliminate all active alarms: There should be no audible
alarms active (See "Smart Button Features" on how to disable
alarm).
Step 2
Press and hold the Smart Button for approximately 5 seconds, or
until the output turns on and the light starts to flash green. The out-
put turning on marks the start of the desired run time.
NOTE: If the pump is in the middle of a cycle, first cancel the cycle
by pressing and releasing the Smart Button.
Step 3
Release the Smart Button when the desired run time is reached.
The output will turn off and the switch is now reprogrammed with
the new run duration.
NOTE: Loss of power does not affect programmed run time.
Rev-A
www.hydrocheckproducts.com | customersupport@hydrocheckproducts.com | 1(877)-225-2124
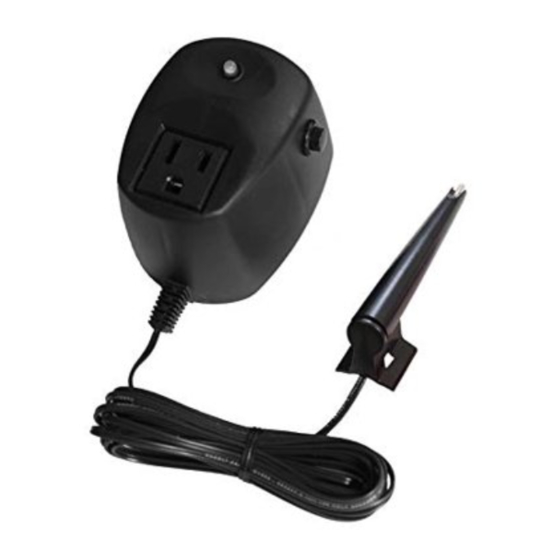
Installation Key
A. Sensor
B. Control Module
C. Pump Power Cord
*"Piggyback plug" and 120 VAC outlet are not pictured.
Product Specifications
Product Dimensions
Weight
Output Rating
Alarm Rating
Power
Sensor Cable Length
D. Discharge Pipe
E. Tie Wrap
2.8 x 2.5 x 3.5 in
14.4 oz
120 VAC, 15 Amp, 1 HP
80 dB
120 VAC, 60 Hz
12 ft
1
Advertisement
Table of Contents

Related Manuals for HydroCheck HC8000T


Summary of Contents for HydroCheck HC8000T
- Page 1 READ PRIOR TO INSTALLATION: The “piggyback plug” attached to the mechanical float switch cannot be used with the HC8000T. It must be disconnected and remain disconnected. If your sump pump has internal float switch wiring, i.e. does not have a “piggyback plug”, then you must secure the float in an upward position as if the pit were full.
- Page 2 STAK Enterprises Inc. has the authority to increase or alter the obligations or limitations of the warranty. The company's obliga- tion of this warranty shall be limited to the repair or replacement of any part of the HC8000T which is found to be defective in materials or work- manship under normal use and service during the 5 year period of product use by original product owner commencing with the date of purchase.
Need help?
Do you have a question about the HC8000T and is the answer not in the manual?
Questions and answers