
Related Manuals for Biomedical Life Systems BIOMED REVIVED II


Summary of Contents for Biomedical Life Systems BIOMED REVIVED II
- Page 1 INSTRUCTION MANUAL EVIVED ® EVIVED ® BioMedical Life Systems, Inc. 1954 Kellogg Avenue Carlsbad, CA 92008 (USA) ww.bmls.com...
- Page 2 BioMedical Life Systems, Inc., Carlsbad, California, has manufactured portable electrotherapy devices and accessories for over thirty five years. The result is a comprehensive family of devices and accessories meeting the needs of workers compensation, advanced physical therapy, professional athletics, and individuals worldwide.
-
Page 3: Table Of Contents
TABLE OF CONTENTS 1. INTRODUCTION ..........2. SAFETY INFORMATION ........3. GETTING TO KNOW YOUR DEVICE ....4. SPECIFICATION ..........5. OPERATING INSTRUCTION ......6. ELECTRODE PLACEMENT OPTIONS ....7. INSTRUCTIONS FOR USE ....... 8. CLEANING AND MAINTENANCE ....9. TROUBLESHOOTING ........10. -
Page 4: Introduction
1. INTRODUCTION ABOUT YOUR DEVICE The BioMed® Revived II is a dual channel output TENS, EMS, and MASSAGE stimulator. Before using, please read all the instructions in this user manual carefully and keep it safe for future use. This device belongs to the group of therapeutic practices to aid in a number of therapies. - Page 5 ABOUT PAIN Pain is an important signal in the human body warning system. It reminds us that something is wrong, without which, abnormal conditions may go undetected, causing damage or injury to vital parts of our bodies. Even though pain is a necessary warning signal, nature may have gone too far in its design.
-
Page 6: Safety Information
WHAT IS EMS? Your muscles work hard. When you exercise, engage in sports, or participate in any sort of strenuous activity, an increased flow of blood is sent to your muscles providing vital nutrients and energy. Using an EMS device (Electrical Muscle Stimulator) after your activity maintains the high flow of nutrients needed to assist in muscle rejuvenation, reducing lactic acid buildup, and helps to speed recovery. - Page 7 Important Safety Precautions and Warnings It is important that you read all the warnings and precautions included in this manual because they are intended to keep you safe, prevent risk of injury and avoid a situation that could re- sult in damage to the device. Safety Symbols Used In This Manual Contraindication Do not use this device if you are using a cardiac...
- Page 8 airway, difficulty in breathing, or adverse effects on heart rhythm or blood pressure. Do not apply stimulation across your chest because the introduction of electrical current into the chest may cause rhythm disturbances to your heart, which could be lethal. Do not apply stimulation over, or in proximity to, cancerous lesions.
- Page 9 19. It could result in improper stimulation or skin burns if electrodes are in contact with each other. 20. Keep this device out of reach of children. 21. Consult your doctor if you have any doubt whatsoever. 22. Discontinue it and do not increase the intensity level if you feel discomfort during use.
- Page 10 14. Do not use sharp objects such as a pencil or ballpoint pen to operate the buttons on the control panel. 15. Check the electrode connections before each use. 16. Electrical stimulator should be used only with BioMedical 17. Life Systems, BioStim® brand electrodes. Adverse Reactions Possible skin irritation or an electrode burn under the electrodes may occur.
-
Page 11: Getting To Know Your Device
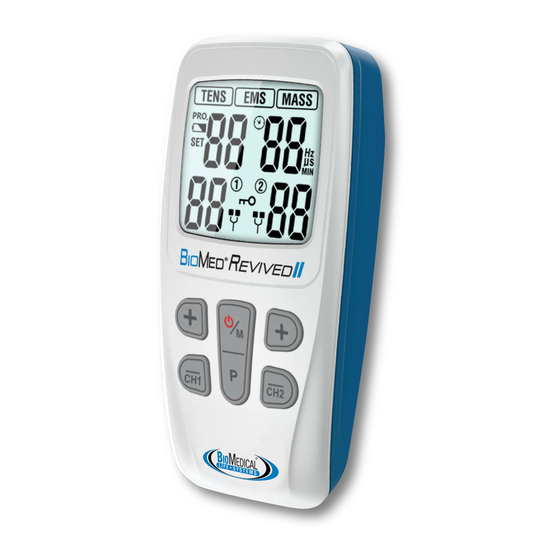
3. GETTING TO KNOW YOUR DEVICE Package Contents (1) BioMed® Revived II (2) Lead wires (4) Electrodes (3) AAA Batteries Other Available Electrodes Oval Butterfly LCD display... - Page 12 No. Function No. Function 1 Treatment mode No Load Indicator ( Channel 1 & Channel 2) 2 Symbol of Program 10 Channel 2 Intensity 3 Low battery indicator 11 Channel 2 Symbol 4 Symbol of SET 12 Treatment Time (min) 5 Program number 13 Pulse Width(µS) 6 Channel 1 Symbol...
-
Page 13: Specification
4 [-] button: At treating mode, press the [-] button to decrease the intensity of the CH1; At the key locking mode, press the [-] button to unlock the keys. At setting mode, press the [-] button to decrease the pulse rate, pulse width or treatment time. - Page 14 Dimension 109 x 54.5 x 23mm (L x W x T) Weight About 70g (without batteries) Automatic shutoff 1 minute Classification BF type applied part, internal power equipment, IP22 Electrodes pad 50x50mm, square Output precision ±20% error is allowed for all the output parameters TENS mode Programs P.W.
-
Page 15: Operating Instruction
5. OPERATING INSTRUCTION Check/ replace batteries Open the battery cover and insert three batteries (type AAA) into the battery compartment. Make sure you are installing the batteries properly. Be sure to place the batteries according to the markings of positive terminal (+) and negative terminal (-) in the battery compartment of device. - Page 16 Connect electrode wires to device Insert the electrode wires connector into electrode connector. Make sure they are properly connected to ensure good performance. Connect electrode wires to device Before proceeding to this step, ensure that the device is completely switched OFF. Hold the insulated portion of the electrode wire connector, and insert the plug into the receptacle on the top of the main device.
- Page 17 maintain optimal stimulation and to prevent skin irritation. Caution Always remove the electrodes from the skin slowly in order to avoid injury. Before applying the self-adhesive electrodes, wash the skin free of dirt and oils, and then dry it. Do not turn on the device when the self-adhesive electrodes are not positioned on the body.
-
Page 18: Electrode Placement Options
5. ELECTRODE PLACEMENT Neck Shoulder Hand Elbow... - Page 19 Back Abdomen Foot...
-
Page 20: Instructions For Use
7. INSTRUCTIONS OF USE Turn on When using it for the first time, open the battery cover and insert new batteries (review operating instructions pg.14). Press the [ON/OFF/M] button to turn the device on, the LCD will be lit and will go into the standby mode as the picture shown below. - Page 21 Choosing pre-programmed treatments Press the [P] button to select the pre-programmed settings mode for the following: • TENS programs 01 through 06. • EMS programs 01 through 05. • Massage programs 01 through 05. Pulse Pulse Mode Program Time Adj. Function Rate(Hz) Width (µs)
- Page 22 Setting Treatment Time Once a setting mode has been selected, press and hold the [P] button to adjust the treatment time by pressing [+] button to increase or [-] button to decrease treatment time. When finished with the treatment time selection, press the [M] button and proceed to “start treatment”...
- Page 23 After choosing a treatment program, press and hold the [P] button to adjust the pulse rate (Hz) by pressing [+] button to increase or [-] button to decrease. When complete press the [P] button. Press the [P] button to adjust the pulse width (μs) by pressing [+] button to increase or [-] button to decrease.
- Page 24 If the sensation feels it too strong, press the [-] button to decrease the intensity to a lower level. The LCD display as follows: Caution: If you feel or become uncomfortable, reduce the stimulation intensity to a more comfortable level and consult with your medical practitioner if problems insist.
- Page 25 Load detection This device will automatically detect the load if the intensity is above level 4. If it hasn’t detected the load or the electrode contacts, the skin not well enough, the intensity will automatically return to level 0 and the symbol blinks and the stimulator will return to the standby mode.
-
Page 26: Cleaning And Maintenance
8. CLEANING AND MAINTENANCE Fully comply with the following necessary daily maintenance requirements to make sure the device is intact and to guarantee its long-term performance and safety. BioMed® Revived II • This device may be wiped clean with a damp clean cloth. •... - Page 27 BioMed® Revived II. Failure to do so will void the warranty. You may also contact us and we will direct you to the proper source. BioMedical Life Systems, Inc. 1954 Kellogg Avenue Carlsbad, CA 92008, USA...
-
Page 28: Troubleshooting
9. TROUBLESHOOTING Should any malfunction occur while using the device,check whether the parameters are set appropriately for therapy, and adjust the control correctly. Please see the following table: Defect Cause Remedy No batteries or batter- Replace batteries No Power ies are bad Electrodes not con- Check connection of nected to skin. -
Page 29: Storage
10. STORAGE Storing the electrode pads and lead wires. 1. Store BioMed® Revived II in a cool dry place. 2. Store the electrodes on the original plastic sheet in the original plastic bag to retain moisture and place bad in a cool dry place. -
Page 30: Electromagnetic Compatibility Tables
12. ELECTROMAGNETIC COMPATIBILITY TABLES Guidance and manufacture’s declaration - electromagnetic emissions The device is intended for use in the electromagnetic environment Electromagnetic environment - Emissions test Compliance guidance The device uses RF energy only for its internal function. Therefore, its RF RF emissions Group 1 emissions are very low and are not... - Page 31 Electri- cal fast ±2 kV for not applicable (for transient/ power supply applicable INTERNALLY POWERED burst IEC lines ME EQUIPMENT) 61000-4-4 Surge not applicable (for IEC 61000- ± 1 kV line(s) INTERNALLY POWERED to line(s) applicable ME EQUIPMENT) <5% UT (>95% dip in UT) for0.5 cycle Voltage dips...
- Page 32 Radiat- 10V/m 10V/m Portable and mobile RF communications ed RF & table & equipment should be used not closer table 9 to any part of the Blood Pressure 61000- Monitor, including cables, than the recommended separation distance calculated from the equation applicable to the frequency of the transmitter.
- Page 33 Test specifications for ENCLOSURE PORT IMMUNITY to RF wireless communications equipment (Table 9) Test fre- Immunity Band a) Modula- Dist. quency Service a) power Test Level (MHz) tion b) (MHz) (V/ m) Pulse b) 380- TETRA 400 modula- tion 18Hz FM c) 430- GMRS 460,...
-
Page 34: Normalized Symbols
Life Systems, Inc. will provide all labor and parts necessary to correct such defects or malfunctions free of charge. If the product is no longer available, BioMedical Life Systems, Inc. reserves the right to substitute a comparable product. The consumer-purchaser is responsible for all shipping charges when returning the device to the manufacturer or designated service facility. - Page 35 BioMedical Life Systems, Inc. shall not be liable for incidental or consequential damages resulting from the sale or use of the device. In the USA, some states do not allow the...
- Page 36 Manufactured For And Distributed By: Biomedical Life Systems, Inc. 1954 Kellogg Avenue Carlsbad, CA 92008 (USA) Ph: (800)726-8367 USA Ph: (760) 579-0801 Intl Fx: (760) 929-9953 Web: www.bmls.com Email: sales@bmls.com...
Need help?
Do you have a question about the BIOMED REVIVED II and is the answer not in the manual?
Questions and answers