Advertisement
Quick Links
Advertisement

Subscribe to Our Youtube Channel
Related Manuals for MABRU POWER SYSTEMS T2000-24V


Summary of Contents for MABRU POWER SYSTEMS T2000-24V
- Page 1 MABRU ROOFTOP RVSC 12000 DC 12V MANUAL You can use the sunroof or vehicle skylight hole to install your New Mabru RV. Self-contained 12,000BTU @12Volts air conditioner (RVSC12DC) on your van, truck, or RV. You can also use the template included in the box to relocate the hole.
-
Page 2: Table Of Contents
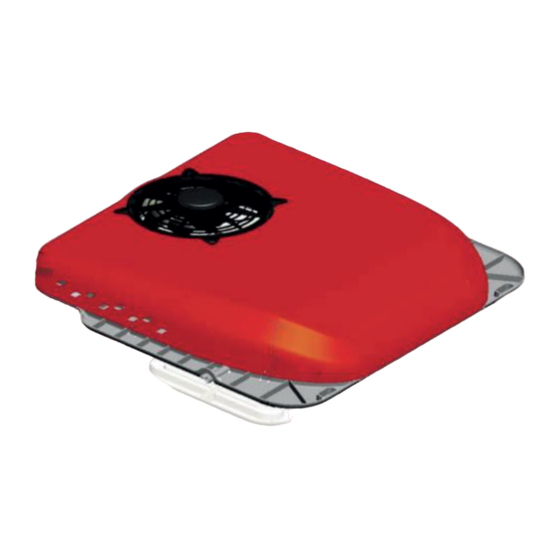
TABLE OF CONTENTS Product Description/Parameters Componements and Controls Error Codes and Troubleshooting Low/Over Voltage Troubleshooting Installation Instructions Wiring Diagrams Disclaimers Safety Precautions Warranty & Returns support@mabrumarine.com +1 888 818 2814 www.MabruRV.com... - Page 3 DESCRIPTION TThe Mabru Power Systems 12V / 24V rooftop air conditioning unit is the ideal unit for RVs, trucks, vans, buses and motorhomes. Our unit has been designed to be sleek, streamlined, aesthetically beautiful and efficient 12V / 24V systems in its class. The 12V / 24V ceiling unit provides fresh air in 15 seconds creating a cool and comforta- ble space.
- Page 4 COMPONENTS AND CONTROLS GUIDE Components and Controls Guide 4. Skylight Panel 1. Outdoor Unit Cover 5. Return Inlet 2. Condenser Fan 6. Display 3. Outdoor and Indoor unit 7. Supply Outlet separator. Mounting 8. LED Lights plate Mode Selector On/Off Switch Temperature Increase Blower Speed Switch...
- Page 5 System Inspect Indicator A/C On/Off Indicator Fan On/Off Indicator High Mode Normal Cooling Mode Fan Speed Low/Economy Mode 12V AC Controls 1. To turn the unit on locate the bu�on and press until screen powers on. 1. To turn the unit on locate the button and press until screen powers on. 2.
-
Page 6: Error Codes And Troubleshooting
ERROR CODES AND TROUBLE SHOOTING Error Codes and Trouble Shooting Digital Display Fault Description Fault Troubleshooting Check to see if pressure is too Current Protection high and if the fan is running Low ba�ery or too much Stall Protection pressure The ba�ery is too low and E4/LU Undervoltage protection... - Page 7 TROUBLESHOOTING NOTES If refrigeration failure occurs this is due to the inlet(return) and outlet (supply) air temperature being less than 5 for more than 3 minutes. Indicating that cooling is not taking place. If this occurs shut the compressor and evaporator fan off. Clear the fault and restart the unit.
-
Page 8: Installation Instructions
INSTALLATION INSTRUCTIONS FOR 12V/24V ROOF-TOP AC UNIT To see the step-by-step video of the installation process, click on the link below or search for Mabru RVSC on YouTube Channel. https://www.youtube.com/watch?v=Xst1ugqDAd4 1 / The unit can be installed in an existing 14 "x 14" "standard size" opening with a bit of disassembly / assembly or, if you want to be simpler and not perform this disassembly / assembly, you can choose to cut a hole using the template provided with your unit. - Page 9 B/ Position the unit on your roof aligned with your exis�ng 14" x 14" roof B / Position the unit on your ceiling aligned with your existing 14 "x 14" ceiling penetration so that penetra�on such that the air flow openings on the bo�om of the AC unit the airflow openings on the bottom of the air conditioning unit are "above"...
- Page 10 the area on the bottom of the AC unit with these openings. The area is the area at the bottom of the air conditioning unit with these openings. Area is approximately 10 3/4" long by 12 1/2" wide approximately 10 3/4 "long by 12 1/2" wide C / You can now insert the unit and C/ Now you can introduce the unit reinstall the Styrofoam airflow director...
- Page 11 Then, clean the surface thoroughly of any debris and dirt. Once the surface Then, clean the surface thoroughly of any debris and dirt. Once the is clean the next step is to apply the foam gasket provided foam gasket that surface is clean the next step is to apply the foam gasket provided foam is installed on the roof to create a seal between the roof and the AC unit.
- Page 12 And apply the strip around the edge of the clean debris free hole. Ensure And apply the strip around the edge of the clean debris free hole. Ensure an an even application of the waterproofing strip and that there are no gaps even application of the waterproofing strip and that there are no gaps in the in the seal between the metal and the weatherproofing strip.
- Page 13 15mm deep into the roof. Driving the screws any further may result in damage to the roof or the unit securing plate. E/ The unit is now properly secured and you can choose to put in place the "outer trim panel" with the LED lights or not. If you design and decide to create your own return grill trim on the interior as below, you will need to keep enough air flow and take care to not have any restric�on to avoid any problems (evaporator frozen, …)
- Page 14 Once the lights are installed and the unit is connected to a power source. The unit may be turned on. support@mabrumarine.com support@mabrumarine.com +1 888 818 2814 +1 888 818 2814 support@mabrumarine.com +1 888 818 2814 www.MabruRV.com www.MabruRV.com Page No.14...
- Page 15 ELECTRICAL INSTALLATION INSTRUCTIONS WITH HOUSE BATTERY BANK, DC TO DC CHARGER, AND VEHICLE ALTERNATOR IF APPLICABLE Electrical i instructions with house battery bank, DC to DC Once your unit is installed you will need to connect the unit and electrical system properly.
- Page 16 D/ Once the ba�eries are securely connected you may connect the Rooftop Unit using the wiring harnesses that are installed on the unit. Lastly, once all connec�ons are made, verify that all the connec�ons are �ght and secure. Failure to do so may result in equipment damage, injury, or fire.
-
Page 17: Wiring Diagrams
WIRING DIAGRAM Wiring Diagram 12/24V ROOFTOP AC WIRING DIAGRAM 12/24V ROOFTOP AC WIRING DIAGRAM support@mabrumarine.com support@mabrumarine.com +1 888 818 2814 +1 888 818 2814 support@mabrumarine.com +1 888 818 2814 www.MabruRV.com www.MabruRV.com Page No.17... - Page 18 12/24V ROOFTOP AC WIRING DIAGRAM 12/24V ROOFTOP AC AND SOLAR WIRING DIAGRAM room temp mode 2.Operation cooling heating mode button support@mabrumarine.com support@mabrumarine.com +1 888 818 2814 +1 888 818 2814 support@mabrumarine.com +1 888 818 2814 www.MabruRV.com www.MabruRV.com Page No.18...
- Page 19 12/24V ROOFTOP AC/SOLAR/SHORE POWER WIRING DIAGRAM 12/24V ROOFTOP AC/SOLAR/SHORE POWER WIRING DIAGRAM support@mabrumarine.com support@mabrumarine.com +1 888 818 2814 +1 888 818 2814 www.MabruRV.com www.MabruRV.com Page No.19...
- Page 20 INSTALLATION REMINDERS AND NOTES A/ For proper installation of the rooftop unit the waterproofing strip and shock dampening strip must be applied to protect the interior of the vehicle from weather elements and serves as a shock absorber to protect the unit from damaged caused by the vehicle’s movements.B/ Additionally, the rubber pad shock absorber reduces noise from the rooftop A/C during normal operation enabling the system to operate at lower decibels.
-
Page 21: Warranty & Returns
OWNER’S LIMITED WARRANTY POLICY This Warranty is made to a purchaser (“owner” or “you”), who acquires the Mabru Power Systems, Inc. (“Mabru”) -manufactured product or component (the “Mabru product”) for his or her own use. 1. WHAT’S COVERED What does the Limited Warranty cover? The Mabru products under this limited warranty are to be free from defects in material and workmanship at the time of sale and under normal use. - Page 22 SOME STATES DO NOT ALLOW THE EXCLUSION OR LIMITATION OF INCIDENTAL OR CONSEQUENTIAL DAMAG- ES, SO THE ABOVE LIMITATIONS MAY NOT APPLY TO YOU. ANY IMPLIED WARRANTY, INCLUDING THE IMPLIED WARRANTY OF MERCHANTABILITY AND FITNESS FOR ANY PURPOSE, IS LIMITED TO THE DURATION OF THIS LIMITED WARRANTY.
- Page 23 If the customer already knows of an authorized Servicing Dealer, the Servicing Dealer should be contacted direct- ly. 2) Second option: If the customer contacts the Mabru Customer Service Department for an authorized Servic- ing Dealer and there are none in the particular area, Mabru may authorize the use of a local Servicing Dealer, in which event Mabru will work with the local Servicing Dealer to assist in any way possible.
- Page 24 Technical Support. Telephone: +1 888 818 2814 or +1 954-467-1770 Email: sales@mabrumarine.com Mail- ing Address: Mabru Power Systems Warranty Department 1105 Old Griffin Road, Dania Beach, Fl 33004 For all other areas visit our website to find your nearest distributor at www.mabrumarine.com We are open from 8:00 support@mabrumarine.com...
Need help?
Do you have a question about the T2000-24V and is the answer not in the manual?
Questions and answers