Advertisement
Quick Links
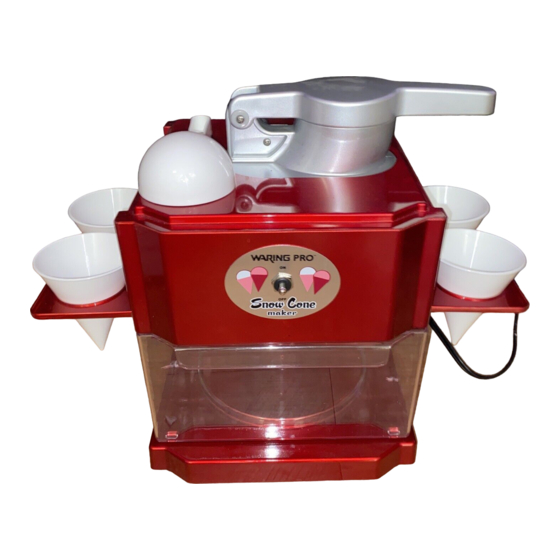
ProfeSSional Snow cone maker
PartS
1. Removable snow bin
2. Main housing
3. Ice chute
4. Ice press
5. BPA-free plastic cones (4)
6. Paper cones (12) – not shown
7. Fold-away cone storage
8. Non-skid feet
9. Toggle switch (on/off)
10. Ice scooper
Quick Start Guide
wScm200mrPc
4
3
2
9
10
5
8
7
Before firSt uSe
1. Carefully unpack your Waring Pro
Snow Cone Maker. Remove plastic from all
parts on the unit. Be sure that the unit has not
been damaged during transport. do not leave
plastic bags around children.
2. Rinse the snow bin with water and a non-
abrasive cleaner, and then dry thoroughly.
oPeration
1. Place unit on a flat, sturdy surface where it will
not be knocked over.
2. Check ice chute for presence of foreign objects
before plugging in.
3. Insert the removable snow bin onto the main
housing. An interlock safety feature will prevent
1
the unit from turning on if not properly in place.
4. Be sure that the toggle switch is set to the Off
position and plug into an outlet.
5. To begin shaving ice, drop approximately
8-12 ice cubes (depending on size and
shape) into the ice chute. Do not overfill or an
interlock safety feature will prevent the shaving
mechanism from turning on. DO NOT ATTEMPT
TO PUSH ICE CUBES INTO BLADE USING
HANDS OR OTHER INSTRUMENTS.
6. Flip the toggle switch to the On position and
firmly push the ice press down to start the ice
shaving mechanism.
NOTE: if a large ice cube should become
lodged in the unit, so that the blades cannot
reach it, flip the toggle switch to the Off
position and unplug from outlet. Empty freshly
shaved snow from the snow bin, place snow
bin back on the main housing, then pour warm
water down the ice chute until lodged ice cube
is melted or falls free. Empty the water from the
Professional
®
Advertisement

Related Manuals for Waring WSCM200MRPC


Summary of Contents for Waring WSCM200MRPC
- Page 1 Quick Start Guide ProfeSSional Snow cone maker wScm200mrPc PartS Before firSt uSe 1. Carefully unpack your Waring Pro Professional ® Snow Cone Maker. Remove plastic from all parts on the unit. Be sure that the unit has not been damaged during transport. do not leave plastic bags around children.
- Page 2 Snow Cone Maker. Keep for further reference. these helpful hints are intended to be a supplement to the instruction booklet. in order to ensure safe operation and optimum performance, please read the entire instruction booklet. ©2012 Waring Consumer products 11WR127969 pg-29285...
Need help?
Do you have a question about the WSCM200MRPC and is the answer not in the manual?
Questions and answers