Advertisement
Quick Links
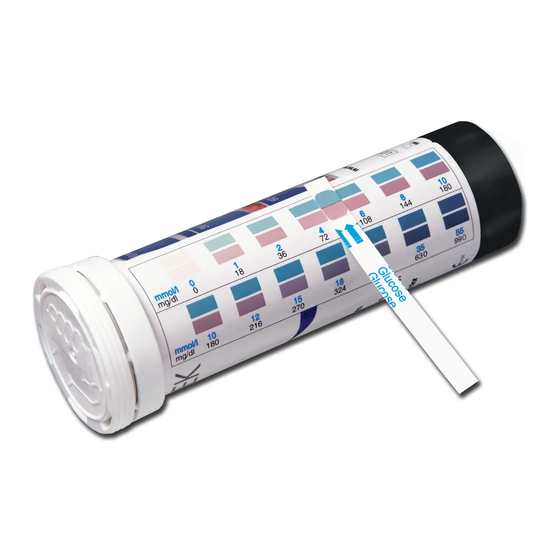
Visual
Blood glucose test strips. Colourimetric visually readable. Suitable for self-testing
ENGLISH
INSTRUCTIONS FOR USE
Product information
What is this test for? BETACHEK test strips are intended for self-testing of blood glucose. The test uses a small drop of
capillary blood (5 microlitres) to provide a semi-quantitative result. The test is not intended for use with neonates.
What is the purpose of glucose testing? High blood glucose causes serious harm to the body over time. This damage
can be prevented by keeping blood sugar at normal levels. Studies have shown that the better the control of blood glucose,
the better the long term health of a person with diabetes. Regular self-testing with BETACHEK Visual will provide useful
information for both you and your healthcare professional in managing the disease. Repeated testing allows you to see the
impact of diet, exercise and your medicine on blood sugar levels. Your healthcare professional will advise you on when you
should test and your target glucose range. Please note that blood glucose testing should only be undertaken after you have
received a thorough course of instruction from a qualified healthcare professional. Self-testing is not to be seen as a substitute
for regular monitoring by your doctor. It can however, allow your doctor to check your blood glucose management. You should
only adapt your treatment if you have been trained to do so.
What is included? BETACHEK Visual Test Strips (see outer packaging for quantity), 1 label with colour chart, instructions
for use.
What is not included but needed? A watch with a second hand or a timer, a clean white tissue, a lancing pen with lancet.
Storing the test strips
Store BETACHEK Test Strips in their original container in a cool, dry place between 2-30˚C (35-85˚F). Keep away from heat
and direct sunlight. Do not freeze. If stored in a refrigerator, remove and warm to room temperature before opening. In the
original bottle these test strips are stable up to the expiry date. Recap container immediately after removing strips. Use before
the expiry date.
How to perform a test
This test has an important timing step. Incorrect timing will give incorrect results.
You need a timer or a watch with a second hand, a clean white tissue and a lancing pen with lancet.
Watch a video demonstration at www.betachek.com
1.
1. Preparation – Wash hands with soap and WARM water and dry them thoroughly. If you use
an alcohol wipe, make sure your finger is completely dry before testing. Remove a test strip
and immediately recap the container. Check the test zone against the "0 Unused" section of the
colour chart on the label. If the test zone shows any sign of blue you should discard the test strip.
2.
2. Obtain blood sample – Use your lancing pen according to its instructions to prick your
finger. Gently squeeze the selected finger at the base moving toward the tip. This should be
repeated several times until you have a large hanging drop of blood (the palm of your hand
should be facing down so the drop can hang from the finger).
3. Apply blood – Place the strip on a firm level surface or if preferred hold the strip moving it
3.
towards the blood drop. Allowing the drop of blood to hang off the finger, press the drop onto
the centre of the two pads, moving it around to ensure complete coverage. Avoid touching the
pads with your finger. As soon as you have applied the blood to the pads start timing. Blood
should completely cover both pads. If you have smeared the blood or not used sufficient blood
to completely cover both the pads then you should repeat the test.
4.
4. Wipe blood off – Exactly 30 seconds after applying the blood, wipe the blood from the test
pads with a tissue. Repeat the wipe using a clean region of the tissue. Ensure the test zone is
clean of blood. Excess blood left on the pads will affect the result.
5.
5. Read results – After wiping the test zone wait another 30 seconds (1 minutes from applying
blood), then compare the test zone to the colours on the label chart.
www.betachek.com
Visual
Tiras de prueba de glucosa en sangre. Colorimétrico visualmente legible. Adecuado para autodiagnóstico
ESPAÑOL
INSTRUCTIONES DE USO
Información
¿Qué es BETACHEK? Las tiras reactivas BETACHEK están diseñadas para medir los niveles de glucosa en sangre. La prueba
utiliza una pequeña gota de sangre capilar (5 micro litros) para proporcionar un resultado semi-cuantitativo. La prueba no
está diseñada para su uso con los recién nacidos.
¿Cuál es el propósito de las pruebas de glucosa? Glucemia elevadas causa daños graves al cuerpo con el tiempo. Este
daño puede prevenirse manteniendo el control de glucosa en sangre en niveles normales. Diversos estudios han demostrado
que un mejor control de la glucosa en sangre, mejora ha largo plazo la salud de una persona con diabetes. El autodiagnóstico
regular con BETACHEK proporcionará información útil para usted y su médico en el manejo de la diabetes. Repetidas pruebas
le permite ver el impacto de la dieta, el ejercicio y los medicamentos . Su médico le aconsejará cuándo debe de realizar las
pruebas y su rango de glucosa objetivo. Por favor tenga en cuenta que las pruebas de glucosa en sangre deben realizarse
después de haber recibido formación por un profesional sanitario cualificado ó médico. El autodiagnóstico no debe ser visto
como un sustituto de la supervisión regular por su médico. Sin embargo, puede permitir que su médico ó profesional sanitario
pueda comprobar su gestión de glucosa en sangre. Usted sólo debe adaptar su tratamiento si ha sido entrenado para hacerlo.
¿Qué está incluido? Las tiras reactivas BETACHEK (véase empaquetado externo del envase ), 1 etiqueta con la carta de
color, instrucciones de uso.
¿Qué no esta incluido pero necesitaba? Un reloj con segundero o un cronómetro, un pañuelo blanco limpio, una pluma
de punción con lanceta.
Almacenamiento
Guarde las tiras BETACHEK en su envase original en un lugar fresco y seco a una temperatura de entre 2-30˚C (35-85˚F).
Manténgalas lejos del calor y la luz solar directa. No congelar. Si se almacena en un refrigerador, retire y se calienta a
temperatura ambiente antes de abrirlas. Guarde en el envase original las tiras hasta la fecha de caducidad. Inmediatamente
después de retirar una tira del envase ajuste bien la tapa para cerrarla. Utilice antes de la fecha de caducidad la tiras.
¿Cómo realizar una prueba?
Esta prueba tiene unos pasos a seguir : La sincronización incorrecta dará , resultados incorrectos.
Necesitas un reloj o un reloj con segundero, un pañuelo blanco limpio y una pluma de punción con lancet.
Ver un vídeo demostración en www.betachek.com/es/gfx
1.
1. Preparación – Lávese las manos con jabón y agua tibia y séquelos muy bien. Si utiliza un
paño con alcohol, asegúrese de que el dedo esté completamente seco antes de la prueba.
Extraiga una tira reactiva y vuelva a tapar inmediatamente el recipiente. Revise la zona de test
contra la sección "0" de la carta de color en la etiqueta del envase. Si la zona de test de la tira
reactiva muestra algún signo de color azul deseche la tira reactiva.
2.
2. Obtener la muestra de sangre utilice su pluma punción según sus instrucciones para
pinchar el dedo. Apriete suavemente el dedo seleccionado en la base hacia la punta. Esto debe
repetirse varias veces hasta que obtenga una gran gota de sangre (la palma de la mano debe
estar hacia abajo para que la gota se puede colgar del dedo).
3. Aplique la gota de sangre en la tira sobre una superficie firme y plana. Mantenga firme la
3.
tira moviéndola hacia la gota de sangre. Permitiendo que la gota de sangre pueda colgar del dedo,
presione la gota en el centro de las dos paneles, moviendo la tira para asegurar la cobertura completa.
Evite tocar los paneles con el dedo. Tan pronto como se ha aplicado la sangre a los paneles iniciar el
cronometraje (30 segundos). La sangre debe cubrir completamente ambas almohadillas. Si usted no
utilizar sangre suficiente para cubrir completamente las almohadillas, entonces debe repetir la prueba.
4.
4. Limpie la sangre exactamente 30 segundos después de aplicar la sangre, limpie la sangre
de los paneles de prueba con un pañuelo de papel.. Asegúrese de que la zona de test está
limpia de sangre. Exceso de sangre en las almohadillas pueden afectar el resultado
5.
5. Lea los resultados después de limpiar la zona, espere otros 30 segundos (1 minuto
después la aplicación de sangre),luego compare la zona de test de la tira con los colores de
la carta de la etiqueta del envase.
www.betachek.com/es
Advertisement

Subscribe to Our Youtube Channel
Related Manuals for BETACHEK Visual


Summary of Contents for BETACHEK Visual
- Page 1 Product information What is this test for? BETACHEK test strips are intended for self-testing of blood glucose. The test uses a small drop of ¿Qué es BETACHEK? Las tiras reactivas BETACHEK están diseñadas para medir los niveles de glucosa en sangre. La prueba capillary blood (5 microlitres) to provide a semi-quantitative result.
- Page 2 ¿Cómo se lee el resultado? es una prueba visual de alta calidad compuesta de dos reactivos y cuenta con una tabla How do I read the result? Results are obtained by comparing the test zone to the colour chart on the label. Use natural light (e.g.
Need help?
Do you have a question about the Visual and is the answer not in the manual?
Questions and answers