
Related Manuals for AETOOL BESA 12


Summary of Contents for AETOOL BESA 12
- Page 1 BESA 12 Battery Electrical System Analyser USER MANUAL AE TOOL LTD USER MANUAL VERSION 1301 www.aetool.com...
-
Page 2: Table Of Contents
Table of Contents 1.0 Introduction------------------------------------------------------------------------------------------ 1.1 BESA 12 (Battery Electrical System Analyser) -------------------------------------------------------3 1.2 Specifications----------------------------------------------------------------------------------------------------4 2.0 Safety Measures------------------------------------------------------------------------------------ 2.1 Safety Precautions---------------------------------------------------------------------------------------------5 2.2 Other Precautions----------------------------------------------------------------------------------------------6 3.0 Working with Batteries-------------------------------------------------------------------------- 4.0 The Battery Electrical System Analyser------------------------------------------------------- 4.1 BESA 12 ---------------------------------------------------------------------------------------------------------- 9 4.2 Key Functions---------------------------------------------------------------------------------------------------9 4.3 Functions of Individual Key--------------------------------------------------------------------------------10... -
Page 3: Introduction
1.0 - Introduction 1.1- BESA 12 (Battery Electrical System Analyser): This Analyser uses the modern technology in battery testing which can test batteries as they are without charging before test. Testing procedures are quick and easy with repeatable results. Test Results can be printed directly on attached mobile printer or it can be stored in the computer for records. -
Page 4: Specifications
Printer head: Thermo print head. 57.5mm ± 0.5mm Paper width: Paper roll diameter: Max. 40mm OD. Printing Speed: 50mm per sec. Working Temperature: 0ºC ~ 50ºC. Working Humidity: 10 ~ 80 % AE TOOL LTD USER MANUAL VERSION 1301 www.aetool.com... -
Page 5: Safety Measures
Before starting the engine for testing or trouble shooting, always make sure the parking brakes is firmly engaged. Put the transmission in Park (automatic transmission) and Neutral (manual transmission). Always block the drive wheels. Never leave vehicle unattended while testing. AE TOOL LTD USER MANUAL VERSION 1301 www.aetool.com... -
Page 6: Other Precautions
This will provide better and accurate results. • Do not attach the analyser clips directly onto the steel bolt that tightened to the battery terminal posts; this may give inaccurate readings or AE TOOL LTD USER MANUAL VERSION 1301 www.aetool.com... -
Page 7: Working With Batteries
Whenever possible, please follow the manufacturer's instructions for testing, jumping, installing, charging and equalising batteries. Never disconnect a battery cable from a vehicle with the engine running because the battery acts like a filter for the electrical system. AE TOOL LTD USER MANUAL VERSION 1301 www.aetool.com... - Page 8 Even if this is a remote possibility, it is best to disconnect the vehicle's battery cables from the battery BEFORE connecting the charger. AE TOOL LTD USER MANUAL VERSION 1301 www.aetool.com...
-
Page 9: The Battery Electrical System Analyser
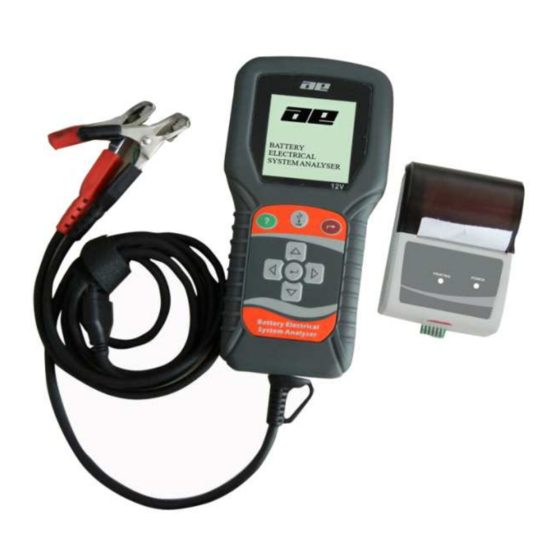
4.0 - The Battery Electrical System Analyser 4.1 – BESA 12 Black Clamp to battery negative (-) post. Red Clamp to battery positive (+) post. Detachable Mobile Printer. USB port for connection to PC. Figure 1 4.2 - Keypad Functions:... -
Page 10: Functions Of Individual Key
Press this key to print the all the Test results on the Detachable Mobile Printer. The printing can be done after each test and in View Last Test mode. AE TOOL LTD USER MANUAL VERSION 1301 www.aetool.com... -
Page 11: Besa 12 Setup
5.0 – BESA 12 Setup 5.1 Printer installation 1. To install the mobile printer, first remove the detachable back cover of the Analyser by sliding outward (Fig. 3a). Then insert the mobile printer into the slot and push all the way in until it stops (Fig. 3b). -
Page 12: Help Key
Once it had been saved, the display will change to the language selected. Press key to exit and get back to the Main menu screen (Fig.5) to continue your test. 6.0 – Help Key AE TOOL LTD USER MANUAL VERSION 1301 www.aetool.com... - Page 13 This selection helps you to familiarise with the usage of the BESA 12 as well as explaining the various test functions and its results. To get into this function, just press key at any one of the functions displayed on the menu screens as shown below (Fig.8 and Fig 9):...
- Page 14 [Exit] to menu. If you wish to continue help on rest of the item like “Voltage, Battery ratings, Internal R and LIFE”, press key anytime will go back to the main menus (Fig. 11). AE TOOL LTD USER MANUAL VERSION 1301 www.aetool.com...
-
Page 15: Battery Test
1. Attach the Analyser clips onto the battery terminal posts [Red to (+) and Black to (-)] the unit will power up and lights up the LCD display screen as shown (Fig.14). BESA-12 Figure 14 BATTERY ELECTRICAL SYSTEM ANALYSER AE TOOL LTD USER MANUAL VERSION 1301 www.aetool.com... - Page 16 The grounding Measured: 406 CCA resistance of the Rating: 630 CCA engine or car chassis is Volts: 12.45 V high. Int. R: 6.72 mOhm Life: 76 % Clean the cable contacts or replace AE TOOL LTD USER MANUAL VERSION 1301 www.aetool.com...
- Page 17 (Fig. 19) below. The Analyser is removing the battery surface charge now. Please wait for a Figure 19 moment! AE TOOL LTD USER MANUAL VERSION 1301 www.aetool.com...
- Page 18 9. If there is no surface charge present, then it will straight away enter into “Select Battery” menu screen as shown in Fig. 22 Select Battery SLI (Wet Type) AGM (Flat/Spiral) [Enter] to proceed AE TOOL LTD USER MANUAL VERSION 1301 www.aetool.com...
- Page 19 11. Before selecting the ratings ‘CCA, SAE, EN, IEC, DIN, CA and JIS #’ from the menu, check the battery specification value. This value can be checked on the battery labels as some of the examples shown below: AE TOOL LTD USER MANUAL VERSION 1301 www.aetool.com...
- Page 20 Refer to the battery model (example: 80D26L or NX110-5L) on the Cold Cranking Amps (CCA) Table list supplied separately or from this manual on page 27 & 28 (See example Fig.25 below.) AE TOOL LTD USER MANUAL VERSION 1301 www.aetool.com...
- Page 21 (00) to 30 by step of 5 units for each pressing. (Fig. 27) Input Battery Rating Increase/decrease: Single digit ⊳ By hundredths 630 CCA Figure 27 Press [Enter] to proceed. AE TOOL LTD USER MANUAL VERSION 1301 www.aetool.com...
- Page 22 14. For less than 7 seconds, the results of the testing will be displayed on the LCD screen. (Fig. 29) Battery: Good Measured: 406 CCA Rating: 630 CCA Volts: 12.45 V Int. R: 6.72 mOhm Life: 76% Figure 29 Interpretations of the above results: AE TOOL LTD USER MANUAL VERSION 1301 www.aetool.com...
-
Page 23: Measured: 406 Cca
CCA available power does not mean that the battery would pass a CCA test at 406 CCA. The available power reading shows that the battery is not able to perform up to its rated ability (630 CCA). AE TOOL LTD USER MANUAL VERSION 1301 www.aetool.com... -
Page 24: Life: 76
Therefore this rating is the same as CCA rating as mentioned above. • IEC (International Electrotechnical Commission) Standard. ° ° IEC amperes rating require that at 0 F (-18 C), the number of amperes that AE TOOL LTD USER MANUAL VERSION 1301 www.aetool.com... - Page 25 12V - Deep Cycle Batteries. An example of the results display is shown below: (Fig.30) Battery: Measured: 220 CCA Volts: 12.26 V Int. R: 6.24 mOhm Figure 30 AE TOOL LTD USER MANUAL VERSION 1301 www.aetool.com...
- Page 26 11.96 V Volts: 10.56 V Int. R: 12.24 mOhm Int. R: 20.24 mOhm State of Charge is low! State of Charge is low! Charge battery and test Internal resistance is AE TOOL LTD USER MANUAL VERSION 1301 www.aetool.com again. high.
-
Page 27: Battery Rating Charts
NX60-24L 28B19R NS40S 38B20LS NX60-24LS 28B19L 40B20L NS40LS 32B20R NS40 40B20R 32B20L NS40L 42B20L 32C24R 42B20RS 32C24L N40L 42B20LS 34B17R 46B24L NS60L 46B24R 75D31L NS60 N70ZL 46B24RS 80D23R NS60S 46B24LS NS60LS 80D23L AE TOOL LTD USER MANUAL VERSION 1301 www.aetool.com... -
Page 28: Din & En Standards Rating Charts
1250 8.2 DIN & EN Standards Rating Chart Battery Amps Battery Amps Model No. Model No. 52805 55057 52815 55068 53517 55069 53520 55218 53521 55414 53522 55415 53621 55421 53624 55422 AE TOOL LTD USER MANUAL VERSION 1301 www.aetool.com... - Page 29 55041 56420 55042 56530 55044 56618 55046 56619 55048 56620 55056 56633 56638 60026 56641 60038 55647 60044 56821 60527 56820 60528 56828 61017 57024 61018 57029 61023 57113 61047 57114 61048 AE TOOL LTD USER MANUAL VERSION 1301 www.aetool.com...
-
Page 30: Yuasa Battery Rating Chart
8.3 YUASA Battery Rating Chart Battery Battery Battery Model No. Model No. Model No. 24-500 65-730 GTH40L 34-6MF 65-900 GTH40S 34-60 74-60 GT50L 34-610MF 75-6MF GTH55DL 34-710 75-72 GTH60L 35-580 75A-72 GTH60DL 41-580 75-660 GTH75DL AE TOOL LTD USER MANUAL VERSION 1301 www.aetool.com... -
Page 31: Rough Cca Guide
To check the grounding condition, this Analyser will measure the resistance from the engine body contact to the battery terminal then it will display the results and the recommendations. AE TOOL LTD USER MANUAL VERSION 1301 www.aetool.com... -
Page 32: Start Testing
3. After you have made your choice, selecting “New: Clear Memory” or “Continue…Test” will proceed to the display below: (Fig. 37) Select Test Battery Test Grounding Test Starter Test Alternator Test Then press [Enter]. AE TOOL LTD USER MANUAL VERSION 1301 www.aetool.com... - Page 33 RED clip still attached to the battery [+] terminal. 7. Press key again and it will starts analyzing (Fig. 40) Analysing ... Please wait! AE TOOL LTD USER MANUAL VERSION 1301 www.aetool.com...
- Page 34 Figure 41 9. Once the Black clip is clamped onto the battery [-] terminal, the Analyser display will light up as shown. (Fig. 42) Grounding Test Press [Enter] to continue the test. AE TOOL LTD USER MANUAL VERSION 1301 www.aetool.com...
- Page 35 12. If the measured resistance reading has gone beyond the limits, then it will display the screen as follows (Fig. 45). Results: High Ohms The grounding resistance of the engine or car chassis is high. Clean the cable contacts or replace cable if necessary. AE TOOL LTD USER MANUAL VERSION 1301 www.aetool.com...
-
Page 36: Starter Test
(Fig.38). 10.0 – Starter Test This test actually checks the cranking effectiveness of the battery and also can predicts when the battery will fail to crank a vehicle. AE TOOL LTD USER MANUAL VERSION 1301 www.aetool.com... -
Page 37: Begin Testing
NEUTRAL for Manual and PARK for Automatic then apply the parking brake. 2. Connect the analyser to the battery terminals and the display will light up as shown (Fig 47). BESA-12 AE TOOL LTD USER MANUAL VERSION 1301 www.aetool.com BATTERY ELECTRICAL... - Page 38 The screen will show (Fig.49). Select Test Battery Test Grounding Test Starter Test Alternator Test Figure 49 Then press [Enter]. 2. Press key to continue and the display will show: (Fig.50) AE TOOL LTD USER MANUAL VERSION 1301 www.aetool.com...
- Page 39 Press [Exit] to main menu. 5. During cranking when it detects that there is no drop in voltage, it will display the following screen (Figure 53). AE TOOL LTD USER MANUAL VERSION 1301 www.aetool.com...
-
Page 40: Alternator Test
As the Rotor rotates its magnetic field “cuts” each Stator winding in turn, this induces a current in each winding. The outputs from the Stator windings are 120 degrees apart and are AE TOOL LTD USER MANUAL VERSION 1301 www.aetool.com... -
Page 41: Start Testing
2. Attach the Analyser clips onto the battery terminal posts and it will power up and lights up the LCD display screen as shown (Fig.54) BESA-12 Figure 54 BATTERY LECTRICAL SYSTEM ANALYSER AE TOOL LTD USER MANUAL VERSION 1301 www.aetool.com... - Page 42 Alternator Test Figure 56 Then press [Enter]. 5. Pressing key to scroll down to the ‘Alternator Test’ (Fig.57) Select Test Battery Test Grounding Test Starter Test Alternator Test Figure 57 Then press [Enter] AE TOOL LTD USER MANUAL VERSION 1301 www.aetool.com...
- Page 43 10 seconds and release the pedal. The maximum and minimum voltages values will be captured. After that press key again and it show as below (Fig 60.) No Load Test At 3,000 rpm: Av Volts: 14.2V AE TOOL LTD USER MANUAL VERSION 1301 www.aetool.com <15.0V: Max. 14.6V...
- Page 44 Results:High charge At 3,000 rpm, At 3,000 rpm, No load Test: No load Test: >13.3V: Min 13.2V <15.0V: Max. 15.6V Check for loose belt Check alternator and and the alternator. the regulator. AE TOOL LTD USER MANUAL VERSION 1301 www.aetool.com...
-
Page 45: Testing With Load At 2,000 Rpm
10 seconds and release the pedal. The maximum and minimum voltages values will be captured. (Fig.65) Loading Test Average At 2,000 rpm: Charging volts. Av.Volts: 13.3V >13.5V: Max. 13.8V >12.5V: Min. 12.8V Press [Enter] for results. AE TOOL LTD USER MANUAL VERSION 1301 www.aetool.com... - Page 46 Results: Low charge At 2,000 rpm, At 2,000 rpm, Loading Test: Loading Test: >13.5V: Max. 13.3V >12.5V: Min. 12.4V Check for loose belt and Check for loose belt and the alternator. the alternator. AE TOOL LTD USER MANUAL VERSION 1301 www.aetool.com...
-
Page 47: View Last Test Results
(Fig.57). 12.0 – View Last Test Results To view the results of the last test, BESA 12 has to be connected to an external power source by either clamping its clips directly to a 12Volt car battery or connected to a PC via the USB port. - Page 48 (Fig. 73) Battery: Good Measured: 406 CCA Rating: 630 CCA Volts: 12.45 V Int. R: 6.72 mOhm Figure 73 Life: 76% AE TOOL LTD USER MANUAL VERSION 1301 www.aetool.com...
-
Page 49: Printing The Last Test Results
The Analyser has to be connected to a 12V battery in order to work with the mobile printer. This is because it needs higher Amps to operate which the PC USB output is unable to provide. AE TOOL LTD USER MANUAL VERSION 1301 www.aetool.com... -
Page 50: Pc Link
(Fig.71). 13.0 – PC Link BESA 12 is also designed to link with PC for data storage and printout through normal printer. To do so, the PC has to install the driver and the software provided in order to operate. - Page 51 As instructed, click [Next>] tab the program will continue to install the driver on the computer. Once it had finished, it will prompt you as shown below. Click [Finish] tab will restart your computer. AE TOOL LTD USER MANUAL VERSION 1301 www.aetool.com...
- Page 52 Step 3. Once the computer has restarted, plug BESA 12 on to any one of the USB port and the computer will start to locate the driver and it will pop up a message box as shown below. Wait for awhile, a different message box will appear stating that the hardware is installed and ready to use.
- Page 53 Go to [Hardware] tab; left click to open the page. Go to [Device Manager], left click again to open up the page. Look for Ports (COM&LPT), and double left click to extend. AE TOOL LTD USER MANUAL VERSION 1301 www.aetool.com...
- Page 54 Select Advance Port Settings as shown: Select Advance Port Settings as shown: Then change to desired COM no. , click OK to confirm. Then change to desired COM no. , click OK to confirm. AE TOOL LTD USER MANUAL VERSION 1301 www.aetool.com www.aetool.com...
- Page 55 Step 6. Back to desktop, open BESA 12 program by left click on the icon and the display page will show as follows: This COM port number should be the same as listed on the Device Manager (refer Step 5).
-
Page 56: Printing Results From Normal Printer
Click on [PRINT] tab and a text box will appear. Select the right printer and click [Print] tab to print. Select the printer which is connected to your computer here. AE TOOL LTD USER MANUAL VERSION 1301 www.aetool.com... -
Page 57: Saving Results
This limited warranty cover defects in materials and workmanship for a period of twelve (12) months which begins from the date the product is purchased by the end user and is subjected to the following terms and conditions: AE TOOL LTD USER MANUAL VERSION 1301 www.aetool.com... -
Page 58: Limitations Of Warranty
The manufacturer or any of its exclusive sales agents shall not be liable for any consequential or incidental damages or losses arising of the loss of uses of this product. AE TOOL LTD USER MANUAL VERSION 1301 www.aetool.com... - Page 59 All warranty information, product features and specifications are subjected to change without prior notice. AE TOOL LTD USER MANUAL VERSION 1301 www.aetool.com...
Need help?
Do you have a question about the BESA 12 and is the answer not in the manual?
Questions and answers