Table of Contents
Advertisement
Available languages
Available languages
Quick Links
Item # 1001-977-412
Model # 7043-207SS
USE AND CARE GUIDE
PUSH BUTTON OPERATED SINK STRAINER
Questions, problems, missing parts? Before returning to the store,
call Glacier Bay Customer Service
8 a.m. -7 p.m., EST, Monday-Friday, 9 a.m. - 6 p.m., EST, Saturday
1-855-HD-GLACIER
HOMEDEPOT.COM/GLACIERBAY
THANK YOU
We appreciate the trust and confidence you have placed in Glacier Bay through the purchase of this sink strainer. We strive to continually create
quality products designed to enhance your home. Visit us online to see our full line of products available for your home improvement needs. Thank you
for choosing Glacier Bay!
Advertisement
Chapters
Table of Contents

Subscribe to Our Youtube Channel
Related Manuals for Glacier bay 7043-207SS


Summary of Contents for Glacier bay 7043-207SS
- Page 1 THANK YOU We appreciate the trust and confidence you have placed in Glacier Bay through the purchase of this sink strainer. We strive to continually create quality products designed to enhance your home. Visit us online to see our full line of products available for your home improvement needs. Thank you...
-
Page 2: Table Of Contents
Table of Contents Table of Contents ............2 Pre-installation..............3 Safety Information ............2 Planning Installation ..............3 Warranty ................2 Tools Required ................ 3 Limited Lifetime Warranty ............2 Package Contents ..............3 Installation ............... 4 What is Covered..............2 What is Not Covered ............... -
Page 3: Care And Cleaning
Pre-installation PLANNING INSTALLATION Before beginning assembly of product, make sure all parts are present. Compare parts with package contents list and hardware contents. If any part is missing or damaged, do not attempt to assemble the product. Contact customer service for replacement parts. Estimated Assembly Time: 30 minutes Installations may vary depending on how the previous sink strainer was installed. -
Page 4: Installation
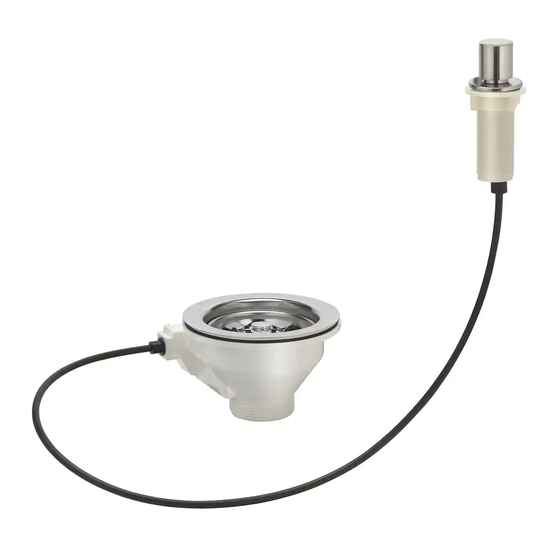
Installation Preparing for installation Remove the old sink strainer and thoroughly clean off old putty from around the sink opening (top and bottom). Push Holding the metal flange, unscrew the long white threaded piece button Flange from under the flange and let it slide down the cable. White threaded ... -
Page 5: Operation
Installation (continued) Connecting to the tailpiece Reattach the strainer to the drain pipe tailpiece (not included) with a slip nut and washer (not included). Adjusting the strainer basket The strainer basket may need to be adjusted to maximize water drainage. - Page 6 Questions, problems, missing parts? Before returning to the store, call Glacier Bay Customer Service 8 a.m. -7 p.m., EST, Monday-Friday, 9 a.m. - 6 p.m., EST, Saturday 1-855-HD-GLACIER HOMEDEPOT.COM/GLACIERBAY Retain this manual for future use. July 15, 2016...
- Page 7 GRACIAS Apreciamos la confianza que ha depositado en Glacier Bay por la compra de este colador de lavabo. Nos esforzamos por crear continuamente productos de calidad diseñados para mejorar su hogar. Visítenos en Internet para ver nuestra línea completa de productos disponibles para sus...
-
Page 8: Índice
Índice Índice ................2 Pre-instalación ..............3 Información de seguridad..........2 Planificación de la instalación ..........3 Garantía ................2 Herramientas requeridas............3 Garantía de por vida limitada ..........2 Contenido del paquete ............3 Instalación ............... 4 Lo que está cubierto ............... 2 Funcionamiento .............. -
Page 9: Cuidado Y Limpieza
Pre-instalación PLANIFICACIÓN DE LA INSTALACIÓN Antes de comenzar a ensamblar este producto, asegúrese de que todas las piezas estén presentes. Compare las piezas con la lista de contenido del paquete y la lista de herraje incluido. Si hace falta alguna pieza o se encuentra dañada, no intente ensamblar el producto. Póngase en contacto con servicio al cliente para las piezas de reemplazo. -
Page 10: Instalación
Instalación Preparación para la instalación Retire el colador de lavabo viejo y limpie completamente la masilla vieja alrededor de la abertura del lavabo (parte superior e inferior). Sosteniendo la brida de metal, extraiga la pieza roscada blanca larga Botón de Push button... -
Page 11: Funcionamiento
Instalación (continuación) Conexión a la cola Vuelva a instalar el colador a la cola de la tubería del desagüe (no incluida) con una tuerca deslizantey arandela (no incluida). Ajuste de la cesta del colador Es posible que se necesite ajustar la cesta del colador para maximizar el drenaje del agua. - Page 12 ¿Tiene preguntas, problemas, o faltan piezas? Antes de regresar a la tienda, llame a Servicio al Cliente de Glacier Bay de lunes a viernes de 8 a.m. a 7 p.m., sábado de 9 a.m. a 6 p.m., hora local del Este.
Need help?
Do you have a question about the 7043-207SS and is the answer not in the manual?
Questions and answers