Table of Contents
Advertisement
Available languages
Available languages
Quick Links
Advertisement
Table of Contents

Subscribe to Our Youtube Channel
Related Manuals for gartenpirat GP1350


Summary of Contents for gartenpirat GP1350
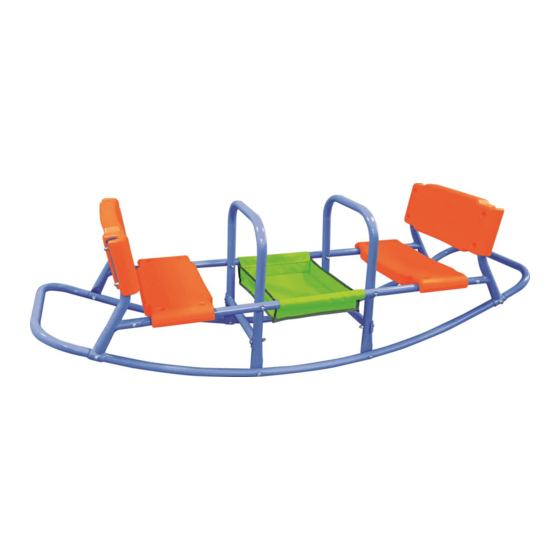
- Page 1 Rocking Boat Seesaw Art. Nr. GP1350 Manufacturer-No. : SE-03 T.K. CHIN COMPANY LTD., 7F, No. 227 Roosevelt Road, Sec.3, Taipei, Taiwan Manufactured for: J. Sedlmayr GmbH Hermann-Böcker-Str. 2b, 82140 Olching, Germany Page 1 of 7...
- Page 2 WARNING To prevent damage or accidents to persons and/or property, please read the following: 1. Thoroughly read all parts of this manual and strictly follow the instructions before using. 2. Do not use any accessories other than those provided and/or specified by the manufacturer.
-
Page 3: Parts List
PARTS LIST M6 35mm bolt (x 32) Lower Pipe (x 2) M6 55mm bolt (x 4) Upper Pipe (x 2) M6 washer (x 16) Side Support (x 2) Seat (x 2), Back Rest (x 2) Spring washer (x 36) Seat Back Support (x 4) Swing Case (x 1) Plastic End Cap (x 4) Domenut (x 36) - Page 4 ASSEMBLY INSTRUCTIONS Step 1: Place 2 Lower Pipes (G) parallel to each other Step 2: Insert Side Supports (I) into Lower Pipes (G) 2-1. Insert the Side Supports (I) into Lower Pipes (G) on both sides by using bolt (A)x 4 + washer (C)x 4 + spring washer (D)x 4 and domenut (E)x 4.
- Page 5 Step 4: Connect Upper Pipes (H) to Seat Back Support (J) 4-1. Fasten Seat Back Supports (J) into Upper Pipes (H) on the left side by using bolt (A) x 1 + washer (C) x 1 + spring washer (D) x 1 and domenut (E) x 1. Step 5: Assemble the Handle Tube (K) &...
- Page 6 Step 6: Slide the Swing Case (N) through the Upper Pipes (H) Step 7: Assemble the other Handle Tube (K) & Stepper (L) 7-1. Bolt the Stepper (L) onto the Handle Tube (K) by using bolt (A) x 2 + spring washer (D) x 2 and domenut (E) x 2.
-
Page 7: Care And Maintenance
Step 8: Assemble Seat (M) x 2 and Back Rests (M) x 2 8-1. Using bolt (A) x 16 + spring washer (D) x 16 and domenut (E) x 16, fasten the Back Rests (M) x 2 onto the Seat Back Support (J) and fasten the Seats (M) x 2 unto Upper Pipes (H). Step 8-2. - Page 8 Bateau à bascule Art. Nr. GP1350 Manufacturer-No. : SE-03 T.K. CHIN COMPANY LTD., 7F, No. 227 Roosevelt Road, Sec.3, Taipei, Taiwan Fabriqué pour : J. Sedlmayr GmbH Hermann-Böcker-Str. 2b, 82140 Olching, Allemagne Page 1 de 7...
-
Page 9: Consignes De Securite
CONSIGNES DE SECURITE Afin de prévenir tous dommages et accidents sur les personnes et/ou sur le bien, veuillez respecter les consignes et recommendations suivantes : 1. Veuillez lire attentivement le manuel d'utilisation et respecter impérativement les consignes avant usage. 2. Ne pas utiliser d'autres accessoires que ceux fournis et/ou spécifiés par le fabricant. 3. -
Page 10: Outils Requis
LISTE PIECES DE RECHANGE Boulon M6 35 mm (x 32) Barre inférieure (x 2) Boulon M6 55 mm (x 4) Barre supérieure (x 2) Rondelle M6 (x 16) Support latéral (x 2) Siège (x 2), Appui-dos (x 2) Rondelle élastique (x 36) Support arrière siège (x 4) Casier (x 1) Capuchon d'extrémité... -
Page 11: Instructions D'assemblage
Instructions d'assemblage Etape 1 : Placer 2 barres inférieures (G) en parallèle Etape 2 : Insérer les supports latéraux (I) dans les barres inférieures (G) 2-1. Insérer les supports latéraux (I) dans les barres inférieures (G) des deux côtés en utilisant 4 x boulon (A) + 4 x rondelle (C) + 4 x rondelle élastique (D) et 4 x écrou borgne (E) (voir figure ci-dessous) (Figure 1) - Page 12 Etape 4 : Raccorder les barres supérieures (H) au support de l'arrière du siège (J) 4-1. Connecter les supports de l'arrière du siège (J) aux barres supérieures (H) sur le côté gauche en utilisant 1 x boulon (A) + 1 x rondelle (C) + 1 x rondelle élastique (D) et 1 x écrou borgne (E).
- Page 13 Etape 6 : Faire glisser le casier (N) à travers les barres supérieures (H) Etape 7 : Assembler l'autre tube du guidon (K) & et les appui-pieds (L) 7-1. Verouiller l'appui-pieds (L) au tube du guidon (K) en utilisant 2 x boulon (A) + 2 x rondelle élastique (D) + 2 x écrou borgne (E) x 2.
-
Page 14: Entretien Et Maintenance
Etape 8 : Assembler 2 x siège (M) et 2 x appui-dos 8-1. Utiliser 16 x écrou (A) + 16 x rondelle élastique (D) et 16 x écrou borgne (E), fermer les 2 x appui-dos (M) sur le support de l'arrière du siège (J) and fixer les 2 x sièges (M) aux tubes supérieurs (H). - Page 15 Schaukelboot Art. Nr. GP1350 Manufacturer-No. : SE-03 T.K. CHIN COMPANY LTD., 7F, No. 227 Roosevelt Road, Sec.3, Taipei, Taiwan Hergestellt für: J. Sedlmayr GmbH Hermann-Böcker-Str. 2b, 82140 Olching, Deutschland Seite 1 von 7...
- Page 16 SICHERHEITSHINWEISE Um Sch ä den und Unf ä lle an Personen und/oder an Sachen zu vermeiden, gehen Sie folgenden Anweisungen und Ratschläge nach: 1. Lesen Sie alle Teile dieses Handbuchs sorgfältig durch und befolgen Sie die Anweisungen strikt vor Gebrauch. 2.
- Page 17 ERSATZTEILELIST M6 35mm Bolzen (x 32) Unteres Rohr (x 2) M6 55mm Bolzen (x 4) Obere Stange (x 2) M6 Scheibe (x 16) Seitliches Stützrohr (x 2) Sitz (x 2), Rückenlehner (x 2) Federscheibe (x 36) Rückenstütz Sitz (x 4) Schaukelkasten (x 1) Plastikverschlusskappe (x 4) Hutmutter (x 36)
- Page 18 MONTAGEANWEISUNGEN Schritt 1 : 2 unteres Rohr (G) parallel nebeneinander stellen Schritt 2 : Seitliches Stü tzrohr (I) in unteres Rohr (G) einsetzen 2-1. Seitiches Stuzrohr (I) auf beiden Seiten vom unteren Rohr (G) einsetzen. Bolzen (A) x 4 + Scheibe (C)x4 + Federscheibe (D)x 4 und Hutmutter (E)x4 benutzen (s.untere Abbildung). (Bild 1) Schritt 3: Zusammenbau Rü...
- Page 19 Schritt 4 : Oberes Rohr (H) mit Rü ckenstü tz Rohr (J) verbinden 4-1. Rückenstütz Rohr (J) mit der linken Seite vom oberen Rohr (H) befestigen. Bolzen (A) x 1 + Scheibe (C) x 1 + Federscheibe (D) x 1 und Mutterhut (E) x 1 benutzen. Schritt 5 : Zusammenbau Handgriff Rohr (K) &...
- Page 20 Schritt 6 : Schaukelkasten (N) in das obere Rohr (H) einsetzen Schritt 7 : Zusammenbau anderes Handgriff Rohr (K) & Fuß stü tz (L) 7-1. Fuß stütz (L) in Handgriff Rohr (K) einsetzen. Bolzen (A) x 2 + Federscheibe (D) x 2 und Mutterhut (E) x 2 benutzen.
-
Page 21: Pflege Und Wartung
Schritt 8 : Zusammenbau Sitz (M) x 2 und Rü ckenlehne (M) x 2 8-1. Bolzen (A) x 16 + Federscheibe (D) x 16 und Mutterhut (E) x 16, Rückenlehner (M) x 2 mit dem Rückenstütz (J) befestigen und Sitze (M) x 2 mit dem oberen Rohr (H) befestigen. - Page 22 Barca a dondolo Art. Nr. GP1350 Manufacturer-No. : SE-03 T.K. CHIN COMPANY LTD., 7F, No. 227 Roosevelt Road, Sec.3, Taipei, Taiwan Fatto per: J. Sedlmayr GmbH Olching, Germania Hermann-Böcker-Str. 2b, 82140 Pagina 1 di 7...
- Page 23 AVVERTIMENTI Per evitare danni o incidenti a persone e / o proprietà, leggere quanto segue: 1. Leggere attentamente tutte le parti di questo manuale e seguire scrupolosamente le istruzioni prima dell'uso. 2. Non utilizzare accessori diversi da quelli forniti e / o specificati dal produttore. 3.
- Page 24 ELEMENTI DI MONTAGGIO M6 35mm vite (X 32) Tubo inferiore (X 2) M6 55mm vite (X 4) Tubo superiore (X 2) Sedile (X 2) Schienale (X 2) M6 Rondella (X 16) Supporto laterale (X 2) Rondella elastica (X 36) Supporto per schienale (X 4) Cassa oscillante (X 1) Plastic End Cap (x 4) Dado (X 36)
-
Page 25: Istruzioni Di Montaggio
ISTRUZIONI DI MONTAGGIO Passo 1: Posizionare 2 tubi inferiori (G) paralleli tra loro Passo 2: Inserire i supporti laterali (I) nei tubi inferiori (G) 2-1. Inserire i supporti laterali (I) nei tubi inferiori (G) su entrambi i lati usando il bullone (A) x 4 + rondella (C) x 4 + rondella elastica (D) x 4 e dado (E) x 4. (Vedi figura sotto) (Figura 1) Passo 3: Assemblare il supporto per schienale (J) 3-1. - Page 26 Passo 4: Collegare i tubi superiori (H) al supporto dello schienale (J) 4-1. Fissare i supporti dello schienale (J) nei tubi superiori (H) sul lato sinistro usando il bullone (A) x 1 + rondella (C) x 1 + rondella elastica (D) x 1 e dado (E) x 1. Passo 5: Assemblare il tubo maniglia (K) e il passo (L) 5-1.
- Page 27 Passo 6: Far scorrere la cassa dell´oscillazione (N) attraverso i tubi superiori (H) Passo 7: Assemblare l´altro tubo maniglia (K) e passo (L) 7-1. Imbullonare il passo (L) sul tubo maniglia (K) usando il bullone (A) x 2 + rondella elastica (D) x 2 e dado (E) x 2. 7-2.
-
Page 28: Cura E Manutenzione
Passo 8: Assemblare 2 sedili (M) e 2 schienali (M) 8-1. Usando il bullone (A) x 16 + rondella elastica (D) x 16 e il dado (E) x 16, fissare il appoggia indietro (M) x 2 sul supporto dello schienale (J) e fissa i sedili (M) x 2 ai tubi superiori (H). Passo 8-2. - Page 29 Columpio Balancí n Sube-Baja Art. Nr. GP1350 Manufacturer-No. : SE-03 T.K. CHIN COMPANY LTD., 7F, No. 227 Roosevelt Road, Sec.3, Taipei, Taiwan Fabricado para: J. Sedlmayr GmbH Hermann-Böcker-Str. 2b, 82140 Olching, Alemania Página 1 de 7...
- Page 30 ADVERTENCIAS Siga las siguientes indicaciones a fin de prevenir dañ os en la propiedad o accidentes: 1. Antes de utilizar, lea con detenimiento este manual de instrucciones y siga las indicaciones . 2. No utilice ningún accesorio que no venga incluí do o esté recomendado por el fabricante. 3.
-
Page 31: Herramientas Necesarias
COMPONENTES Tornillo M6 35mm (x 32) Barra inferior (x 2) Tornillo M6 55mm (x 4) Barra superior (x 2) Arandela M6 (x 16) Soporte lateral (x 2) Asiento (x 2), Respaldo (x 2) Arandela ranurada (x 36) Soporte trasero asiento (x 4) Complemento cajón central (x 1) Embellecedor de plástico (x 4) Tuerca bóveda (x 36) -
Page 32: Instalación
INSTALACIÓ N Paso 1: Coloque las 2 barras inferiores (G) paralelas la una a la otra Paso 2: Acople los soportes laterales (I) a las barras inferiores (G) 2-1. Inserte los soportes laterales (I) en las barras inferiores (G) utilizando 4 tornillos (A) + 4 arandelas (C)+ 4 arandelas ranuradas (D) + 4 tuercas bóvedas (E). - Page 33 Paso 4: Acople las barras superiores (H) a los soportes traseros del asiento (J) 4-1. Asegure, por el lateral izquierdo los soportes traseros del asiento (J) a las barras superiores (H) utilizando 1 tornillo (A) + 1 arandela (C) + 1 arandela ranurada (D) + 1 tuerca bóveda (E) x 1.
- Page 34 Paso 6: Pase el cajón central (N) a través de las barras superiores Paso 7: Acople el asidero (K) y la barra para pies (L) del otro lateral 7-1. Asegure la barra para pies (K) al asidero (K) utilizando 2 tornillos (A) + 2 arandelas ranuradas (D) + 2 tuercas bóvedas (E).
-
Page 35: Mantenimiento
Paso 8: acople los asientos (M) y los respaldos (M) 8-1. Asegure los respaldos (M) a los soportes traseros del asiento (J) y los asientos (M) a las barras superiores (H). Utilizando 16 tornillos (A) + 16 arandelas ranuradas (D) + 16 tuercas bóvedas (E).
Need help?
Do you have a question about the GP1350 and is the answer not in the manual?
Questions and answers