MAKER MADE M2 Setup Manual
Hide thumbs
Also See for M2:
- Setting up (52 pages) ,
- Complete beginner assembly manual (45 pages) ,
- Complete beginner assembly manual (38 pages)

Related Manuals for MAKER MADE M2


Summary of Contents for MAKER MADE M2
- Page 1 SET-UP GUIDE FOR MASLOW TO M2 UPGRADE KIT A guide to assembling your MakerMade M2 CNC Kit. v 1.2 Updated 12.6.21 ©Maker Made, LLC...
- Page 2 SECTION 1. Intro - 3 SECTION 2. Parts Needed - 4 SECTION 3. What’s in the box? - 5 SECTION 4. Assembling the M2 - 6 SECTION 5. Attaching your router - 13 SECTION 6. Tips and safety warnings - 14...
- Page 3 MakerMade family! Here are some notes on the layout... 1. Setting up the M2 can be broken down into three main parts: building the M2, building the frame (or mounting it on an existing Maslow frame), and calibration. This guide covers building the M2.
-
Page 4: Parts N E E De D
Drew’s Note: Check out the M2 Video Playlist for an overview of what’s in the box and other how-to videos! You’ll have to supply your own router for your M2. Here is the recommended list: Router Clamp Size MakerMade Community... -
Page 5: What's In The Box
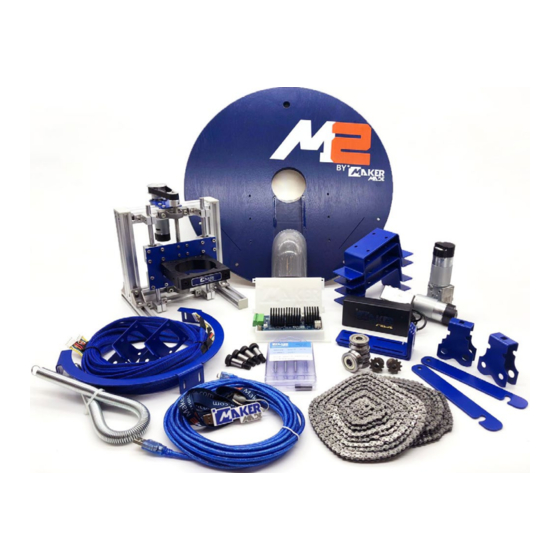
WHAT’S I N TH E BOX? DUE v1.2 Control Board, 10’ MicroUSB to USB cord AC/DC Power Adapter Sled Shield, and Case and cord Z Axis Assembly Dust Collection Bracket 91mm Router Clamp Spring Velcro Dust Collection and Acrylic Dust Cover USB Drive Paint Marker Brick Mounting Straps (3) - Page 6 ASSE M B LI NG YOU R M2 The M2 Upgrade Kit comes in several pieces to assemble. Drew’s Note: We recommend reading this entire section before beginning assembly. Check out this video playlist on how to build the...
- Page 7 1. There are three sets of countersunk pilot holes in the sled. Place the ring carriage in the center and align with the pilot holes. Remove your ring carriage from your Maslow and take it apart. Then, align the L-brackets with the ring bracket attachment on each set of holes, with the tall sides toward the center.
-
Page 8: Top View
4. Assemble both roller bearing carriages by inserting the shoulder bolt through larger carriage hole, then through a washer, the ring bearing, another washer, and out though the smaller side of the roller bearing carriage. Use the largest (5mm) hex wrench on one TOP VIEW SIDE VIEW... - Page 9 7. Attach the large gear to the motor, just above shaft base, ensuring one large set screw is on the flat side of motor shaft. Attach with the two large set screws using the second smallest (2.5mm) hex wrench. Z Axis Bag C 8.
- Page 10 Re-tighten the grub screws at the new height. Drew’s Note: Be sure that your belt is tight and level between the gears! If the belt is loose or not level, the Z axis on your M2 will not move properly. 12. Attach the...
- Page 11 13. Insert the eight bolts into the holes from the outside of the base of the left right sides of the Z axis assembly. From the inside of the z-axis assembly, hand tighten the T-nuts half-way onto the bolts. Z Axis Bag C Left Right...
- Page 12 Loop the two longer Velcro brick straps by feeding them through the slots on the sides of the Z axis assembly. You’ll attach the bricks (and cinch them tight) after you mount your M2 to your frame. Drew’s Note: The M2 needs...
- Page 13 Attach a router bit to your router and insert it into the router clamp. Tighten the clamp. The bit should be just above touching the surface of the table that you’re building your M2 on, about 1/4” (6mm) up.
- Page 14 Resources section for the Makerverse Calibration Guide to run your M2! The MakerMade M2 CNC kit is used to assemble a large format CNC machine. It is designed to use a router (or another tool) to cut 4’ by 8’ sheet materials. When used correctly, this machine is very safe.
Need help?
Do you have a question about the M2 and is the answer not in the manual?
Questions and answers
porque el microcable no lo lee mi computadora y ya actualise los controladores
The MAKER MADE M2 micro cable may not be recognized by your computer after updating the drivers because the updated FTDI drivers do not work with certain knock-off chips, such as those in the CH340 line. These updated drivers can block communication with the board. To fix this, you may need to roll back to an earlier version of the driver that supports these chips. Also, ensure the USB cable is a data cable, not just a charging cable.
This answer is automatically generated