Advertisement
MINI 3
This handbook aims to bring to the attention of key technical, functional and maintenance of your motor MINI 3. Read carefully the following pages, will be synonymous
with safety, reliability and great satisfaction durable.
This manual is considered part of the motor MINI 3, in case of transfer, will be delivered to the new owner.
.
About this manual lists all of the information available at time of printing. The SIMONINI RACING srl reserves the right to modify or change without notice
page 1
Advertisement
Table of Contents

Related Manuals for SIMONINI Racing MINI 3

Summary of Contents for SIMONINI Racing MINI 3
- Page 1 MINI 3 This handbook aims to bring to the attention of key technical, functional and maintenance of your motor MINI 3. Read carefully the following pages, will be synonymous with safety, reliability and great satisfaction durable. This manual is considered part of the motor MINI 3, in case of transfer, will be delivered to the new owner.
-
Page 2: Technical Data
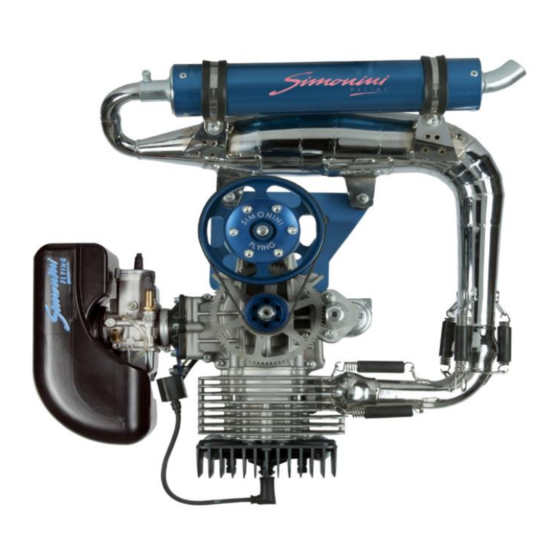
TECHNICAL DATA BORE 72,8mm STROKE 65mm DISPLACEMENT 270cc COMPRESSION RATIO 10.1 / 1 Weight ready to fly 22 kg CONSUMPTION A 5400 rpm 3,2litres/hour POWER 7000 rpm 36hp STATIC THRUST Over 100Kg Lamellar intake with Bing 36mm carburetor Aluminum cylinder with ceramic coating magnesium, Exhaust resonance Poly-V belt reduction Electronic ignition... - Page 3 page 3...
- Page 4 MINI 3/01 KIT ENGINE SCREWS MINI 3/29 WASHER-PRESSURE OUTLET MINI 3/64 COMPLETE SET OF BEARINGS MINI 3/02 COMPLETE EXHAUST SYSTEM MINI 3/31A REED VALVE NEW MODEL MINI 3/65 COMPLETE ROD MINI 3/03 COMPLETE SET OF GASKETS MINI 3/33 AIR FILTER...
-
Page 5: Tightening Torques
TIGHTENING TORQUES Description Special number in table Kgf.m Head Nut 6x40 Screws Connector 6x30 Screws 6x25 Screws Nut 12 19/76 12x30 Screws 8x40 Screws Spark Plug ELECTRICAL DIAGRAM page 5... -
Page 6: Installation
INSTALLATION The MINI 3 engine must be fitted to the frame using its six elastic supports "silent blocks", radially mounted: two placed on the head and four on the back of the engine. During the installation, some safety precautions must be made: remember that an engine generates vibrations, even if very few, which can cause the loosening and/or removal of screws or any other object. -
Page 7: Carburetor And Fuel Pump
The MINI 3 is equipped with a depression pump that draws fuel directly from the tank. The draft tube has to no longer than 80 cm. - Page 8 The engine, before being sold, was subjected to a pre-running-in to verify the proper operation and a test that confirms all the features advertised. Once you require a MINI 3, you should pay particular attention to the first hour of operation, in order to ensure all the engine’s qualities over time.
-
Page 9: Maintenance
MINI 3. Now the engine MINI 3 will be ready for use for which it was designed by continuing to use a percentage of oil by 3% for the next 10 hours. WARNING! DURING THE RUNNING-IN PHASE, KEEP PARTICULAR ATTENTION TO THE EXHAUST GAS TEMPERATURE AND HEAD TEMPERATURE UNDER CONTINUOUS OBSERVATION. - Page 10 • Replace the transmission belt • Check the status of the intake manifold rubber • Replace the exhaust pipe sound-absorbent material • Check the electrode gap spark-plug: if it is over 0.6 mm, change the spark plug • Rubber components such as belt transmission, silent block, intake manifold and depression tube may be damaged by atmospheric agents.
- Page 11 - There must not be any signs of seizure or deep cracks. - Check the wear by measuring the piston at 18.5mm from the bottom keeping the measuring instrument at a right angles to the axis pin. Height limits: SELECTION A: 72.690mm SELECTION B: 72.700mm SELECTION C: 72.710mm SELECTION D: 72.720mm...
- Page 12 shown in diagram 2, and moving the connecting rod vertically. The slack shown by the comparator is assessed. Measure the diameter of the hole in the connecting-rod foot. Height limit: 20.00mm • Reed valve: Verify that between the frame and the reeds there is no space (diagram 3).
-
Page 13: Maintenance Tools
We also inform you that high exhaust gas temperatures, in many cases, are a symptom of poor carburetion. While high temperatures under the spark plugs, usually, are due to poor ventilation (heat dissipation) of the engine, caused by the presence of bodies and / or materials that prevent the passage of air cooling. COMPONENTS AND TOOLS ON REQUEST To have the possibility to customize the engine and then adapt it to different needs and methods of use, SIMONINI offers a range of components on request:... - Page 14 • any previous repairs • carburetion setting • complete description of the problem Thank you for your trust and we remind you that the staff of SIMONINI RACING srl will be at your disposal for any questions. SIMONINI RACING SRL Via per Marano 4303, Loc.
Need help?
Do you have a question about the MINI 3 and is the answer not in the manual?
Questions and answers