
Subscribe to Our Youtube Channel
Related Manuals for Stafford Instruments ST215C


Summary of Contents for Stafford Instruments ST215C
- Page 1 ST215C TAFFOR Temperature Programmer Handbook www.staffordinstruments.co.uk Issue: 6.053 © Copyright 2020 - 2021 Stafford Instruments Ltd. ST215C User Handbook Page Date: 25 May 2021...
-
Page 2: At A Glance
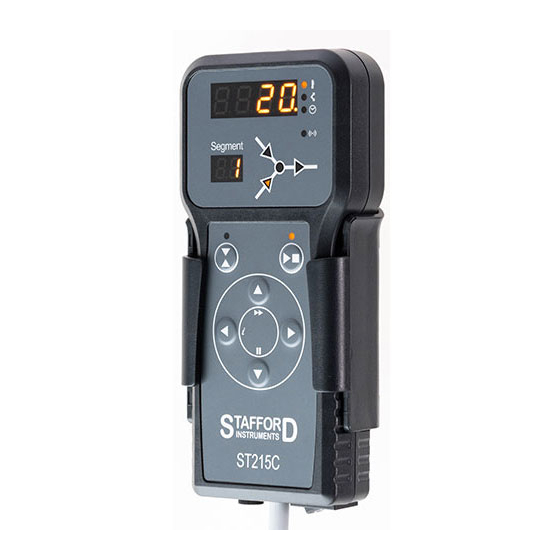
Segment segment display mimic display event LED running LED event key start/stop key up key right key left key down key fuse on/off switch cable Page ST215C User Handbook... -
Page 3: Quick Start Guide
To exit the programming mode either wait 20 seconds or press the ► key to start firing If the keyboard is locked then press the ▲ & ▼ keys together & hold down for 5 seconds to un- lock ST215C User Handbook Page... -
Page 4: Table Of Contents
Control Relay Option ........9 Firing ............12 Cooling ............13 Operating Notes ........14 Adjusting While Firing .......15 Error Messages .........16 Sample Glass Programs ......18 Sample Ceramics Programs .....19 Other Features ..........20 WiFi & USB Datalogging Option ....21 Installation ..........26 Characteristics ..........32 Page ST215C User Handbook... -
Page 5: Features
Keyboard lockable Delayed start facility - up to 99 hours 59 mins Power failure recovery Energy used display Setpoint display Alarm buzzer & alarm output Event/damper/fan control relay option WiFi + USB datalogger option °C/°F operation ST215C User Handbook Page... -
Page 6: Turning On
LOCKED. To re-lock the keyboard press the ▲ & ▼ keys together & hold down for 5 seconds. If any mimic panel lamps are on then the ST215C is firing. To stop the firing press the ► key. During firing the right-hand decimal point will light to show when heating power is being applied to the kiln. -
Page 7: Programming
(crystal glazing or glass-making for example). The ST215C ramps the kiln temperature at the required ramp rate until the kiln reaches the soak / target temperature. It then soaks (dwells) at the soak temperature for the soak period. - Page 8 Note 2: to exit programming without cycling through all of the above steps wait 20 seconds without pressing any keys - the ST215C will revert to the idle display. Alternatively press the ► key to exit programming and to begin firing immediately.
-
Page 9: Control Relay Option
Control Relay Option Control Relay Configuration The ST215C has an optional control relay that can be configured (see installation section) as: not used, an event output, a damper control output or a fan control output. Event Output The event output can be programmed to change state at the start of a ramp and also at the start of a soak period. - Page 10 Press the key. The ST215C will now reset and the new damper control temperatures will be stored. Note: in the sequence above it is important that the key is pressed a total of 4 times else changes will not be saved.
- Page 11 Press the key. The ST215C will now reset and the new fan control temperatures will be stored. Note: in the sequence above it is important that the key is pressed a total of 4 times else changes will not be saved.
-
Page 12: Firing
ST215C will apply heating power to the kiln for 12 seconds every 30 seconds. The kiln heating indicator will light for 12 seconds every 30 seconds. If the kiln has a contactor then a loud click will be heard both when the kiln heating indicator lights up and when it goes out. -
Page 13: Cooling
When the kiln has cooled to less than 40°C the display alternates every 5 seconds between the kiln temperature and End. To return the ST215C back to idle condition ready for the next firing press the ► key (or turn off the power to the instrument... -
Page 14: Operating Notes
Operating Notes Kiln too slow If the ST215C is programmed to heat the kiln at a faster rate than the kiln is capable of then the ST215C will turn on full power then wait until the kiln temperature has risen to the correct temperature before proceeding to the next ramp or soak segment. -
Page 15: Adjusting While Firing
If ramping then the ST215C will switch to soak at the current kiln temperature. If soaking then the ST215C will advance to the ramp in the next segment if any, or else it will end the firing. Changes made to the operation of the ST215C in this way are temporary and are not stored. -
Page 16: Error Messages
Error Messages If the ST215C detects a problem the buzzer will sound and an error message will be displayed. This error message will alternate with a display of kiln temperature. The segment number display will show where the error occurred. - Page 17 All these error messages cause the ST215C to terminate the firing. The alarm buzzer will sound once per second. To reset the ST215C turn off the power to the instrument and have the fault investigated and rectified by your installer or kiln service engineer.
-
Page 18: Sample Glass Programs
Page ST215C User Handbook... -
Page 19: Sample Ceramics Programs
Sample Ceramics Programs The ST215C is provided pre-programmed with the ceramics firing programs below. These programs may be modified or over-written as required. Program Program Name Seg 1 Seg 1 Seg 1 Seg 2 Seg 2 Seg 2 Seg 3... -
Page 20: Other Features
ST215C is currently trying to achieve). Keyboard Lock Facility The keys on the ST215C can be locked so that pressing them has no effect. This is an anti-tamper feature used to ensure that the operation of the ST215C or the program data cannot be altered by un-authorised people. -
Page 21: Wifi & Usb Datalogging Option
USB FLASH memory “thumb” drive. The radio icon lamp on the front panel flashes when the ST215C is paired to a WiFi network and is send- ing or receiving information. WiFi Configuration To access the controller over an internet connection go to www.staffordinstruments.co.uk then click on the “MY CONTROLLER”... - Page 22 This can be adjusted over the range 5 to 300 seconds (default 60 seconds) using parameter P50 with the controller in configuration mode. Please see the Installation Instructions section of this document for details. Log File Format This is illustrated on page 23 of this document. Page ST215C User Handbook...
- Page 23 LOGnnn.CSV file format ST215C User Handbook Page...
- Page 24 It is best to store this file on a separate drive and remove it from the controller after use. In this way unnecessary reconfiguring is avoided the next time the controller is powered on. This drive can be used to re-configure multiple controllers. Page ST215C User Handbook...
- Page 25 If a firmware update is required then this can be requested by email. If an update is available then this will be sent to you as an email attachment together with instruc- tions on how to load the update. ST215C User Handbook Page...
-
Page 26: Installation
This instrument is designed for use mainly in Domestic, Commercial & Light Industrial environments where electromagnetic interference may cause a loss of accuracy of the displayed temperature reading of up to 3°C. Specified accuracy will be restored when the interference is removed. Page ST215C User Handbook... - Page 27 Suitable proprietary RC suppressors are often available from contactor manufacturers as add-on blocks. A suitable RC suppressor with insulated wire leads (fly leads) is the Okaya Electric XEB1201B. These are available from Stafford Instruments Ltd. - our part number: X00104. ST215C User Handbook...
- Page 28 Connecting Lead The ST215C is fitted as standard with a connecting lead and plug. The lead lengths can be either 2m or 3m. The plug type will one of the four shown. Page ST215C User Handbook...
- Page 29 Configuring To enter configuration mode power down the ST215C. Press and hold down both the key & the key while powering up the ST215C. When the thermocouple type is displayed release the key & the key. The first setup parameter number is now displayed (flashing 00).
- Page 30 USB Data Logging Sample Period seconds Disable setup password protection 0=enabled, 1=disabled Operating units °C/°F 0=°C, 1=°F Note: The setup parameters shown thus are freely adjustable. The other setup parameters might be password protected - contact supplier. Page ST215C User Handbook...
- Page 31 Operating Units °C/°F: When units are changed the controller will reload its default set of programs (in either °C or °F units as required). Warning! - this will over-write any existing firing programs! ST215C User Handbook Page...
-
Page 32: Characteristics
Fixing slot centres (vertical): 70mm rately collected for proper treatment. In this Fixing slot size: 8mm x 4mm way you will assist in the recovery, recycling & reuse of many of the materials used in this product. Page ST215C User Handbook...
Need help?
Do you have a question about the ST215C and is the answer not in the manual?
Questions and answers
How can i program my own heatingprogram in the st215c? And if not possible, how can i switch from a cooling ramp to a heating ramp?