
Related Manuals for Islandaire 6041228


Summary of Contents for Islandaire 6041228
- Page 1 Programmable (7 day, 5-1-1 day or Non-Programmable) Wired Thermostat 6041228 Installation and Operation Manual 6140444 Rev. 04/09/21...
-
Page 3: Table Of Contents
Installation and Operation Manual Thermostat Application Guide Power Type Description Hardwire (Common Wire) Hardwire (Common Wire) with Gas or Oil Heat Battery Backup Electric Furnace Heat Pump (No Aux. or Emergency Heat) Heat Pump (With Electric Aux.) A trained, experienced technician Heat Pump (With Gas Aux.) must install this product. -
Page 4: Installation Tips
Installation Tips Wall Locations The thermostat should be installed approximately 4 to 5 feet above the floor. Select an area with average temperature and good air circulation. Do not install thermostat in locations: • Close to hot or cold air ducts •... - Page 5 Installation Tips Installation Manual Subbase Installation Horizontal Mount Vertical Mount Electrical Hazard Failure to disconnect the power before beginning to install this product can cause electrical shock or equipment damage. Mercury Notice All of our products are mercury free. However, if the product you are replacing contains mercury, dispose of it properly.
- Page 6 Installation Tips Mount Thermostat Align the 4 tabs on the subbase with corresponding slots on the back of the thermostat, then push gently until the thermostat snaps in place.
- Page 7 Installation Tips Battery Installation Connect R and C terminals to 24V power. Note: The C (common wire) does not have to be con- nected when the thermostat is powered by batteries. Battery installation is optional if thermostat is hardwired. Note: Installing batteries will enable the thermostat to remember the program that you have set even if there has been a power outage.
-
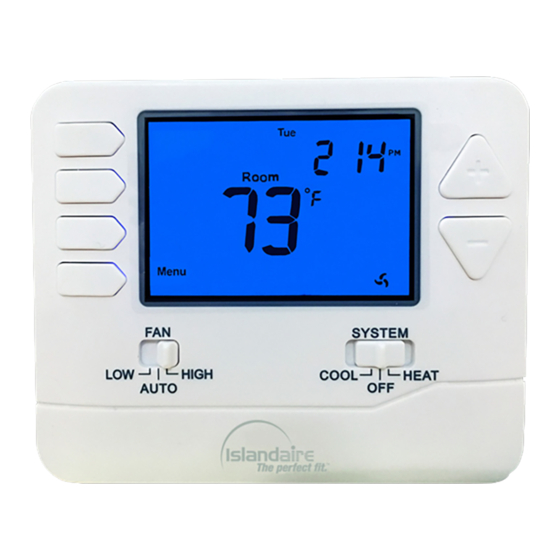
Page 8: Thermostat Quick Reference
Thermostat Quick Reference Getting to know your thermostat Indicates the Displays current current room day of week temperature and time Displays the user selectable setpoint temperature Low Battery indicator: Replace batteries when indicator is shown Time Period indicator: System Operation Indicates current indicators: On will program time period... -
Page 9: Wiring
Wiring Wiring This thermostat is shipped from the factory to operate a conventional heating and cooling system. This thermostat will also operate a heat pump system. See the “heat pump” configuration step on page 10 of this manual to configure the thermostat for heat pump applications. - Page 10 Use the S1 and S2 screw terminals to thermostat to remember the program connect the optional indoor remote that you have set even if there has been a temperature sensor (Islandaire part no. power outage. 6040912). Indoor remote sensor wires must be separated from the thermostat wires.
-
Page 11: Wiring Diagrams
Wiring Diagrams Power supply Splice together GL and GH wires. O and B terminals not used. Typical 1H/1C Conventional System: 2 Speed Fan COMPRESSOR RELAY HEAT RELAY FAN LOW RELAY FAN HIGH RELAY Typical 1H/1C Conventional System: 1 Speed Fan COMPRESSOR RELAY HEAT RELAY... - Page 12 Wiring Diagrams Power supply Cap off W Terminal B or O is used on Heat Pump Systems; B is energized in heating, O is energized in cooling. Typical 1H/1C Heat Pump System: 2 Speed Fan Typical 2H/1C Heat Pump System: 2 Speed Fan COMPRESSOR COMPRESSOR RELAY...
-
Page 13: Technician Setup
Technician Setup Technician Setup Menu This thermostat has a technician setup menu for easy installer configuration. To set up the thermostat for your particular application: 1. Press the Menu button. 2. Press and hold the Tech Set button for three seconds. This three second delay is designed so that homeowners do not accidentally access the installer settings. - Page 14 Technician Setup Menu Tech Setup Steps LCD Will Show Adjustment Options Default Compressor The compressor short Selecting ON will not Short Cycle cycle delay protects the allow the compressor Com Delay Com Delay Delay compressor from short to be turned on for 5 cycling.
- Page 15 Technician Setup Menu Tech Setup Steps LCD Will Show Adjustment Options Default Heating The swing setting, The heating swing Swing* often called “cycle rate”, setting is adjustable Heat Heat Swing Swing “differential” or “antici- from 0.2° to 2°. For pation”, is adjustable. A example: A swing smaller swing setting setting of 0.4°...
- Page 16 Technician Setup Menu Tech Setup Steps LCD Will Show Adjustment Options Default 12 or 24 You can select either a Use the “+” or “-” key Hour Clock 12 or 24 hour clock. to select 12 or 24 hour clock. Electric/Gas This setting allows the Most PTAC systems...
-
Page 17: Time Setting/Programming
7. The current minutes will be flashing. Use the “+” or “-” key to select the current minutes. 8. Press the Done button. Programming The 6041228 Thermostat is shipped with an energy saving default program. The thermostat can be re-programmed as described in the paragraph entitled “Set Program Schedule”. There are two program schedule options: •... -
Page 18: Programming
Programming Default Programming Factory Default Program Setpoint Setpoint Day of Temperature Temperature Week Time Period Time (Heat) (Cool) Wake 6 AM 70°F (21°C) 75°F (24°C) Leave 8 AM 62°F (17°C) 83°F (28°C) Weekday Return 6 PM 70°F (21°C) 75°F (24°C) Sleep 10 PM 62°F (17°C) - Page 19 Programming Set Program Schedule (7 Day Schedule) To customize your 7 day program schedule, proceed as follows: 1. Set the System Switch to either Heat or Cool. Note: You have to program heat and cool separately. 2. Press the Menu button. 3.
- Page 20 Programming Set Program Schedule (5+1+1 Schedule) To customize your 5+1+1 day program schedule (weekday, Saturday, Sunday), proceed as follows: 1. Set the System Switch to either Heat or Cool. Note: You have to program heat and cool separately. 2. Press the Menu button. 3.
- Page 21 Programming Temporary and Permanent Hold Temporary Hold: The thermostat will display “Hold” and “Run Sched” on the left side of the screen when you press the “+” or “-” key. If you do nothing, the temperature will remain at this setpoint temporarily for four hours. After this time, the thermostat will revert back to programmed temperature control.
-
Page 22: Specifications
Specifications 6041228 Wired Programmable Thermostat Temperature Display Range ...........32 °F to 99 °F (0 °C to 37 °C) Temperature Control Range ..........44 °F to 90 °F (7 °C to 32 °C) Load Rating ....... 1A per terminal, 1.5A maximum all terminals combined Swing (cycle rate or differential) ...... - Page 23 THIS PAGE INTENTIONALLY LEFT BLANK...
- Page 24 Installation and Operation Manual 500 Middle Country Road, St. James, NY 11780 • 1-800-886-2759 e-mail: sales@islandaire.com • www.islandaire.com Ph: 631-471-2900 • Fax: 631-471-2913...
Need help?
Do you have a question about the 6041228 and is the answer not in the manual?
Questions and answers