Table of Contents
Advertisement
Quick Links
EAGLE LE
control unit for telescopes and astrophotography
VERSION 1.0
Update 08-05-2021
EAGLE is manufactured by PrimaLuceLab S.p.A. (Italy). For any matters relating to the use, service and warranty,
please refer to the addresses given in the relevant documents.
P r i m a L u c e L a b S . p . A . • V i a R o v e r e d o 2 0 / B , 3 3 1 7 0 , P o r d e n o n e
w w w. p r i m a l u c e l a b . c o m
•
Advertisement
Table of Contents

Related Manuals for PrimaLuceLab EAGLE LE


Summary of Contents for PrimaLuceLab EAGLE LE
- Page 1 VERSION 1.0 Update 08-05-2021 EAGLE is manufactured by PrimaLuceLab S.p.A. (Italy). For any matters relating to the use, service and warranty, please refer to the addresses given in the relevant documents. P r i m a L u c e L a b S . p . A . • V i a R o v e r e d o 2 0 / B , 3 3 1 7 0 , P o r d e n o n e w w w.
- Page 2 QUALITY CONTROL: After assembly in our laboratories, every EAGLE unit, is tested by PrimaLuceLab technical experts to verify the correct operation of all components = the integrated computer, stability and speed of the wire- less connection and the power bridge. ...
- Page 3 P r i m a L u c e L a b S . p . A . E A G L E L E U s e r M a n u a l Index Components Identification First use: how to choose the correct power source First use: switch on and activation of wireless network First use: Setting remote control with iPhone or iPad First use: Setting remote control from a Windows computer...
- Page 4 • Do not bend, modify or force any part of EAGLE NOTICE In case you check any malfunction, please contact us immediately (+ 39-0434-1696106 or sup- port@primalucelab.com). Do not try to disassemble, repair or modify yourself EAGLE, without our written approval, in order not to loose the manufacturer warrantee. ...
-
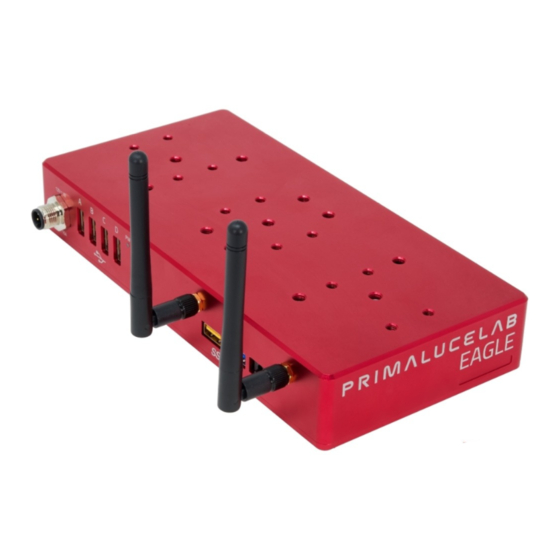
Page 5: Components Identification
P r i m a L u c e L a b S . p . A . E A G L E L E U s e r M a n u a l Components Identification The numbers indicate the name of the specific component. Read the paragraphs below for detailed operation de- scription. - Page 6 P r i m a L u c e L a b S . p . A . E A G L E L E U s e r M a n u a l First use: how to choose the correct power source EAGLE allows you to distribute power to many devices used in telescopes astrophotography (such as mount, ca- mera, filter wheel, electronic focuser, dew heaters, etc.), thus eliminating the need for many different power sup- plies.
-
Page 7: First Use: Switch On And Activation Of Wireless Network
P r i m a L u c e L a b S . p . A . E A G L E L E U s e r M a n u a l First use: switch on and activation of wireless network EAGLE is designed to be controlled from an external device (not included with EAGLE) via WiFi. - Page 8 P r i m a L u c e L a b S . p . A . E A G L E L E U s e r M a n u a l Image 2: Connect the power plug into the socket (1) ket (1 - 12V power input), you will hear a beep sound and the PW LED light will turn on.
- Page 9 EAGLE A window will appear where you will be asked to enter the password of your network (image 5). The password is primalucelab. Using the keyboard (virtual or physical) of your device, enter the password paying attention to appropriate upper or lower case.
- Page 10 On Windows operating systems, when you select EAGLE’s WiFi network, you may be requested to insert a “PIN from the router label”. Please click on the “Connect using a security key instead” and then type the password “primalucelab”. p a g e 9...
- Page 11 (picture 8) where you can enter your username and password to log on to Win- dows. The values are: - Username: PrimaLuceLab; - Password: (that shown on the quick guide in the EAGLE box) Then press the button "Save" to save the access data.
- Page 12 P r i m a L u c e L a b S . p . A . E A G L E L E U s e r M a n u a l Returning to the main page you will find a new connection (picture 10). Tap on it and wait a few seconds, you’ll see on your device's desktop EAGLE (image 11).
- Page 13 P r i m a L u c e L a b S . p . A . E A G L E L E U s e r M a n u a l NOTE After being connected to the EAGLE's WiFi, I start a Remote Desktop connection but I get an error “Unable to connect”.
- Page 14 P r i m a L u c e L a b S . p . A . E A G L E L E U s e r M a n u a l 3) With the IPv4 address and DNS settings configured manually, the Remote Desktop should work correctly. Please launch again the Microsoft Remote Desktop app and start the connection.
- Page 15 A window will open (picture 15) where you can enter your username and password to log on to Windows. The values are: - Username: PrimaLuceLab; - Password: (that shown in the flyer in the EAGLE box) Image 15: Insert User name and Windows access password.
- Page 16 P r i m a L u c e L a b S . p . A . E A G L E L E U s e r M a n u a l Image 17: Select the created link Double click on the connection and you will be connected to the EAGLE Manager (image 18).
- Page 17 A window will open (picture 20) where you can enter your username and password to log on to Windows. The values are: - Username: PrimaLuceLab; - Password: (that shown in the flyer in the EAGLE box) Image 20: Insert User name and Windows access password.
- Page 18 P r i m a L u c e L a b S . p . A . E A G L E L E U s e r M a n u a l Image 22: Select the created link Double click on the connection and you will be connected to the EAGLE Manager (image 23).
- Page 19 P r i m a L u c e L a b S . p . A . E A G L E L E U s e r M a n u a l NOTE After being connected to the EAGLE's WiFi, I start Remote Desktop connection but I get an error “Unable to connect”.
- Page 20 This will remove all the access data saved related to your EAGLE’s WiFi network. Please connect again to the EAGLE’s WiFi (you will be requested to enter again the “primalucelab” password) and start the Remote Desktop connection to your EAGLE.
- Page 21 P r i m a L u c e L a b S . p . A . E A G L E L E U s e r M a n u a l First use: Setting remote control from an An- droid device This guide has been written by using an Android smart- phone 9.1 and Microsoft Remote Desktop client...
- Page 22 P r i m a L u c e L a b S . p . A . E A G L E L E U s e r M a n u a l Returning to the main page you will find a new connection (picture 27). Image 27: Select the created link Double click on the connection and you will be connected to the EAGLE Manager (image 28).
- Page 23 P r i m a L u c e L a b S . p . A . E A G L E L E U s e r M a n u a l NOTE After being connected to the EAGLE's WiFi, I start Remote Desktop connection but I get an error “Unable to connect”.
- Page 24 P r i m a L u c e L a b S . p . A . E A G L E L E U s e r M a n u a l 3) Next configure DNS to the IP address of your EAGLE (192.168.137.1). 4) With the IPv4 address and DNS settings configured manually, the Remote Desktop should work correctly.
-
Page 25: First Use: Backup Your Ssd Drive Before Installing Your Software
P r i m a L u c e L a b S . p . A . E A G L E L E U s e r M a n u a l First use: backup your SSD drive before installing your software Before installing your devices driver and your astronomy software in the Windows operating system of the EAGLE, we suggest you to create a backup copy of your SSD. - Page 26 P r i m a L u c e L a b S . p . A . E A G L E L E U s e r M a n u a l Macrium Reflect will start and you'll see a detailed list of the disks of your EAGLE. Select the SSD disk of the EA- GLE (the first line) by checking the leftmost box option and click"Image This Disk”.
- Page 27 P r i m a L u c e L a b S . p . A . E A G L E L E U s e r M a n u a l In the next window, please leave the options as they are and press Next to continue. In the next window, please press Finish button finish the backup wizard.
- Page 28 P r i m a L u c e L a b S . p . A . E A G L E L E U s e r M a n u a l In the next window, please press OK button to start the backup of your SSD drive. Finally, Macrium Reflect will begin the cloning process.
- Page 29 P r i m a L u c e L a b S . p . A . E A G L E L E U s e r M a n u a l At the end of the procedure, you will get a confirmation message. You can press OK and exit from Macrium Reflect and disconnect your drive from the EAGLE.
-
Page 30: First Use: Install Your Software
P r i m a L u c e L a b S . p . A . E A G L E L E U s e r M a n u a l First use: install your software EAGLE uses a Windows 10 64 bit operating system. -
Page 31: First Use: Turn Off Eagle
P r i m a L u c e L a b S . p . A . E A G L E L E U s e r M a n u a l First use: turn off EAGLE When you want to turn off EAGLE, first disconnect your remote control device. -
Page 32: First Use: Installing Eagle On The Telescope
P r i m a L u c e L a b S . p . A . E A G L E L E U s e r M a n u a l First use: installing EAGLE on the telescope EAGLE has been designed entirely with SolidEdge three-dimensional design software to offer the best modularity with the PLUS elements (rings, dovetail plates or clamps) and/or any brand telescopes. - Page 33 P r i m a L u c e L a b S . p . A . E A G L E L E U s e r M a n u a l In order to use the EAGLE with this configuration, insert 2 M6 screws (a) in each PLUS ring (2 screws for each ring) and so fix the EAGLE.
- Page 34 P r i m a L u c e L a b S . p . A . E A G L E L E U s e r M a n u a l Connecting to telescopes not equipped with PLUS rings If your telescope is not equipped with PLUS support rings, just add the optional "PLUS Vixen + Losmandy style dovetail clamp"...
- Page 35 P r i m a L u c e L a b S . p . A . E A G L E L E U s e r M a n u a l First use: powering other instruments connected to the EAGLE EAGLE incorporates a power bridge to which you can connect up to 4 instruments such as mount, camera, filter wheel and electronic focuser.
- Page 36 P r i m a L u c e L a b S . p . A . E A G L E L E U s e r M a n u a l WHAT IF I CONNECT A DEVICE THAT HAS A HIGHER POWER CONSUMPTION THAN THE ONE ALLOWED ONE FROM THE POWER OUT PORTS OF THE EAGLE : the power board has a dedicated chip that protects the electronics.
-
Page 37: First Use: Remotely Control Devices With Eagle Manager
P r i m a L u c e L a b S . p . A . E A G L E L E U s e r M a n u a l First use: remotely control devices with EAGLE Manager When you remotely (with WiFi or Ethernet wired connection) connect to the EAGLE, you will see the EAGLE Ma- nager control interface. - Page 38 P r i m a L u c e L a b S . p . A . E A G L E L E U s e r M a n u a l In the first window that appears (“Select power source”, image 38) please check your power source, with AC po- wer units (5A or 14A) or with a battery.
- Page 39 P r i m a L u c e L a b S . p . A . E A G L E L E U s e r M a n u a l - connect or disconnect every power out port of EAGLE Leaving power connected to your devices (for example, mount, camera, filter wheel, etc.) allows you to activate them remotely when you turn on the entire system.
- Page 40 P r i m a L u c e L a b S . p . A . E A G L E L E U s e r M a n u a l - set power out voltage of the 3 power out ports with adjustable voltage For example, you can increase or decrease the heat generated by dew heaters connected to EAGLE without the need for external controller.
- Page 41 P r i m a L u c e L a b S . p . A . E A G L E L E U s e r M a n u a l - connect or disconnect devices attached to the 4 USB 2.0 ports This feature is convenient in case of temporary crash of autoguider or planetary camera (or other devices), which can then be reactivated without the need to go to the telescope and disconnect/reconnect the cable.
- Page 42 P r i m a L u c e L a b S . p . A . E A G L E L E U s e r M a n u a l - set WiFi connectivity You can access the EAGLE in Access Point (AP) mode for field use (use your smartphone, tablet or external com- puter by connecting directly to EAGLE without the need of a WiFi router) or HOST mode for connecting to your exi- sting network such as the WiFi network at your home.
- Page 43 P r i m a L u c e L a b S . p . A . E A G L E L E U s e r M a n u a l ATTENTION! Make sure that you entered the correct network parameters (especially your network password) because, if they are wrong, EAGLE will not be able to access your network and at the same time it will not create its network in Access Point mode: in this case you won’t be able to connect to EAGLE anymore and you will need to click its RESET button to reset the network.
- Page 44 P r i m a L u c e L a b S . p . A . E A G L E L E U s e r M a n u a l - remotely turn on/off the entire telescope EAGLE has a standard ON/OFF button to turn on/off the unit but you can also turn off the whole system remotely.
- Page 45 By default, EAGLE generates a WiFi network with EAGLExxxxx name (where xxxx is the serial number of your EAGLE) as reported also in the front part of the EAGLE. Default password is primalucelab but you can change it for your safety.
- Page 46 P r i m a L u c e L a b S . p . A . E A G L E L E U s e r M a n u a l - DARK mode DARK mode feature that allows you to instantly turn off all the LED lights on the EAGLE. Not only this will prevent any influence on your telescope but it is also a great feature for your astronomy friends that may be close to you while enjoying the night sky together.
- Page 47 54). Image 54: EAGLE Switch ASCOM driver EAGLE’s ASCOM drivers are already installed in your system. Updates can be found at https://www.primalucelab.- com/astronomy/downloads. EAGLE's ASCOM drivers require at least ASCOM platform 6.4 that is already installed on your system. ...
-
Page 48: Advanced Use: Program Connection And Power To Devices
P r i m a L u c e L a b S . p . A . E A G L E L E U s e r M a n u a l Advanced use: program connection and power to devices In the ADVANCED SETTINGS window, you can determine how EAGLE Manager sets USB and power ports (ex- cept for the USB 3.0 ports that will always be active) when EAGLE is turned on or off. -
Page 49: Advanced Use: Remotely Turn On Eagle With Wired Connection
P r i m a L u c e L a b S . p . A . E A G L E L E U s e r M a n u a l Advanced use: remotely turn on EAGLE with wired connection EAGLE is designed to allow you, in a simple and fast way, to remotely control your telescope that is connected and powered by EAGLE. - Page 50 P r i m a L u c e L a b S . p . A . E A G L E L E U s e r M a n u a l It is therefore necessary to set a static IP address for EAGLE. To do this, select the Start button and then click on Control Panel and select "...
- Page 51 - In “PC name” field, enter the static IP of the EAGLE that is 192.168.100.100 - In “Username” field enter PrimaLuceLab - In “Password” field enter Windows access password you find in the EAGLE quick guide ...
- Page 52 P r i m a L u c e L a b S . p . A . E A G L E L E U s e r M a n u a l Immagine 61: set the Remote Desktop for wired connection Create the new connection, click on the name of the newly created connection (in our example "EAGLE Wired") to activate the remote connection (Image 62). ...
- Page 53 After the EAGLE is turned off, please press the Power On button of the EAGLE and, as soon as you see the PrimaLuceLab logo on the screen, please press the F2 button in your keyboard to enter in the motherboard BIOS.
- Page 54 P r i m a L u c e L a b S . p . A . E A G L E L E U s e r M a n u a l Here press the ADVANCED button and then press on the "Power" tab. In the window that opens, click on “Secon- dary power settings”...
-
Page 55: Controlling The Telescope Remotely With Cartes Du Ciel
P r i m a L u c e L a b S . p . A . E A G L E L E U s e r M a n u a l Controlling the telescope remotely with Cartes du Ciel Sky Charts is a free planetarium software for Windows that shows all the sky objects and lets you control the telescope. - Page 56 P r i m a L u c e L a b S . p . A . E A G L E L E U s e r M a n u a l 3) Select “Telescope” then “Control panel”. This will open a new window “ASCOM interface” . Click on “Select” and this will open a new window “ASCOM Telescope Chooser”.
- Page 57 P r i m a L u c e L a b S . p . A . E A G L E L E U s e r M a n u a l For example, if you use a SkyWatcher mount, you may use the “EQMOD USB interface for SkyWatcher mounts” that directly connects the mount electronics to the EAGLE using a USB port.
- Page 58 P r i m a L u c e L a b S . p . A . E A G L E L E U s e r M a n u a l 4) In the “ASCOM Telescope Chooser” window select “Proprierties” and the “ASCOM configuration” window will open. Set the right number port in “Port”...
- Page 59 P r i m a L u c e L a b S . p . A . E A G L E L E U s e r M a n u a l 6) A circle indicator indicates the telescope position, in this example it’s in the North Polar star. In order to move the telescope to a desired object you can see in the planetarium window, you can select the object, make a right mouse click, select “Tele- scope”...
- Page 60 P r i m a L u c e L a b S . p . A . E A G L E L E U s e r M a n u a l 8) You can increase the magnification of the sky chart using the Zoom buttons. Then select one of the available speeds in the speed selector (3 or 4 are ok for object centering) and center the object in the telescope field of view (in your eyepiece or in the camera) Zoom buttons...
- Page 61 P r i m a L u c e L a b S . p . A . E A G L E L E U s e r M a n u a l 10) The telescope will be synchronized and the sky chart position will be set to the object. 11) When you want to disconnect the planetarium software from the mount, select “Telescope”...
-
Page 62: Autoguiding With Phd2 Guiding
P r i m a L u c e L a b S . p . A . E A G L E L E U s e r M a n u a l Autoguiding with PHD2 Guiding PHD2 Guiding is a free software among the most used for autoguiding since it's very easy to use. In this tutorial we will explain how to set up this software (that is pre loaded into the EAGLE) using a QHY5L-II camera but the same steps can also be made using other autoguiding cameras. - Page 63 P r i m a L u c e L a b S . p . A . E A G L E L E U s e r M a n u a l 3) In the “Connect Equipment” window verify that the “Mount” option is “On-camera”. This option is used when the camera inte- grates an ST4 autoguide port.
- Page 64 P r i m a L u c e L a b S . p . A . E A G L E L E U s e r M a n u a l PHD2 Guiding will perform a loop images that will be displayed on the screen. Do not worry if, as in the image below, you notice a lot of background noise: in fact PHD Guiding automatically compresses the image histogram to help better visualize the guide stars and this makes especially the sky background very noisy (but it has no impact on guide accuracy).
- Page 65 P r i m a L u c e L a b S . p . A . E A G L E L E U s e r M a n u a l 7) Then press the third button on the left (the one with the green icon): PHD2 Guiding will automatically start the calibration pro- cess that allows the software to "understand"...
- Page 66 P r i m a L u c e L a b S . p . A . E A G L E L E U s e r M a n u a l 8) After the calibration, PHD2 Guiding will indicate the starting position of the guide star with two green lines (one horizontal and one vertical) and it will begin automatically guiding.
-
Page 67: Drift Alignment Using Phd Guiding
P r i m a L u c e L a b S . p . A . E A G L E L E U s e r M a n u a l Drift Alignment using PHD Guiding In order to record the best astrophotography pictures it’s important to record pictures with exposition times as long as possible. - Page 68 P r i m a L u c e L a b S . p . A . E A G L E L E U s e r M a n u a l Azimuth Alignment Open the Drift Align Tool: You will see a window like this: ...
- Page 69 P r i m a L u c e L a b S . p . A . E A G L E L E U s e r M a n u a l Position your scope for the Azimuth axis adjustment. Point near the Meridian and the celestial equator. You can either click the Slew button, or move the mount manually.
- Page 70 P r i m a L u c e L a b S . p . A . E A G L E L E U s e r M a n u a l Notice we are only a few degrees off the meridian ("Meridian offset"), and close to the equator (small value of De- clination.).
- Page 71 P r i m a L u c e L a b S . p . A . E A G L E L E U s e r M a n u a l Slowly turn your mount's Azimuth adjustment, watching the screen and moving the guide star towards the magenta circle.
- Page 72 P r i m a L u c e L a b S . p . A . E A G L E L E U s e r M a n u a l After moving the guide star, click Drift to take another measurement. Before you click Drift, it's OK to nudge the mount to re-center the star, or to find a different star, or to get back closer to the meridian.
- Page 73 P r i m a L u c e L a b S . p . A . E A G L E L E U s e r M a n u a l Altitude Alignment Now, you will need to repeat the process for the mount's Altitude adjustment. Click the Altitude button; the Drift tool will now look like this: Click Slew or manually slew your mount towards the horizon (East or West): ...
- Page 74 P r i m a L u c e L a b S . p . A . E A G L E L E U s e r M a n u a l The exact position is not important, but 25-35 degrees above the horizon works well. Click Drift to start drifting. Drift until you have a stable Dec slope.
- Page 75 P r i m a L u c e L a b S . p . A . E A G L E L E U s e r M a n u a l Q & A Q: Where to save my pictures or videos? A: You can save captured images or videos directly on the hard disk of EAGLE.
- Page 76 P r i m a L u c e L a b S . p . A . E A G L E L E U s e r M a n u a l 1,000,000,000 bytes. A 480GB SSD is, in other words, actually 480,000,000,000 bytes. Windows OS uses binary bytes, so 1,024 bytes per Kilobyte, 1,024 KB per Megabyte, and so on.
- Page 77 The use of these commands is by your own risk and PrimaLuceLab has no responsibility on any application of these commands and integration on third party softwares. If you have problems related to the use of the EAGLE with third party softwares, please refer to the third party software support.
- Page 78 P r i m a L u c e L a b S . p . A . E A G L E L E U s e r M a n u a l http://localhost:1380/setregout?idx=5&volt=9.2 Set the voltage in RCA ports voltage with indexes from 5 to 7. To turn off, set the voltage to 0. Reply: {"result":"OK"} http://localhost:1380/setregout?idx=5&label=Heater Set label of the power port 5 to "Heater".
- Page 79 P r i m a L u c e L a b S . p . A . E A G L E L E U s e r M a n u a l Note on EAGLE Manager integration: The EAGLE Manager is not to be modified and it must be automatically started at Windows startup (as it is default in the EAGLE), also when the EAGLE’s ports are controlled through third party software.
-
Page 80: Troubleshooting
EAGLE uses standard WiFi antennas with sma connector and male central pin. F) If you checked all the points A, B, C, D, E and you still can’t find the WiFi network, you may have an hardware issue, please write us to support@primalucelab.com. ... - Page 81 P r i m a L u c e L a b S . p . A . E A G L E L E U s e r M a n u a l Q: I’m able to find and connect to EAGLEXXXXXX WiFi network, but WiFi disconnects A: WiFi connection stability depends on many factors, one of them is the quality of the antenna built in in the device you use to remotely control the EAGLE.
- Page 82 P r i m a L u c e L a b S . p . A . E A G L E L E U s e r M a n u a l Q: I connected a USB device to one of the USB ports of the EAGLE and it doesn’t work A: Since the EAGLE includes also a Windows 10 64bit computer, it can control USB devices by properly installing the correct Windows 10 64bit drivers and softwares.
- Page 83 E) If you checked all the points A, B, C, and you still have power problems, you may have an hardware issue. In this case please write us to support@primalucelab.com and we’ll support you to fix the problem. ...
- Page 84 All these steps require knowledge on computers and may require to change internal components, so if you can’t do this or feel uncomfortable, please contact us writing an email to support@primalucelab.com 1) If the PW LED is off, you may have a problem related to the power ON button or a related to the motherboard power management.
- Page 85 P r i m a L u c e L a b S . p . A . E A G L E L E U s e r M a n u a l LED. If it’s still blinking in a pattern of three, please check that the RAM modules have the correct voltage (in case you previously changed the ones installed as standard in the EAGLE): SODIMM DDR4 1,2V.
-
Page 86: Information To Users
The abusive disposal of the product by the user implies the application of the administrative sanctions as per D.Lgs. 152/2006. Compliance with the RAEE legislation (D.Lgs. 49/2014) PrimaLuceLab is registered to AEE Register with number IT17030000009790 PrimaLuceLab adheres to Sistema Collettivo ERP Italia for the com- pliance to RAEE legislation. p a g e 8 5... -
Page 87: Warranty
E A G L E L E U s e r M a n u a l WARRANTY 1) The PrimaLuceLab product warranty is effective from the date of purchase and is valid only if it is with the invoice (or receipt) of purchase. ...
Need help?
Do you have a question about the EAGLE LE and is the answer not in the manual?
Questions and answers