Table of Contents
Advertisement
Available languages
Available languages
Quick Links
- 1 Primo Utilizzo: Accensione E Attivazione Della Rete Wireless
- 2 Come Accedere a Eagle Core con un Dispositivo Ios (Iphone O Ipad)
- 3 Come Accedere a Eagle Core con un Dispositivo Android
- 4 Come Accedere a Eagle Core con un Pc O Mac Tramite Rete Ethernet
- 5 Prima DI Utilizzare Eagle Core: Impostare la Vostra Fotocamera
- 6 Collegamento a Macchine Fotografiche con Teleobiettivi
- Download this manual
Advertisement
Table of Contents

Subscribe to Our Youtube Channel
Related Manuals for PrimaLuceLab EAGLE CORE


Summary of Contents for PrimaLuceLab EAGLE CORE
- Page 1 EAGLE CORE e introduzione all’astrofotografia con reflex digitali and introduction to DSLR astrophotography...
-
Page 2: Table Of Contents
Come accedere a EAGLE CORE con un dispositivo iOS (iPhone o iPad) Come accedere a EAGLE CORE con un dispositivo Android Come accedere a EAGLE CORE con un PC o Mac tramite rete Ethernet Prima di utilizzare EAGLE CORE: impostare la vostra fotocamera 10 EagleApp: l’interfaccia di controllo di EAGLE CORE... - Page 3 ITALIANO Grazie per aver acquistato EAGLE CORE, l’unità di controllo wireless che rende l’astrofotografia con le reflex digitali facile e veloce. Nella prima parte di questo manuale troverete tutte le spiegazioni su come usare EAGLE CORE. Nella seconda parte troverete una guida su come iniziare a fare astrofotografia utilizzando EAGLE CORE con telescopi e obiettivi fotografici.
-
Page 4: Contenuto Della Confezione E Identificazione Delle Parti
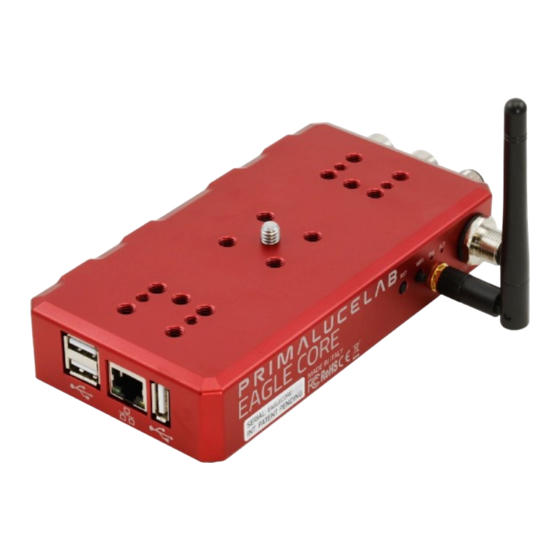
Contenuto della confezione e identificazione delle parti 1) Unità di controllo EAGLE CORE 2) Cavo di alimentazione per presa accendisigari - lunghezza 200cm 3) 4 viti M6x12, 4 viti M6x8, 4 viti M5x12 4) Manuale d'uso I numeri indicano il nome del componente sotto elencato. Leggere i paragrafi successivi per i dettagli sul funzionamento. -
Page 5: Primo Utilizzo: Accensione E Attivazione Della Rete Wireless
Primo utilizzo: accensione e attivazione della rete wireless L’unità di controllo EAGLE CORE è progettata per essere comandata da un dispositivo esterno (non incluso nella confezione). Potete utilizzare un qualsiasi dispositivo mobile (tablet o smartphone) con qualsiasi sistema operativo (iOS, Android o Windows Mobile) o da un altro computer (Windows o Mac). - Page 6 Wi-Fi per comandare EAGLE CORE. Una volta alimentato, EAGLE CORE avvia EAGLE OS e crea una rete Wi-Fi alla quale è possibile accedere con uno smartphone, tablet o un computer. Per sicurezza ogni dispositivo EAGLE CORE crea una rete WiFi diversa dagli altri EAGLE CORE, mentre la password di accesso è...
-
Page 7: Come Accedere A Eagle Core Con Un Dispositivo Ios (Iphone O Ipad)
Come accedere a EAGLE CORE con un dispositivo iOS (iPhone o iPad) Se utilizzate un dispositivo iOS come iPhone o iPad, per prima cosa dovete accedere alle impostazioni del dispositivo, attivare il Wi-Fi e selezionare la rete eaglecorexxxx (il nome della rete dipende dal numero seriale di EAGLE CORE ed è... -
Page 8: Come Accedere A Eagle Core Con Un Dispositivo Android
Come accedere a EAGLE CORE con un dispositivo Android Se utilizzate un dispositivo Android, dovete accedere alle impostazioni, attivare il Wi-Fi e selezionare la rete eaglecorexxxx (il nome della rete dipende dal numero seriale di EAGLE CORE ed è riportato sull’etichetta bianca all’esterno di... -
Page 9: Come Accedere A Eagle Core Con Un Pc O Mac Tramite Rete Ethernet
" Potete accedere a EAGLE CORE anche tramite cavo di rete. Collegate un cavo di rete dal computer (PC o Mac) ad EAGLE CORE ed aprire il browser del vostro computer. Ora digitare l’indirizzo 192.168.0.250, premete il bottone ENTER della... -
Page 10: Prima Di Utilizzare Eagle Core: Impostare La Vostra Fotocamera
EagleApp: l’interfaccia di controllo di EAGLE CORE L’interfaccia di controllo di EAGLE CORE, EagleApp, è stata creata per un utilizzo in modalità touch, (come fate solitamente con i tablet o gli smartphone): con un semplice “Tap” su un’icona di EagleApp, EAGLE CORE esegue una funzione o presenta un menu diverso. -
Page 11: Il Tab "Guiding
Qui è possibile impostare il tempo di posa, il guadagno della camera di guida, eseguire la calibrazione e fare partire l’autoguida. Per maggiori informazioni su come eseguire l’autoguida con EAGLE CORE, leggere il paragrafo “Attivare l’autoguida” a pagina 41. " Il tab “Acquisition”... -
Page 12: Le Impostazioni Avanzate Di Eagle Core
Selezionando “Advanced settings” visualizzate le impostazioni di scelta della camera di guida; di default in EAGLE CORE è impostata come camera di guida il simulatore, in questa finestra è invece possibile selezionare la camera di guida utilizzata (ad esempio la QHY5L-II o la Lodestar). -
Page 13: Le Impostazioni Di Sesto Senso
Le impostazioni di SESTO SENSO ATTENZIONE: è necessario che sia il firmware di SESTO SENSO che EAGLE CORE siano aggiornati alla versione 2.0 o successive. Prima di proseguire con la calibrazione di SESTO SENSO è necessario installarlo sul proprio telescopio seguendo le istruzioni nel manuale di SESTO SENSO. - Page 14 Premete Ok e la calibrazione di SESTO SENSO è terminata. ATTENZIONE: non sconnettere mai il cavo USB o di alimentazione tra EAGLE CORE e SESTO SENSO mentre il LED “ACT” è acceso, spegnere SEMPRE EAGLE CORE utilizzando il pulsante di spegnimento ed attendere che il led “ACT” sia spento prima di togliere l’alimentazione ad EAGLE CORE.
-
Page 15: Modificare La Password Di Accesso Di Eagle Core
“eaglecore”. Non è possibile modificare il nome della rete WiFi creata da EAGLE CORE, in quanto ogni EAGLE CORE ha una sua rete univoca (per evitare sovrapposizioni quando ci sono più EAGLE CORE accesi nello stesso momento). Per modificare la password è... -
Page 16: Aggiornare Eagle Core
LED ACT si riaccende per segnalare la riuscita della procedura e la creazione della rete Wi-Fi. ATTENZIONE: - se utilizzate un dispositivo iOS, notate che l’aggiornamento di EAGLE CORE può essere effettuato con dispositivi dotati di sistema operativo iOS almeno versione iOS11. -
Page 17: Collegamento A Macchine Fotografiche Con Teleobiettivi
ATTENZIONE: per collegare EAGLE CORE ad altri elementi meccanici PLUS non utilizzare viti più lunghe di M6x12 e M5x12. In caso contrario le viti potrebbero toccare gli elementi interni di EAGLE CORE e potrebbero portare a rotture o malfunzionamenti. Le viti vengono fornite con EAGLE CORE. - Page 18 PLUS da 80mm lateralmente a EAGLE CORE tramite gli spessori (opzionali) e le viti M5X40 (opzionali). Attenzione: per evitare flessioni il telescopio di guida non deve superare i 3 Kg di peso. Per installare la camera al di sopra di EAGLE CORE avete due possibilità: A.
- Page 19 1) Vite M6x12 2) Barra Vixen o Losmandy PLUS 3) Morsetto PLUS Vixen/Losmandy 4) Anelli di guida PLUS da 80mm con distanziali 5) Telescopio guida 60mm 6) Barra Vixen PLUS 90mm...
-
Page 20: Collegamento A Telescopi Dotati Di Anelli Di Supporto Plus (Spaziati Fino A 12Cm)
Per utilizzare EAGLE CORE in questa configurazione, inserite 2 viti M6x12 in ciascun anello PLUS (2 viti per ogni anello) e fissate così EAGLE CORE. Quindi, se volete utilizzare un telescopio di guida in parallelo, potete fissare gli anelli di guida PLUS... -
Page 21: Collegamento A Telescopi Dotati Di Anelli Di Supporto Plus (Spaziati Più Di 12Cm)
Collegamento a telescopi dotati di anelli di supporto PLUS (spaziati più di 12cm). Se volete utilizzare EAGLE CORE con telescopi dotati di anelli PLUS spaziati maggiormente di 12 cm, è possibile posizionare EAGLE CORE sopra agli anelli di supporto per sostenere un compatto telescopio in parallelo. Per farlo dovrete però... -
Page 22: Collegamento A Telescopi Non Dotati Di Anelli Plus
Nel caso in cui il vostro telescopio non sia dotato di anelli di supporto PLUS, è sufficiente aggiungere il “Morsetto Vixen+Losmandy PLUS” che viene avvitato direttamente a EAGLE CORE per consentire di collegare a qualsiasi piastra Vixen o Losmandy anche di marca diversa. -
Page 23: Alimentare Altri Strumenti Attraverso Eagle Core
Alimentare altri strumenti attraverso EAGLE CORE EAGLE CORE incorpora un bridge di alimentazione a cui è possibile collegare fino a 3 strumenti come montatura, camera e focheggiatore elettronico, evitando la necessità di altre fonti di alimentazione e riducendo il numero e lunghezza dei cavi. - Page 24 Se la vostra periferica richiede più corrente di quella distribuita da EAGLE CORE, il fusibile blocca la porta (è un sistema di protezione per evitare sbalzi di corrente che potrebbero danneggiare lo strumento collegato).
- Page 25 3) INFINE scollegate i cavi di alimentazione dalle “3 uscite di alimentazione 12V” di EAGLE CORE Se per qualche motivo non si riesce più ad accedere ad EAGLE CORE tramite Wi-Fi è possibile effettuare un riavvio della rete Wi-Fi tendendo premuto il pulsante Wi-Fi su EAGLE CORE per circa 10”.
-
Page 27: Domande E Risposte
EAGLE CORE scarica l’ultima immagine acquisita in formato jpg e la mostra durante il processo di acquisizione. D: posso installare in EAGLE CORE altro software? R: No: EAGLE CORE dispone di un sistema operativo EAGLE OS, con già installati... -
Page 28: Astrofotografia Con Teleobiettivo O Telescopio
D: posso collegare EAGLE a internet? R: Non è possibile utilizzare EAGLE CORE per accedere ad internet: EAGLE CORE crea una rete Wi-Fi che va utilizzata per il suo controllo tramite dispositivi esterni. -
Page 29: Accessori Consigliati Per Eagle Core
Accessori consigliati per EAGLE CORE QHYCCD camera QHY5L-II Telescopio guida 60mm Morsetto Vixen+Losmandy PLUS monocromatica (PLLMORVLP) CompactGuide (PLLCG60) (QHY5L-II-M) Alimentatore di rete 12V per Cavi di alimentazione Eagle Anelli di guida PLUS 80mm Eagle - 5A per reflex digitali Canon EOS... -
Page 30: La Montatura E L'inseguimento Degli Oggetti In Cielo
Lo smaltimento abusivo del prodotto da parte dell’utente comporta l’applicazione delle sanzioni amministrative di cui al D.Lgs. 152/2006. Conformità alla normativa RAEE (D.Lgs. 49/2014) PrimaLuceLab è iscritta al Registro AEE con numero IT17030000009790 PrimaLuceLab aderisce al Sistema Collettivo ERP Italia... - Page 31 Scope of delivery and parts identifications First use: power on and wireless network activation How to connect to EAGLE CORE using an iOS device (iPhone or iPad) How to connect to EAGLE CORE using an Android device 68 How to connect to EAGLE CORE with a PC or Mac...
- Page 32 DSLR cameras. In the first part of this manual you will find all the explanations on how to use EAGLE CORE. In the second part you will find a guide on how to start astrophotography using EAGLE CORE with telescopes and photo lenses.
- Page 33 Scope of delivery and parts identifications 1) EAGLE CORE control unit 2) Power cable with cigarette plug for Eagle (length 200cm) 3) 4 M6x12 screws, 4 M6x8 screws, 4 M5x12 screws 4) User manual The numbers indicate the name of the component listed below. Read the following paragraphs for details on operation.
- Page 34 Eagle - 200cm“ included in the package (image 3). This way you can power the EAGLE CORE using 12V field battery with cigarette plug. If you want to power it with a wall plug, you can use the optional “AC adapter for...
-
Page 35: Prima Di Iniziare A Fotografare: Inquinamento Luminoso E Alimentazione
After more or less 40 seconds EAGLE CORE emits a sound and the “ACT” LED will turn on, this means the WiFi connection is active and you can use your WiFi device to control EAGLE CORE. Once powered, EAGLE CORE starts EAGLE OS and creates a Wi-Fi network that can be accessed with a smartphone, tablet, or computer. -
Page 36: Iniziare A Fotografare, Guida Passo Passo
How to connect to EAGLE CORE using an iOS device (iPhone or iPad) If you are using any iOS device like iPhone or iPad, first of all you need to access the device settings, activate Wi-Fi, and select the eaglecorexxxx network (the name of the network depends on the serial number of EAGLE CORE and it’s printed on the white label... - Page 37 How to connect to EAGLE CORE using an Android device If you use an Android device, you need to access the settings, activate Wi-Fi and select the eaglecorexxxx network (the name of the network depends on the serial number of EAGLE CORE and is printed on the white label EAGLE CORE case, in this case Eaglecore005).
- Page 38 How to connect to EAGLE CORE with a PC or Mac You can connect to EAGLE CORE and then use EagleApp also from a Windows or Mac computer. You need to access the settings of your computer, activate Wi-Fi and select the eaglecorexxxx network. When prompted, enter "eaglecore" as the default password, and then press the "Sign In".
-
Page 39: Passo 2: Allineare La Montatura Alle Stelle
- Set your camera to manual mode "M" or, if present, in "B" mode (based on your camera model). - Using the USB cable of the camera, connect it to one of the EAGLE CORE USB ports. - Check the battery of your camera is charged (we recommend using "Eagle- compatible power cable for Canon EOS and Nikon DSLR camera”). -
Page 40: Passo 3: Puntare L'oggetto Da Fotografare
Here you can set the exposition time, gain, calibrate and start the autoguide. For more information on how to autoguide with EAGLE CORE, read "Start the autoguide" on page 101. “Acquisition” tab In the "Acquisition" tab you can set the capture parameters and manages all the operations of the camera used (focus and capture images). -
Page 41: Passo 5: Attivare L'autoguida
With a "Tap" on "Advanced settings", you access the guide camera selection; by default in EAGLE CORE the simulator is set as default, in this window you can select the guide camera used (eg QHY5L-II or Lodestar). - Page 42 SESTO SENSO settings ATTENTION: it is necessary that both SESTO SENSO and EAGLE CORE firmwares are updated to version 2.0 or later. Before continuing with the SESTO SENSO calibration it is necessary to install it on your telescope following the instructions in the SESTO SENSO manual.
- Page 43 WARNING: never disconnect the USB or power cable between the EAGLE CORE and SESTO SENSO while the "ACT" LED is on, ALWAYS turn off EAGLE CORE by using the off button and wait until the "ACT" LED is off before removing the power to EAGLE CORE.
-
Page 44: Passo 6: Impostazioni Avanzate Di Autoguida (Opzionali)
WARNING: If we changed to the wrong password or we forgot it, we need to connect to EAGLE CORE using a network cable connection and a computer, then we would be able to change the password. We suggest not to change the password on the field while we use the telescope to avoid any problem. - Page 45 EAGLE CORE will amit a sound and the ACT LED will turn on to confirm update and WiFi network creation. WARNING: - if you have an iOS device, please note EAGLE CORE update can be performed on devices with iOS operative system at least iOS11 version.
- Page 46 PLUS elements or with different instruments, or using the telephoto lens of your camera. WARNING: in order to connect EAGLE CORE to other PLUS mechanical elements, do not use longer screws than M6x12 and M5x12. Otherwise, the screws could touch the EAGLE CORE internal elements and could lead to breaks or malfunctions.
-
Page 47: Passo 7: Riprendere Le Immagini Con La Reflex Digitale
EAGLE CORE using the optional spacers and the M5X40 screws (optional). Warning: in order to avoid any flexure, the guide telescope must not exceed 3 Kg weight. In order to install the camera above EAGLE CORE you have two options: S c r e w... - Page 48 1) M6x12 screw 2) Vixen or Losmandy bar 3) Vixen/Losmandy PLUS dovetail clamp 4) 80mm PLUS guide rings with spacers 5) 60mm guide telescope 6) 80mm Vixen PLUS bar...
- Page 49 In order to use EAGLE CORE in this configuration, insert 2 M6x12 screws into each PLUS ring (2 screws for every ring) and fasten EAGLE CORE. So if you want to use a guide telescope in parallel, you can fasten the PLUS guide rings to the top of EAGLE...
-
Page 50: Comandare La Montatura Skywatcher, Orion O Altre Con Eagle Core E Skyfi
Connection to telescopes with PLUS support rings (spaced more than 12cm) If you want to use EAGLE CORE with telescopes with PLUS rings spaced more than 12 cm, you can place EAGLE CORE above the support rings to support a compact telescope in parallel. - Page 51 Connection to telescopes without PLUS support rings If your telescope does not have PLUS support rings, just add the “PLUS Vixen+Losmandy dovetail clamp" and screw it directly to EAGLE CORE to allow you to connect it any Vixen or Losmandy dovetail bar.
- Page 52 Power other instruments through EAGLE CORE EAGLE CORE incorporates a power bridge that can be used to connect up to 3 instruments such as mount, camera and electronic focuser avoiding the need for other power supply sources and reducing the number and length of cables. Through a special internal board, EAGLE CORE distributes 12V power to the 3 ports to which the various devices are connected via the optional cables.
- Page 53 WARNING: the power OUT ports of the EAGLE CORE depends on the power supply or the battery connected to the power IN port of EAGLE CORE. Since various astronomy instruments require strictly 12V fixed power supply, you need to check that your power source supplies a stable 12V voltage.
- Page 54 If this function does not work, it is possible to press the reset button RST, in this case EAGLE CORE is forced to restart, while all the devices powered by EAGLE CORE remain powered.
- Page 56 DSLR cameras. D: can I connect EAGLE CORE to the internet? R: You can not use EAGLE CORE to access the Internet: EAGLE CORE creates a Wi-Fi network to be used for its control using external devices.
- Page 57 Recommended accessories for EAGLE CORE 60mm CompactGuide guide QHYCCD QHY5L-II mono PLUS Vixen+Losmandy dovetail clamp (PLLMORVLP) scope (PLLCG60) camera (QHY5L-II-M) Eagle-compatible power cable PLUS 80mm guide rings AC adapter for Eagle - 5A for Canon EOS and Nikon (PLLANGU80P) (PL1000025)
- Page 58 The abusive disposal of the product by the user implies the application of the administrative sanctions as per D.Lgs. 152/2006. Compliance with the RAEE legislation (D.Lgs. 49/2014) PrimaLuceLab is registered to AEE Register with number IT17030000009790 PrimaLuceLab adheres to Sistema Collettivo ERP Italia for the compliance to RAEE legislation.
Need help?
Do you have a question about the EAGLE CORE and is the answer not in the manual?
Questions and answers