Advertisement
Quick Links
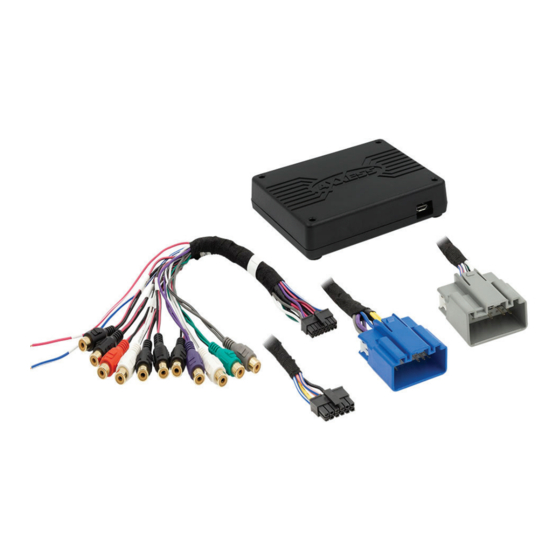
INTERFACE COMPONENTS
• AXDSPX-A2B1 interface
• AXDSPX-A2B1 harness
• AXDSPX-A2B1 interface harness (male connectors: 12-pin, 16-pin)
• Amplifier bypass harness (female connectors: 16-pin, 16-pin)
• AXBK-1
APPLICATIONS
Ford
Escape
2017
Fusion
AxxessInterfaces.com
Ford A2B Data Interface with Amplifier
Bypass Harness & DSP 2017
INTERFACE FEATURES
• Designed for Sony A2B
amplifiers
• A2B data interface with AXDSP-X
(digital signal processor) built-in
• Includes an amplifier bypass
harness
• Retains factory chimes including
parking sensor chimes
2017
© COPYRIGHT 2020 METRA ELECTRONICS CORPORATION
AXDSPX-A2B1
I N S TA L L AT I O N I N S T R U C T I O N S
TABLE OF CONTENTS
Connections ............................................................2
Installation .............................................................3
Troubleshooting .....................................................4
• Retains SYNC voice prompts
• All chimes/voice prompts
go through the aftermarket
amplifier and/or cluster
• Adjustable chime level
TOOLS REQUIRED
• Micro-B USB updatable
• Crimping tool and connectors, or solder gun,
• Zip ties
Product Info
solder, and heat shrink • Tape • Wire cutter
REV. 1/29/20 INSTAXDSPX-A2B1
Advertisement

Related Manuals for Axxess AXDSPX-A2B1


Summary of Contents for Axxess AXDSPX-A2B1
- Page 1 • Tape • Wire cutter INTERFACE COMPONENTS • Zip ties • AXDSPX-A2B1 interface • AXDSPX-A2B1 harness • AXDSPX-A2B1 interface harness (male connectors: 12-pin, 16-pin) Product Info • Amplifier bypass harness (female connectors: 16-pin, 16-pin) • AXBK-1 APPLICATIONS Ford...
- Page 2 CONNECTIONS Factory Amp Harness RCA Jacks (sold separately) Gray - Front Right + Purple - Rear Right + Gray/Black - Front Right - Purple/Black - Rear Right - White - Front Left + Green - Rear Left + White/Black - Front Left - Green/Black - Rear Left - Factory Amp (must be removed)
- Page 3 7. Connect the amp turn-on wire from the AXDSPX-A2B1 harness. 8. Click the Identify button to confirm that the AXDSPX-A2B1 is connected properly. If so, a chime will be heard from the front left speaker or gauge cluster. Test all functions of the installation for proper operation.
- Page 4 Contact our Tech Support line at: 386-257-1187 • If the Red light in the AXDSPX-A2B1 interface is blinking, it is not communicating to the vehicle. Remove the key from the Or via email at: ignition, unplug the connectors from the interface, then inspect all connections made. If everything is proper, connect the techsupport@metra-autosound.com...
Need help?
Do you have a question about the AXDSPX-A2B1 and is the answer not in the manual?
Questions and answers