Advertisement
Quick Links
APPLICATIONS
Visit axxessinterfaces.com for current application list
AxxessInterfaces.com
Honda DSP Interface With Amp Bypass Harness
2016-Up
INTERFACE FEATURES
• Includes a DSP (Digital Signal Processor)
• 31 Band graphic EQ
• 10 individually assignable outputs
• Independent equalization on each of the 10 outputs
• Independent high pass, low pass, and bandpass filters
• Each channel can be delayed independently up to 10ms
• Clipping detection and limiting circuits
• Designed for amplified models
• Includes an amp bypass harness
• Retains level control of subwoofer through the factory radio
• Settings adjusted via Bluetooth
in a smart device application (tablet
®
or mobile phone), compatible with both Android and Apple devices
• Read, write, and store configurations for future recall
• Password protect feature available in the mobile app
• Micro-B USB updatable
© COPYRIGHT 2020 METRA ELECTRONICS CORPORATION
AXDSPX-HN3
I N S T A L L A T I O N I N S T R U C T I O N S
TABLE OF CONTENTS
Connections ............................................................2
Installation .............................................................3
Mobile App ........................................................4-12
Specifications ........................................................13
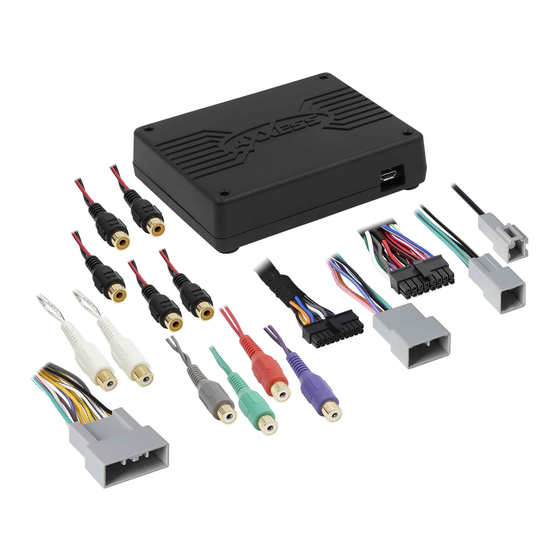
INTERFACE COMPONENTS
• AXDSPX-HN3 interface
• AXDSPX-HN3 interface harness
• AXDSPX-HN3 amp bypass harness
TOOLS & INSTALLATION ACCESSORIES REQUIRED
• Crimping tool and connectors, or solder gun,
solder, and heat shrink • Tape • Wire cutter
• Zip ties • Multimeter
Apple App Store
Google Play Store
iOS 12.1 or higher
REV. 8/3/20 INSTAXDSPX-HN3
Advertisement

Related Manuals for Axxess AXDSPX-HN3


Summary of Contents for Axxess AXDSPX-HN3
- Page 1 • AXDSPX-HN3 interface • AXDSPX-HN3 interface harness • Independent equalization on each of the 10 outputs • AXDSPX-HN3 amp bypass harness • Independent high pass, low pass, and bandpass filters • Each channel can be delayed independently up to 10ms TOOLS & INSTALLATION ACCESSORIES REQUIRED...
-
Page 2: Connections
CONNECTIONS Factory Amp RCA Jacks White / Front Left Woofer + (sold separately) White/Black / Front Left Woofer - Gray / Front Right Woofer + Gray/Black Front Right Woofer - Green / Rear Left Woofer + Green/Black / Rear Left Woofer - Purple / Rear Right Woofer + Purple/Black / Rear Right Woofer - Yellow/Blue / Front Left Tweeter +... -
Page 3: Installation
INSTALLATION 1. Locate the factory amp in the passenger side kick panel. Unplug and remove the amp. 2. Install the AX-DSPX-HN3 harness to the vehicle and make all necessary connections, but leave the amp turn-on wire disconnected. 3. Connect the AX-DSPX-HN3 harness to the AX-DSPX-HN3 interface. 4. -
Page 4: Mobile App
MOBILE APP Setup Instructions • General information tab for installing the interface. Continued on the next page... - Page 5 MOBILE APP (CONT.) Bluetooth Connection • Scan - Press this button to start the Bluetooth pairing process, then select the interface • Disconnect - Disconnects the interface from the app. once it is found. “Connected” will appear in the top left corner of the app once paired. Note: The ignition must be cycled on during this process.
- Page 6 MOBILE APP (CONT.) Configuration • Identify - Click this button to send a test tone to the front left speaker. • Recall Configuration - Recalls a configuration from the mobile device. • Reset to Defaults - Resets the interface to factory settings. During the reset process the amp(s) •...
- Page 7 MOBILE APP (CONT.) Outputs Output Channels • Location - Location of speaker. • Invert - Will invert the phase of the speaker. • Group - Used to join channels together for simple equalization. Example, left • Mute - Will mute desired channel(s) for tuning individual channels. front woofer/midrange and left front tweeter will be considered simply left front.
- Page 8 MOBILE APP (CONT.) Crossover Adjust • If installing a subwoofer, the front and rear outputs will default to a 100Hz high pass filter to keep the low frequency signals out. If a subwoofer is not being installed, change the front and rear crossover points down to 20Hz for a full range signal, or to the lowest frequency the speakers will play down to.
- Page 9 MOBILE APP (CONT.) Equalizer Adjust • All channels can be adjusted independently within this tab with 31 bands of available equalization. It is best to tune this by using an RTA (Real Time Analyzer). • The Gain slider on the far left is for the channel selected. Continued on the next page REV.
- Page 10 MOBILE APP (CONT.) Delay Adjust • Allows a delay of each channel. If a delay is desired, first measure the distance (in inches) from each speaker to the listening position, then enter those values to the corresponding speaker. Add (in inches) to the desired speaker to delay it.
- Page 11 MOBILE APP (CONT.) Inputs/Levels • Chime Volume - Not applicable in this application. • Amp Turn On • Signal Sense - Will turn the amp(s) on when an audio signal is detected, and keep on for • Clipping Level - Use this feature to protect sensitive speakers like tweeters from 10 seconds after the last signal.
- Page 12 MOBILE APP (CONT.) Locking Down Data Last and the most important. You must lock down your configuration and cycle the key!!!
-
Page 13: Specifications
SPECIFICATIONS Input Impedance 1M Ohm Operating Voltage 10-16 volts DC Input Channels Standby Current Draw Input Options High Level or Low Level Operation Current Draw 150mA Input Type Differential balanced Adjustments/Controls Application via Bluetooth Input Voltage 0 - 28-volts (peak-to-peak) Remote Output 12 volts DC (signal sense (high level range) - Page 15 REV. 8/3/2020 INSTAXDSPX-HN3...
- Page 16 AXDSPX-HN3 I N S T A L L A T I O N I N S T R U C T I O N S Having difficulties? We’re here to help. Contact our Tech Support line at: 386-257-1187 Or via email at: techsupport@metra-autosound.com...
Need help?
Do you have a question about the AXDSPX-HN3 and is the answer not in the manual?
Questions and answers