Table of Contents
Advertisement
Quick Links
Advertisement
Table of Contents

Related Manuals for Summit to Sea GRAND DIVE VERTICAL


Summary of Contents for Summit to Sea GRAND DIVE VERTICAL
- Page 1 GRAND DIVE VERTICAL ————--...
- Page 2 Congratulations on choosing one of the most innovative and safe hyperbaric chambers. In addition to this manual we have an easy to follow instructional video available https://www.summit-to-sea.com/instructions Scroll down to Instruction Videos and click on “Grand Dive Vertical”...
- Page 3 Our patented designs are like no other on the market. Now that you have all the equipment to begin your treatments it is extremely important to watch this entire video and read the manual that was included on a thumb drive in your packet before operating your chamber.
-
Page 4: Safety First
SAFETY FIRST Safety is one of our main priorities at Summit to Sea. It is our policy and practice to extensively test all of our chambers to ensure that Summit to Sea chambers have the highest quality, comfort, and safety. - Page 5 SAFETY FIRST Dual Compressor System For safety Summit to Sea has multiple redundant systems and components. One of these is the dual compressor system. In the event one of the compressors fails you would still receive ample fresh air delivered into the chamber allowing you to deflate the chamber and safely exit.
-
Page 6: Pressure Relief Valves
SAFETY FIRST Pressure Relief Valves Your chamber also has dual air relief valves. When you are at full pressure air will release from the blue valves. Your gauge needle should be in the blue range. The yellow valve is a safety back up valve set at a slightly higher pressure which acts as a safety backup valve. - Page 7 SAFETY FIRST Zipper stress relief system (buckles) It is very important that when operating the chamber all belts are buckled and both zippers are completely closed. The belts reduce stress on the zippers extending their life.
- Page 8 SAFETY FIRST Failed Circuit Alarm Summit to Sea is the only company in the mild hyperbaric industry whose chamber system will alert you to a power outage. In the event that there is a power outage which would prevent the compressors from supplying fresh air into the chamber the user would be alerted with a loud alarm.
- Page 9 COMPLIANCE Our hyperbaric chambers are Class II medical devices cleared by the FDA requiring a prescription. As we are constantly developing new technology to improve our chambers, there may be a photo or video footage that doesn’t quite match your chamber.
-
Page 10: What Is Included
WHAT IS INCLUDED Chamber with carry bag and two cradles In the OPEN ME FIRST BOX Silicone and Zipper cleaner Auxiliary Valve Thumb drive with set up instructions Failed Circuit Alarm Frame Floor system Carpet 2 Compressors... -
Page 11: Online Manual
ONLINE MANUAL If you ever misplace this thumb drive you can log on to: www.summit-to-sea.com/instructions to find you chamber’s manual. - Page 12 OVERVIEW 1. Connecting the compressors 2. Use of Summit to Sea’s unique zipper system 3. Connecting the chamber to the floor 4. Frame installation 5. Carpet installation 6. Inserting chair or other furniture...
- Page 13 SET UP Now it is time to connect the compressors to the electrical outlet Please note that some wall sockets are configured so that one of the outlets is connected to a light switch. If so, make sure the failed circuit alarm is not plugged into the socket controlled by the light switch.
- Page 14 SET UP The following diagrams will describe several options for connecting your compressors to the electric wall outlet. Using a power strip Using a remote switch Using both the power strip and remote switch Directly connecting the compressors to the wall outlets...
- Page 15 SET UP USING A POWER STRIP Plug the circuit alarm into the wall outlet. Next plug the power strip into the back of the circuit alarm plug. Now you can plug your compressors into the power strip. CIRCUIT ALARM POWER STRIP ...
- Page 16 SET UP USING A REMOTE SWITCH Plug the circuit alarm into the wall outlet. Next plug the remote into the back of the circuit alarm plug. Now you can plug your compressors into the remote. CIRCUIT ALARM REMOTE IF USING AN COMPRESSOR COMPRESSOR ACCESSORY...
- Page 17 SET UP USING BOTH THE POWER STRIP AND REMOTE SWITCH Plug the circuit alarm into the wall outlet. Next plug the remote into the back of the circuit alarm plug. Now you can plug your compressors into the remote. CIRCUIT ...
- Page 18 SET UP COMPRESSORS CONNECTED TO THE WALL OUTLET Plug the circuit alarm into the wall outlet. Next plug one of the compressors into the back of the circuit alarm plug. Then plug the second compressor into the other wall outlet. ...
- Page 19 SET UP Now you will connect the floor to the chamber. The first thing you will do is to check to make sure all the velcro pieces attached to the floor cover are securely fastened to the stabilizer ring. Then place the floor on the ground with the “This Side Up”...
- Page 20 SET UP Next you will remove the chamber from its carry bag and place it on top of the floor. This Side Up...
- Page 21 floor to the chamber. We want to explain our unique zipper system. Summit to Sea is the only manufacturer that provides a two zipper combination, one internal air tight zipper and one external mechanical zipper. This allows for a fast and efficient means of closing and sealing the...
- Page 22 SET UP To inflate the chamber to shape you will need to do the following: Close the internal and external zippers Close the red air release valve Connect the compressor hoses to the chamber and turn on the compressors This Side Up...
- Page 23 SET UP It is important that your buckles are connected when closing both internal and external zippers. This allows for each side of the zipper teeth to line up and makes it easier to zip. It also takes the stress off of the zipper teeth extending the life of your zipper.
- Page 24 SET UP First close the internal zipper. Notice that the internal zipper has a dock at the top end. When you fully close the internal zipper into the dock an air tight seal is created. This Side Up...
- Page 25 SET UP The picture on the left shows the slider completely closed into the dock. If it is not completely closed the chamber will not fully pressurize. RIGHT WRONG...
- Page 26 SET UP Next close the external zipper. To be sure it is fully closed, pull the zipper string through the safety strap. You will not see the slider when it is fully closed.
- Page 27 SET UP Now that you have both zippers completely closed make sure the red knob on the dump valve is in the closed position.
- Page 28 SET UP Connect the compressor hoses to the chamber. These fill valve connectors are located to the right of the zippers. It is recommended to put a small dot of silicone lubricant on the O ring on the end of each fill valve connector.
- Page 29 SET UP Once the chamber is soft and to shape turn off the compressors so there is plenty of slack to buckle the belts. If the belts are too tight to connect open the red knob to release pressure. Buckle all 8 buckles at the base of the chamber.
- Page 30 SET UP Once you have the chamber centered on the floor and all the buckles connected turn the compressors on to inflate the chamber to full pressure. Your chamber should look like this. If your chamber is tilting it is because it is not centered. Turn the red knob to partially deflate so that you can recenter the chamber.
- Page 31 SET UP Now that you have the floor connected to the chamber you will want to deflate the chamber so that you can build the frame inside. Turn off the compressors and turn the red knob to release the pressure. When the gauge reads zero you can unzip the external and internal zippers.
- Page 32 SET UP BUILDING THE FRAME It is a good idea to practice building the frame outside of the chamber first so you understand how it should look when inside the chamber. It is best if someone gets inside the deflated chamber with the individual pieces which consists of 2 rings, 3 poles and the round carpet.
- Page 33 SET UP The frame consists of a white top ring, a black bottom ring and 3 poles. Use the screwdriver included in your packet to connect the bottom ring.
- Page 34 SET UP Place each pole into the Ts on the black ring. Place the top ring onto the three poles.
- Page 35 SET UP Your frame will look like this after it is built inside the chamber. Someone will need to hand the chamber pieces to the person inside. Once the chamber is inflated you will put the frame together.
- Page 36 SET UP Once the frame is built inside with the carpet you can turn the red knob to release the air and deflate the chamber. Again, do not open the zippers unless the gauge reads zero.
- Page 37 SET UP Now that you have finished setting up the chamber you will want to chose a chair to be placed inside. Please make sure that you do not damage the zippers when trying to get the chair inside. Usually it is best to place the chair on its side and slide the bottom of the chair through the middle of the zipper at the widest opening.
- Page 38 SET UP Some suggestions for chairs are a comfortable office chair, a padded chair, or even a foldable camping chair with a cup holder. If you have smaller children you might consider just putting a comfortable bean bag inside.
- Page 39 CONGRATULATIONS Congratulations you have successfully set up your chamber. Now we would like to give you a more detailed explanation of the individual components on your chamber and their function.
-
Page 40: Pressure Relief Valves
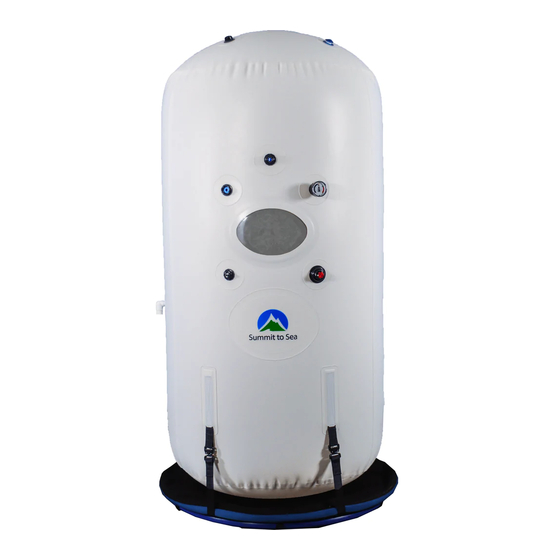
COMPONENTS Pressure Relief Valves There are two pressure relief valves with blue circles. These are designed and factory calibrated to equalize the pressure at 1.3 ATA or 4.4 PSI One is located on top of the chamber and the other one is located above the window. - Page 41 COMPONENTS Pressure Relief Valves There is a safety backup pressure relief valve with a yellow circle which is set to open at a slightly higher pressure than the blue valves. There may be a slight venting of air which is normal. This is on the top of your chamber.
- Page 42 COMPONENTS Color coded gauge Next you will see the color coded gauge. The needle will start at the bottom of the black area at zero. Once the chamber is fully pressurized air will be released out of the blue pressure relief valves and the needle will appear in the blue area.
- Page 43 COMPONENTS Notice that the gauge is reading zero when you begin. It will then reach the blue section on the gauge which is 1.3 ATA. You will hear air being released from the blue pressure relief valves.
- Page 44 COMPONENTS Internal Color coded gauge There is also an internal gauge which operates similar to the exterior gauge. The only difference is the external gauge needle moves clockwise and the internal gauge needles moves counter clockwise.
-
Page 45: Fill Valves
COMPONENTS Fill Valves To the right of the zippers are two fill valves. -
Page 46: Auxiliary Valve
COMPONENTS Auxiliary Valve Next to the window is an auxiliary port where the auxiliary valve attaches. This small auxiliary valve is located in your packet along with the zipper cleaner, zipper lubricant and thumb drive. - Page 47 COMPONENTS Red Dump Valve The red knob is used to depressurize the chamber at the end of your treatment. It is designed to turn in either direction to release air from the chamber. As you turn the red knob you will notice that you have control of the speed of depressurization.
- Page 48 COMPONENTS When inflating your chamber it is important that the red knob be in the closed position so no air will release.
-
Page 49: Accessory Ports
COMPONENTS Accessory Ports There is also two additional ports, one between the two fill valves and one on the top of the chamber with black protective covers over the blue plugs. These are for additional accessories such as a cooler to be connected. -
Page 50: During Treatment
DURING TREATMENT As the chamber begins to inflate, you may notice added pressure on the ears. This feeling indicates the need to equalize the pressure. The pressure feeling is similar to that of landing in an airplane. This pressure is relieved through the Eustachian tube. There are several methods for relieving this pressure. - Page 51 DURING TREATMENT The first, is the Valsavla maneuver. Pinch your nose, close your mouth and try gently blowing out your nose. Repeat every time you begin to feel that pressure Drinking water Yawning or opening your mouth wide will also help. Lastly, chewing gum may help relieve this pressure.
- Page 52 DURING TREATMENT If these suggestions do not resolve the ear pressure, open the red relief knob until the feeling of pressure is gone. Then close the red knob to continue to pressurize the chamber. The red relief knob will allow you to control the speed of pressurization to aid in equalizing the pressure on your ears.
- Page 53 DURING TREATMENT WHAT TO WEAR You may wear any type of clothing in the chamber; however, comfortable and soft clothing is typically used. Do not wear shoes inside the chamber.
- Page 54 DURING TREATMENT WHAT TO BRING INTO THE CHAMBER Feel free to bring food, drinks, books and personal computers, or any other form of entertainment into the chamber. It may also be helpful to have your cell phone with you. We ask that you refrain from bringing in sharp objects such as forks or knives.
- Page 55 REMINDERS We hope that this manual has been helpful for you to become more familiar and comfortable when operating your chamber. It is very important to heed these few important reminders.
- Page 56 REMINDERS Make sure both the inside and the outside zippers are completely closed each time the chamber is in use. Failure to do this may result in inability to pressurize or damage the chamber.
- Page 57 REMINDERS If the relief valve does not release air when it is at full pressure, stop your treatment and call your distributor. It is important that the relief valves are clear of all obstructions inside and out during your treatment.
- Page 58 REMINDERS The compressors must remain on for the entire treatment. This ensures the circulation and exchange of fresh air to provide a safe and comfortable treatment.
- Page 59 REMINDERS Be sure both zippers are completely closed. Do not open the zipper until the gauge reads zero. Each belt must be fastened from the start of inflation to full deflation. The blue relief valve must be releasing air when the chamber is at full pressure.
- Page 60 Summit to Sea also believes that we have the best customer service of any hyperbaric chamber company on the market. We will always try our best to be available and give you prompt service.
- Page 61 CHAMBER CARE Filters It is recommended that the compressor filters are changed approximately every 6 months. To learn how to change these filters go to www.summit-to-sea.com/filters To order these replacement filters go to www.summit-to-sea.com/accessories...
- Page 62 CHAMBER CARE White Compressor Filter To see a video on how to change the filters go to www.summit-to-sea.com/filters There is a filter right under the top plate of the compressor. It is recommended that your replace the filter every 6 months.
- Page 63 CHAMBER CARE The .003 Micron Filter To see a video on how to change the filters go to www.summit-to-sea.com/filters Follow these instructions to replace this filter It is recommended that you replace the filter every 6 months. Put the black bulb Lay the compressor on its side Push the black bulb up Unscrew the silver...
- Page 64 CHAMBER CARE Resetting the Safety Switch To see a video of how to reset the safety switch go to www.summit-to-sea.com/safetyswitch First you will need to remove the compressor cover by loosening the 4 screws with a pair of pilers and then using a Philips screwdriver to remove the screws.
- Page 65 CHAMBER CARE Resetting the Safety Switch If the safety switch has been tripped you will see this little red button. Move the white switch to the center of the compartment.
- Page 66 CHAMBER CARE On occasion the inside airtight zipper requires Tzip silicone lubricant.The chamber comes with this Tzip silicone to lubricate the docks where the zipper triggers are secured. It is necessary to keep this dock lubricated. Squeeze a small amount of the silicone onto your finger and spread it out on the dock.
- Page 67 CHAMBER CARE ZIPPERS The outside zipper requires very little maintenance. A bottle of zipper cleaner lubricant has been included in your packet to use on a monthly basis. Periodically, wipe the outside open zipper with a damp cloth.
- Page 68 CHAMBER CARE CLEANING THE CHAMBER There is no maintenance needed other than cleaning with a non-petroleum based household cleaner. An anti-bacterial cloth has been included with your chamber. To order these cloths go to www.summit-to-sea.com/accessories FITTINGS & HOSES Regularly check the fittings and hoses for cracks or damage. If you see any damage, call your distributor for a replacement part.
- Page 69 CHAMBER CARE STORAGE Prior to storing the chamber, ensure that it has been cleaned inside and out by using a non-petroleum based household cleaner. Carefully fold the chamber ensuring all gauges and fittings are protected with bubble wrap or a similar material. Place the chamber in the carry case and store in a dry area between 40 and 80 degrees.
-
Page 70: Warranty
Summit to Sea has always and will continue to cover all components on our chambers — including zipper, windows, seams, valves, hoses... in other words, if it came from Summit to Sea we will stand behind our product. -
Page 71: Extended Warranty
EXTENDED WARRANTY Extended warranties are available for purchase anytime within the two year warranty period. The extended warranties also cover all components on the chamber — including zipper, windows, seams, valves, hoses, etc. Contact your distributor. 1 Year Extended warranty $950 2 Year Extended warranty $1,200 3 Year Extended warranty $1,450... -
Page 72: Troubleshooting
TROUBLESHOOTING COMPRESSOR DOES NOT TURN ON Try another appliance (i.e. lamp) in the same outlet If the appliance does not work use a different outlet or call an electrician. If the appliance does work see a short video on resetting the safety switch To order these replacement filters go to www.summit-to-sea.com/filters... - Page 73 TROUBLESHOOTING CHAMBER IS NOT GETTING TO PRESSURE Double check the inside zipper to make sure both ends of the zipper are completely sealed and placed inside the dock. If your chamber is not getting to full pressure check to see if the red knob is closed and no air is escaping.
- Page 74 TROUBLESHOOTING It is highly recommended to watch the video several times. Also, anyone else who may be operating the chamber needs to watch this video. By doing this it will ensure a safe environment for all who will be benefiting from the use of the chamber. Remember, if you have any questions regarding the operation of your chamber please do not hesitate to call your distributor.
-
Page 75: Important To Read
IMPORTANT TO READ Important Safety Considerations You should NOT use this chamber without guidance and instruction from your health care provider. Do NOT use the chamber if you have the following conditions: Common colds or flu-like symptoms Recent alcohol consumption Blocked ear canals Blocked sinuses Otic barotraumas... - Page 76 IMPORTANT TO READ CAUTIONS CAUTION: Federal law requires this device for sale by or on the order of a physician. CAUTION: Do not inflate the chamber with only pure oxygen; use the compressor provided. It is designed to work safely with the chamber. CAUTION: Inspect all seams and fittings prior to use to ensure they are secure.
- Page 77 IMPORTANT TO READ WARNING: In the unlikely event that there is a rapid decompression, the individual inside the chamber must EXHALE. Please make sure that each individual receiving treatment understands this precaution. WARNING: Do not replace the compressor with any other model. The chamber is designed to work specifically with the compressor provided.
- Page 78 IMPORTANT TO READ Pressure Regulation Valves (Relief Valves) Summit to Sea Chambers utilizes redundant pressure regulation valves. These are factory programmed to ensure a steady, constant pressure. During treatment, there will be a steady flow of fresh air through the chamber. For proper operation, the air compressor is to be running throughout the entire treatment.
- Page 79 IMPORTANT TO READ Compressor- Ultra quiet compressors provide patented sound suppression which permits a restful and relaxing dive experience. These highly compact compressors are designed for continuous operation providing you with a long lasting solution to hyperbaric pressurization needs. This compressor is small and compact making it easy to transport. With its small carbon footprint, this compressor will easily integrate into your environment.
- Page 80 IMPORTANT TO READ Valves-The Grand Dive has three pressure release valves to ensure a safe and comfortable operation. This redundancy assures your safety. The Shallow and the Dive have two release valves. Windows-The window has a five layer, one firm acrylic layer between four vinyl layers to ensure a long lasting, permanent seal.
- Page 81 IMPORTANT TO READ USE CARE to avoid the use of any sharp objects that may penetrate the walls of the chamber. WARNING: Never take a treatment alone. Always have someone outside the chamber to assist you. CLEAN the inside of the chamber with a soft, damp microfiber cloth provided after each use.
- Page 82 IMPORTANT TO READ Be sure to swallow often during the pressurization process. If you cannot clear your ears, have the individual helping you temporarily stop the compressor until the pressure in your ears releases. Once the chamber is at full pressure, you will hear the “hissing” of the exhaust valves. This is important as it will prevent CO2 build up.
- Page 83 IMPORTANT TO READ FDA 510K CLEARANCE Portable Mild Hyperbaric Chambers are Class II Medical Devices. They meet the FDA 510(k) Specifications. The chamber has been cleared by the FDA for the treatment of Acute High Altitude Sickness. FDA WARNING Increasing the percentages of oxygen content in the air delivery is considered the same as administering a drug under FDA regulations.
- Page 84 SUMMIT TO SEA Important links to know: To order additional: filters, zipper lubricant, zipper cleaner www.summit-to-sea.com/accessories To learn how to change both filters www.summit-to-sea.com/filters If you have questions or need technical support send an email to: support@summit-to-sea.com...
- Page 85 SUMMIT TO SEA PO Box 339 Mound, MN 55364 Phone 1.877.PSI.DIVE (1.877.774.3483) Fax 1.877.420.7622 www.summit-to-sea.com © 2011 Summit to Sea, LLC...
Need help?
Do you have a question about the GRAND DIVE VERTICAL and is the answer not in the manual?
Questions and answers