Table of Contents
Advertisement
Available languages
Available languages
Advertisement
Table of Contents

Subscribe to Our Youtube Channel
Related Manuals for Mi-T-M AGW-SM14-30M


Summary of Contents for Mi-T-M AGW-SM14-30M
- Page 1 AIR COMPRESSOR/GENERATOR/WELDER OPERATOR’S MANUAL CAUTION RISK OF INJURY! READ ENTIRE MANUAL BEFORE OPERATING! THIS MANUAL IS AN IMPORTANT PART OF THE AIR COMPRESSOR/GENERATOR/WELDER AND MUST REMAIN WITH THIS UNIT! Operator’s Manual ©Copyright 2011, Mi-T-M Corporation® 37-1159-E/S-021319...
-
Page 2: Introduction
Introduction THANK YOU for purchasing a Mi-T-M product. The SERIAL NUMBER is located in the Specification or Identification Numbers section. Accurately record all the READ THIS MANUAL carefully to learn how to operate numbers to help in tracing the machine should it be stolen. -
Page 3: Table Of Contents
Contents INTRODUCTION ..............................2 RECOGNIZE SAFETY INFORMATION ......................... 5 CONTROLS ..............................15-16 INSTALLATION ..............................18 OPERATION ...............................22 START-UP ...............................22 WELDING START-UP ............................22 SHUTDOWN ...............................24 OPERATING CONTROLS ............................ 24 CABLE SIZE ...............................25 TROUBLESHOOTING ............................26 MAINTENANCE ..............................28 MAINTENANCE CHART: ............................. 28 CHECKING ENGINE OIL ............................. - Page 4 Contents Operator’s Manual...
-
Page 5: Recognize Safety Information
Safety RECOGNIZE SAFETY INFORMATION This is the safety alert symbol. When you see this symbol on your machine or in this manual, be alert to the potential for personal injury. Follow recommended precautions and safe operating practices. UNDERSTAND SIGNAL WORDS A signal word--DANGER, WARNING or CAUTION--is used with the safety-alert symbol. - Page 6 CARBON MONOXIDE - POISONOUS GAS Use unit outdoors, away from open windows, vents, or doors. Unit exhaust contains carbon monoxide - a poisonous gas that can kill you. You CAN NOT smell or see this gas. Never use the unit in enclosed or partially-enclosed spaces. The unit can produce high levels of carbon monoxide very quickly.
- Page 7 SAFETY WARNING WHEN REFUELING Injury or death may occur as a result of improper fueling. Do not smoke while filling engine fuel tank. Always refuel slowly to avoid the possibility of spilled fuel which may cause a risk of fire. Gasoline is extremely flammable and its vapors can explode if ignited.
- Page 8 ELECTRICAL HAZARDS This product must be grounded. If it should malfunction or breakdown, grounding provides a path of least resistance for electric current to reduce the risk of electric shock. Do not touch live electrical parts. DANGER - IMPROPER CONNECTION OF THE EQUIPMENT- GROUNDING CONDUCTOR CAN RESULT IN A RISK OF ELECTROCUTION.
- Page 9 RISK OF FIRE OR EXPLOSION Serious injury or death may occur from normal sparks in the engine ignition system or engine exhaust/muffler. Always operate the unit in a well ventilated area free of flammable vapors, combustible dust, gases or other combustible materials.
- Page 10 RISK OF BREATHING Serious injury or death could occur from inhaling compressed air. The air stream may contain carbon monoxide, toxic vapors or solid particles. Never inhale air from the unit either directly or from a breathing device connected to the unit. Serious injury or death may occur from inhaling engine exhaust.
- Page 11 RISK OF FLYING OBJECTS Soft tissue damage can occur from the compressed air stream. Always wear safety glasses to shield the eyes from flying debris. Never point the air stream at any part of your body, anyone else or animals. Never leave pressurized air in the unit.
- Page 12 IMPORTANT SAFETY INSTRUCTIONS WARNING: To reduce the risk of injury, read this operator’s manual completely before using. When using this product, the following basic precautions should always be followed: 1. Risk from Negligence: Risk of injury from negligent use. Never allow children or adolescents to operate this unit! Stay alert- watch what you are doing.
- Page 13 WEAR PROTECTIVE CLOTHING Wear close fitting clothing and safety equipment appropriate to the job. Wear dry, hole-free insulating gloves and body protection. Wear a suitable hearing protective device such as earmuffs or earplugs to protect against objectionable or uncomfortable loud noises. Operating equipment safely requires the full attention of the operator.
- Page 14 SAFETY SIGNS MAINTENANCE INSTRUCTIONS INSTRUCCIONES DE MANTENIMIENTO WARNING/ADVERTENCIA REFER TO INSTRUCTION MANUAL FOR LEA LAS INSTRUCCIONES PARA INSTRUCCIONES RISK OF BURNS RIESGO DE QUEMAR DETAILED INSTRUCTIONS. PARTICULARES. El amortiguador y las areas Muffler and adjacent If unit is operated in an excessively dirty or dusty area, increase Si la unidad está...
-
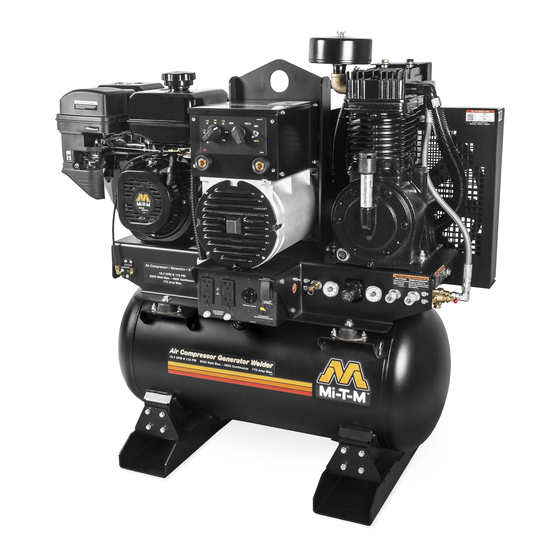
Page 15: Controls
Controls 1-Pump Air Filter 10-Weld Amperage Setting 18-20A Toggle Breaker 2-Fuel Cap 11-Generator/Welder Selector 19-20A Push Button Breaker Switch 3-Engine Air Cleaner 20-Pump Oil Sight Glass 12-Min/Max Weld Amperage 4-Engine Choke 21-Pump Oil Drain Toggle Switch 5-Engine Oil Fill 22-Safety Relief Valve 13-Positive Welding Terminal 6-Engine Oil Drain 23-Pressure Gauge... - Page 16 Controls 1-Engine Air Cleaner 11-Weld Amperage Setting 19-Idle Control Switch 2-Engine Oil Fill 12-Generator/Welder Selector 20-20A Toggle Breaker Switch 3-Pump Oil Drain 21-Engine Keyswitch 13-Min/Max Weld Amperage 4-Pilot Valve 22-20A Push Button Breaker Toggle Switch 5-Pump Air Filter 23-Safety Relief Valve 14-Positive Welding Terminal 6-Pump Oil Fill 24-Pressure Gauge...
-
Page 17: Installation
Installation INSTALLATION Read safety warnings before setting-up the unit. Ensure the oil level in the unit's pump is adequate. If low, add SAE-30W non-detergent oil. LOCATION: In order to avoid damaging the unit, do not incline the unit transversely or longitudinally more than 10°. WARNING: RISK OF ASPHYXIATION! DO NOT OPERATE IN AN ENCLOSED AREA. - Page 18 2. Use an extension cord with a 3 hole receptacle and a 3 prong plug at the opposite ends to ensure continuity of the ground protection from the unit to appliance. Mi-T-M strongly recommends that all applicable federal, state and local regulations relating to grounding specifications be checked and followed.
- Page 19 Installation GASOLINE ENGINE Review "Risk of Fire or Explosion" before fueling. Read the engine manual accompanying this unit for correct engine start-up maintenance procedures. Read and understand the safety labels located on the unit. WARNING: RISK OF EXPLOSION OR FIRE CAUSING SERIOUS INJURY OR DEATH! DO NOT SMOKE WHILE FUELING! DO NOT FILL FUEL TANK WHILE THE UNIT IS RUNNING...
- Page 20 WITH OIL AT THE FACTORY, SO BE SURE TO FILL IT BEFORE OPERATING THE ENGINE. ENGINE OIL CAPACITY MODEL # Liters Quart Ounces AGW-SM14-30M 1.16 37.2 AGW-SH22-20M 67.6 NOTE: These engines are equipped with a “Low Oil” shut-off system for engine protection. If the engine fails to start, check engine crankcase for oil.
- Page 21 Installation easy starting, do not use gasoline left over from the previous season. • Do not add oil to the gasoline. Fuel Type • For best results use only clean, fresh, unleaded gasoline with a pump sticker octane rating of 87 or higher. •...
-
Page 22: Operation
Operation OPERATION PRE-OPERATION: Check the engine oil level before starting. (See engine manual.) Fill the fuel tank according to the engine manual instruction. Pump oil level should be checked before each use. Check the oil level indicator on the pump crankcase. Make certain the oil is in the center of the oil sight glass. - Page 23 Operating the Unit 4. Move idle control to full throttle setting. 5. Check grounding. 6. Welding Cable Diagram (Selecting Weld Cable Sizes)*: WARNING: DO NOT USE WORN, DAMAGED, UNDERSIZED, OR POORLY SPLICED CA- BLES. TURN OFF POWER BEFORE CONNECTING TO WELD OUTPUT TERMINALS. Weld Output Terminals Weld Cable Size** and Total Cable (Copper) Length in Weld Circuit Not Exceeding*** 100 ft (30 m)
-
Page 24: Shutdown
NOTE: This engine is equipped with a “Low Oil” shutdown system for engine protection. The engine stops when the oil level gets too low. The engine will not restart without adding oil. If you notice any unusual noise or vibration, stop the unit and refer to "Troubleshooting". -
Page 25: Cable Size
OPERATION CABLE SIZE: Equipment damage can result from low voltage. Therefore, to prevent excessive voltage drop between the unit and the equipment, the cable should be of adequate gauge for the length used. The cable selection chart gives the maximum cable lengths for various gauges of wire which can adequately carry the loads shown. -
Page 26: Troubleshooting
Troubleshooting Symptom Problem Solution Engine will not start. Various engine problems. Refer to the engine manual accompanying your unit. Noisy operation. Loose engine pulley or pump flywheel. Tighten pulley and or flywheel. Lack of oil in the pump. Add correct amount of oil. Check for bearing damage. - Page 27 Troubleshooting Symptom Problem Solution Unit has no output. Circuit breakers tripped. Reset circuit breakers. Inadequate cord sets or Check cord sets or extension cords extension cords. capabilities. Air leaks from Safety Relief Valve. Possible defective Safety Relief Operate Safety Relief Valve manually Valves.
-
Page 28: Maintenance
Maintenance MAINTENANCE CHART: To ensure satisfactory operation over an extended period of time, an engine requires normal maintenance at regular intervals. The Periodic Maintenance Chart below shows periodic inspection and maintenance items and suitable intervals. The bullet mark designates that the corresponding item should be performed at that interval. NOTE: Some adjustments require the use of special tools or other equipment. -
Page 29: Checking Engine Oil
7. Check the oil level as instructed in the engine manual. 8. Wipe up any spilled oil. AIR CLEANER: WARNING: RISK OF FIRE OR EXPLOSION. DO NOT OIL DRAIN PLUG USE GASOLINE OR LOW FLASH POINT SOLVENTS (Fig. 1 MI-T-M) TO CLEAN THE ELEMENT. CLEAN THE ELEMENT Operator’s Manual... - Page 30 2. Fuel Hose Fittings 3. Fuel Tank and Cap 4. Carbon Canister and Mounting Brackets (Fig. 2 MI-T-M) These components should be inspected on a daily basis for cracks, leaks, and abnormal wear. If cracking, leaks or abnormal wear has occurred, the components should be replaced immediately.
- Page 31 Maintenance GFCI TEST RECORDS: As with any other safety devices, the GFCIs supplied with these generators must be checked every month to insure that they are functioning properly. To test the GFCIs, follow the instructions and then enter the date of the test below. 1.
- Page 32 To change the gap, bend the side- electrode only, using a spark plug tool. (Fig. 3) Install and tighten the spark plug. Connect the spark plug lead. RECOMMENDED SPARK PLUG: Engine MI-T-M Honda Spark Plug NGK BPR6ES ZFR5F Spark Plug 0.7 - 0.8 mm...
- Page 33 Maintenance WIRING SCHEMATIC RECTIFIER N° 2-3 SWITCH 2 RECTIFIER N° 1 ROTOR STATOR IMPEDANCE Operator’s Manual...
- Page 34 Maintenance WIRING DIAGRAM AGW-SM14-30M Operator’s Manual...
- Page 35 Maintenance WIRING DIAGRAM AGW-SH22-20M Operator’s Manual...
-
Page 36: Storage
Storage Service STORING UNIT SHORT TERM (1-6 MONTHS): 1. Add gasoline conditioner & stabilizer at the specified concentration. 2. Run the unit for two (2) minutes to ensure the mixed fuel is in the entire fuel system. Close the fuel valve and run the unit until it stops. -
Page 37: Specifications
Specifications SPECIFICATIONS ITEM SPECIFICATION AGW-SM14-30M AGW-SM14-B AGW-SH22-20M Mi-T-M Mi-T-M Honda Model R420E R420E GX690 Engine Oil ....... 37.2 oz......37.2 oz......67.6 oz. Max Watts w/o Compressor ..5000 ......5000 ......5000 Cont. Watts w/o Compressor .. 4500 ......4500 ......4500 Cont. -
Page 38: Warranty
STATEMENT OF WARRANTY Mi-T-M warrants all parts, (except those referred to below), of your new unit to be free from defects in materials and workmanship during the following periods: For Two (2) years from the date of original purchase: Compressor Pump... - Page 39 SORE , but Mi-T-M cannot deny warranty coverage solely for the lack of receipts. -As the SORE owner, you should be aware that Mi-T-M may deny you warranty coverage if your SORE or a part has failed due to abuse, neglect, or improper maintenance or unapproved modifications.
- Page 40 (10) Mi-T-M shall provide any documents that describe that Mi-T-M warranty procedures or policies within five working days of request by the Executive Officer. (c) WARRANTED PARTS: The repair or replacement of any warranted part otherwise eligible for warranty coverage may be excluded from such warranty coverage if Mi-T-M demonstrates that the engine has been abused, neglected, or improperly maintained, and that such abuse , neglect ,or improper maintenance was the direct cause of the need for repair or replacement of the part.
- Page 41 Garantía provece de concesionario Mi-T-M para quien Medidas en este manual se dan en sistema métrico y en opere y mantenga su equipo como describido en este equivalentes de unidades de Estado Unidos.
- Page 42 Materias Pagiña Seguridad ............... 43 Mandos .............. 53-54 Instalación ............. 55 Operación ............... 60 Localización de fallas ..........65 Mantenimiento ............67 Almacenamiento ............ 75 Especificaciónes ............ 76 Garantia ..............77 Toda información, ilustraciónes, y especificaciones en este manual se basa en información lo último que disponible al tiempo de publicación.
- Page 43 Seguridad RECONOZCA INFORMACIÓN DE SEGURIDAD Este es el símbolo de alerta de seguridad. Cuando mire este símbolo en la máquina o manual, sea alerta de posibilidad o potencia de graves personales. Siga precauciones recomendables y prácticas de operación. COMPRENDA PALABRAS DE ALERTAS PELIGRO Una palabra de alerta -- Peligro, Advertencia, Precaución -- se usa con el símbolo de alerta de seguridad.
- Page 44 MONÓXIDO DE CARBONO- GAS VENENOSO Use unidad en aire libre, afuera de ventanas abiertas, tiros, o puertas. Exhausto de unidad contiene monóxido de carbono- un gas venenoso que puede matarle. No puede oler o ver este gas. Nunca use unidad en espacios cerrados o parcialamente cerrados. Unidades puede producir neveles altas de monóxido de carbono muy rápido.
- Page 45 INSTRUCCIONES DE SEGURIDAD DE LLENDADO DE COMBUSTIBLE Un resulto de abastecer de combustible incorrecto es lesiones graves y la muerte. No fumar cuando llenar el tanque de motor con combustible (fuel). Siempre reabastecer de fuel despacio para evitar derrames que puede causar riesgo de fuego.
- Page 46 RIESGOS DE ELECTRICOS Este producto tiene que tener la toma a tierra. Si lo debe fallar o funcionar mal la toma a tierra proveer un camino de resistencia mínima para corriente eléctrico para reducir el riesgo de descarga eléctrica. No tocar las partes eléctricas. PELIGRO - CONECCIÓN INCORRECTA DE EQUIPO - CON- DUCTOR DE TIERRA PUEDE RESULTAR EN RIESGO DE ELECTROCUCIÓN.
- Page 47 RIESGO DE EXPLOSIÓN O fuego chipas normales de sistema de encendido del motor o de exhosto de motor/mofle puede causar lesiones graves y la muerte. Siempre funcionar el compresor de aire en ambientes de bien ventilados sin vapores flamables, polvos combusible, gases, o toras materiales combustibles. No solde donde la atmósfera puede contener polvo inflamable, gas, o vapores líquidos (como la gasolina).
- Page 48 RIESGOS A LA RESPIRACIÓN La inhalación de aire comprimido puede causar lesiones graves e incluso la muerte. El chorro de aire podría contener monóxido de carbono, vapores tóxicos o partículas sólidas. No inhalar jamás el aire porcedente del compresor de aire ni a través de cualquier dispositivo de respricaión conectado al compresor de aire.
- Page 49 RIESGO DE OBJETOS VOLANTES El chorro de aire comprimido podría causar lesiones a los tejidos blandos. Usar siempre las gafas de protección para proteger los ojos de las particulas volantes. No dirigir jamás el chorro de aire a cualquier parte de su cuerpo o del cuerpo de otra persona o animal.
- Page 50 ADVERTENCIAS IMPORTANTES DE SEGURIDAD ADVERTENCIA: Para reducir el riesgo de lesiones, lea este manual de operador completamente. Cuando usando este producto, seguir siempre las precauciones basicas consiguentes: 1. Riesgo de negligencia: Un uso negligente del compresor puede ocasionar lesiones. No permitir jamás que niños o adolescentes pongan en marcha el compresor de aire.
- Page 51 USE ROPA PROTECTORA Use ropa medida cerca y equipo de seguridad apropiado al trabajo.Lleve guantes de aislamiento secos y sin agujero y protección de cuerpo. Use devise protector de oído como orejeras o tapón para el oído para protectar en contra de ruidos inaceptables y altos.
- Page 52 SEÑALES DE SEGURIDAD MAINTENANCE INSTRUCTIONS INSTRUCCIONES DE MANTENIMIENTO WARNING/ADVERTENCIA REFER TO INSTRUCTION MANUAL FOR LEA LAS INSTRUCCIONES PARA INSTRUCCIONES RIESGO DE QUEMAR RISK OF BURNS DETAILED INSTRUCTIONS. PARTICULARES. Muffler and adjacent El amortiguador y las areas If unit is operated in an excessively dirty or dusty area, increase Si la unidad está...
- Page 53 Mandos 1-Filtro de Aire de Bomba 11-Interruptor Seleccionador de 19-20A Interruptor de Botón Generador/Soldar Empujado 2-Capa de Combustible 12-Interruptor Palanca de Mínimo/ 20-Cristal de Vista del Petroleo de 3-Filtro de Aire de Motor Máximo Amperaje Bomba 4-Estárter de motores 13-Enchufe de Soldar Positivo 21-Desagüe del Petroleo de 5-Llena de Petroleo de Motor Bomba...
- Page 54 Mandos 1- Filtro de Aire de Motor 11- Ajuste de Amperaje de Soldar 19- Interruptor de Control Inactivo 2- Llena de Petroleo de Motor 12- Interruptor Seleccionador de 20- 20A Interruptor de Palanca Generador/Soldar 3- Desagüe del Petroleo de 21- Motor interruptor de llave Bomba 13- Interruptor Palanca de 22- 20A Interruptor de Botón...
- Page 55 Instalación INSTALACIÓN Lea las advertencias de seguridad antes de preparar el compresor del aire. Asegurar que el nivel del aceite en bomba de compresor de aire es adecuado. Si bajo, agregar SAE-30W, aceite sin-detergente. COLOCACIÓN: Para evitar daños al compresor de aire, éste no debe inclinarse transversalmente o longitudinalmente a más de 10°.
- Page 56 Instalación INSTRUCCIONES DE CONEXION A TIERRA Este equipo debe conectarse a tierra. La conexión a tierra provee un camino de resistencia reducida a la corriente elétrica para reducir el riesgo de choque, en caso de malfuncionamiento o falla. PELIGRO: LA CONEXIÓN INCORRECTA DEL CONDUCTOR DE CON- EXIÓN A TIERRA DEL EQUIPO PUEDE RESULTAR EN UN RIESGO DE ELECTROCUCIÓN.
- Page 57 Instalación MOTOR DE GASOLINA Revisar "Riesgo de expolsión o fuego" antes de agregar fuel. Leer manual de motor que acompando este compresor de aire para mantenimiento correcto de encender de motor. ADVERTENCIA RIESGO DE EXPLOSIÓN O FUEGO QUE CAUSAR LESIONES GRAVES Y LA MUERTE! NO FUMAR CUANDO DANDO FUEL! NO LLENAR EL TANQUE DE FUEL CUANDO COMPRESOR DE AIRE ENCENDIDO O CALOR.
- Page 58 ACEITE ANTES DE PONER EL MOTOR EN MARCHA. VOLUMEN DE ACEITE DEL MOTOR # DE MODELO LITROS CUARTOS ONZAS AGW-SM14-30M 1.16 37.2 AGW-SH22-20M 67.6 NOTA: Estos motores están protegidos con un sistema de corte por bajo nivel de aceite. Si el motor no arranca, como primera medida inspeccionar el nivel de aceite en el cárter.
- Page 59 15% de MTBE en proporción volumétrica). No use otros tipos de mezcla de gasolina y éter con el motor. INSTALACIÓN DE BATERÍA ADVERTENCIA: DEBERÁ HACER DE UN CONCESION- ARIO AUTHORIZADO DE MI-T-M. # DE REEMPLACE DE BATERÍA 32-0058 ALTITUD ALTA En altitud alta, la mezcla de aire/combustible del carburador estandard será...
- Page 60 Operación OPERACIÓN Controles antes del arranque: Antes de empezar, controlar el nivel del aceite. (ver manual de motor.) Llenar el tanque de fuel en accordancia de manual de instruccion. Debe revisarse el nivel del aceite de la bomba debe revisarse antes de cada aplicación.
- Page 61 Operación distincto cuando este es completo. SI RECIPIENTES NO COLOCAR CORRECTO, NO USE RECIPIENTES. VEA CONCESIONARIO PARA SERVICIO INMEDIATAMENTE. 10. Si unidad tiene control de flojear a posición de ANDADO DE RALENTI AUTOMATICO. Ahora cargas pueden aplicar a la unidad. COMIENZO DE SOLDAR: 1.Quite toda la corriente alterna cargas eléctricas de la unidad.
- Page 62 Operación CARTA DE ELECTRODO VARIEDAD DE AMPERAJE 3/32 6010 5/32 6011 3/16 1/16 5/64 3/32 6013 5/32 3/16 3/32 7014 5/32 3/16 3/32 7018 5/32 3/16 5. Una vez que le presión en el interior de los depósitos de aire es inferior a 10 libras, abrir la válvula de descarga debajo de cada depósito de aire para eliminar la humedad.
- Page 63 Operación El control de marcha en vacío comanda la velocidad del motor de la siguiente manera: 1. Con interruptor del control de marcha en vacío en posición de a toda velocidad (OFF), arranque el motor. 2. Después de precalentar el motor durante un par de minutos, llevar el interruptor de control de marcha en vacío a la posición de marcha (ON).
- Page 64 Operación CONTROLES TAMAÑO DEL CABLE: Un voltaje bajo puede dañar el equipo. Por consiguiente, para evitar las caídas de tensión excesivas entre el generador y el equipo, el cable deberá tener el calibre adecuado para la longitud requerida. La tabla de datos para la selección del cable proporciona la longitud máxima para los distintos calibres de alambre que pueden tolerar las cargas indicadas a continuación.
- Page 65 Localización de Fallas Síntoma Problema Soluciones El motor no encender. Varias problemos de motor. Referir a manual de motor de su compresor de aire. Funcionamiento ruidoso. Polea de motor o bomba de rueda Apretar polea y/o rueda volado. voldao es suelto. Falta aceite en la bomba.
- Page 66 Localización de Fallas Síntoma Problema Soluciones No hay salida de voltaje del Arranque de control de marcha en Coloque control de marcha en vacío. unidad. vacío. Serie de cordon o extensiones Revise capabilidades de series de inadecuados. cordon o extensiones. Fugas de aire en la bomba.
- Page 67 Mantenimiento MANTENIMIENTO Leer el manual de instrucciónes antes de efecturar cualquier operación de mantenimiento. Mantener limpias las aberturas de ventilación. Mantenga el unidad limpiado. No rociar con agua. Revisar periódicamente los tornillos y pernos, y ajustarlos en la medida de lo necesario (véase el cuadro de mantenimiento periódico).
- Page 68 PARA LIMPIAR EL ELEMENTO DEL FILTRO, YA QUE SE PONRÍA GENERAR UN INCENDIO O UNA EXPLOSIÓN.. PRECAUCIÓN: NO PONGA EL MARCHA EL MOTOR SIN EL FILTRO DE AIRE, YA QUE SE PONDRÍAN CAUSAR OIL DRAIN PLUG SERIAS AVERÍAS. (Fig. 1 MI-T-M) Manual del Operador...
- Page 69 La velocidad de vacío viene regulada de fábrica y raramente necesita recalibración. Es recomendable llevar a cabo las regulaciones de este tipo en un concesionario de Mi-T-M. Cuando se produce funcionamiento errático del motor en vacío, normalmente es indicación de que se debe regular el carburador.
- Page 70 ADVERTENCIA: SI EL BOTÓN DE COLOCAR NO SALTE AFUERA, NO USE EL RECIPIENTE(S). VEA UN CONC- ESIONARIO AUTORIZADO DE MI-T-M PARA SERVICIO INMEDIATAMENTE. 2. Si el resultado de la prueba indica que el GFCI funciona correctamente, conéctelo nuevamente a la electricidad presionando FIRMEMENTE el botón <<RESET>>...
- Page 71 Para cambiar el espacio, torcer sólo el lado-electrodo, usando herramiento de chispero. (Fig. 3) Instale y aprete el chispero. Conecte el cable de chispero. Chispero Recomendado: MOTOR MI-T-M HONDA CHISPERO NGK BPR6ES ZFR5F ESPACIO DE CHISPER 0.7 Milímetros...
- Page 72 Mantenimiento Esquema de Cableado RECTIFIER N° 2-3 SWITCH 2 RECTIFIER N° 1 ROTOR STATOR IMPEDANCE Manual del Operador...
- Page 73 Mantenimiento Diagrama de Cableado AGW-SM14-30M Manual del Operador...
- Page 74 Mantenimiento Diagrama de Cableado AGW-SH22-20M Manual del Operador...
- Page 75 Almacenamiento ALMACENAMIENTO A CORTO PLAZO (1 A 6 MESES): 1. Agregue acondicionador y estabilizador de combustible, con la concentración adecuada. 2. Ponga en marcha la unidad durnate dos (2) minutos para asegurar que la mezcla de combustible se distribuya en todo el circuito.
- Page 76 ESPECIFICACIÓN AGW-SR14-30M AGW-SM14-B AGW-SH22-20M Motor ........Mi-T-M......Mi-T-M ......Honda Modél ........R420E ......R420E ......GX690 Aceite ........1.1 L ......1.1 L ......1.99 L Vatios con el compresor ..5000 ......5000 ......5000 Vatios sin el compresor ... 4500 ......4500 ......4500 Vatios con el compresor ..
- Page 77 DECLARACIÓN DE GARANTÍA Mi-T-M garantiza que todas las piezas (excepto aquellas a las que se hace referencia abajo), de su nueva generador libres de defectos en materiales y mano de obra durante los periodos siguientes: Por dos (2) años a partir de la fecha original de compra: Bomba de Compresor Cañerias...
- Page 78 DERECHOS Y OBLIGACIONES DE SU GARANTÍA La Junta de Recursos de Aire de California, y la Corporación Mi-T-M (Mi-T-M) se complacen en explicar la garantía del sistema de control de emisiones (“emisiones”) de su motor/equipamiento pequeño para uso fuera de carreteras 2018/2019. En California, los nuevos equipamientos que utilizan motores pequeños para uso fuera de carreteras deben ser diseñados, construidos, y equipados para cumplir con las estrictas...
- Page 79 No se deben utilizar partes/piezas adicionales o modificadas que no estén exentas por la Junta de Recursos de Aire. El uso de cualquier parte/pieza adicional o modificada no exenta será motivo para rechazar un reclamo de garantía. Mi-T-M no será...
- Page 80 Manufactured by Mi-T-M 50 Mi-T-M Drive, Peosta IA 52068 563-556-7484/ Fax 563-556-1235 Manual del Operador...
Need help?
Do you have a question about the AGW-SM14-30M and is the answer not in the manual?
Questions and answers